


Another blog post on the subject of Hybrid Azure AD joined devices that have been provisioned using Windows Autopilot. As you may have figured by now, this scenario even though it’s not in preview any longer, it sure feels like it some times. A while back I wrote a blog post that demonstrated how you can silently enable BitLocker on devices provisioned under this scenario, since the current implementation of the Endpoint Protection policy for BitLocker in Intune doesn’t support it. Another obstacle that you need tackle when hybrid joining your devices is device certificates. Certificates and BitLocker encryption are two fairly common enterprise configurations, hence my previous statement that it feels like it’s not really out of preview yet. Even though this scenario works well for provisioning a device and configure it mostly according to your desire, Microsoft still has a few things to figure out before hybrid joined devices are working as well as if you’d have simply Azure AD joined them.
Why SCEP certificate distribution needs an improvement
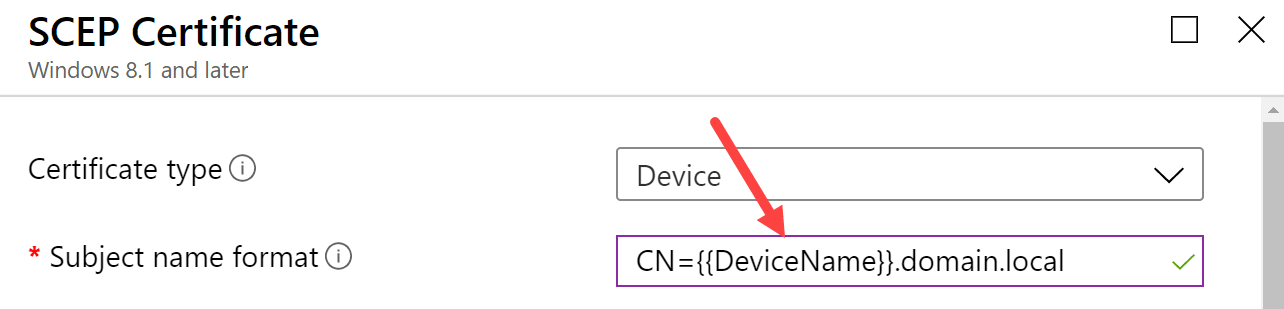
The issue is not that SCEP certificate distribution simply doesn’t work for Hybrid Azure AD joined devices, because it does. If you provision a device and have a functioning NDES/PKI infrastructure in place to deliver the certificate to the device, you’ll and up with a device based certificate on your machine in the end. Why does this then need to be improved? Generally, a device certificate should contain the Fully Qualified Domain Name (FQDN) or the host name or the device as its subject name. In most cases, the SCEP certificate profile is configured with subject name be constructed using {{DeviceName}} to such as below:
For a device that’s provisioned using Windows Autopilot and setup as Hybrid Azure AD joined, the computer name handling is a bit different from a device setup as Azure AD joined. An Azure AD joined device gets the computer name configuration directly from the Autopilot deployment profile (if configured, otherwise the default name is kept, but let’s assume that the profile contains a computer naming standard) and the computer name is set fairly early during the provisioning of the device. However, for a Hybrid Azure AD joined device, the Autopilot deployment profile does not contain the same computer naming configuration capabilities, this is controlled with a different profile named the Domain Join profile, a Device Configuration profile type. Since the computer naming functionality is split out from the Autopilot deployment profile, the computer name is not set as early in the provisioning as it would have for an Azure AD joined device.
If we take a step back for a second, remember how the MDM policies are processed on a device when it first contacts Intune after is has been enrolled. Depending on your environment of course, but in general however, the device would end up with a payload of policies that it’ll attempt to apply. As of writing this blog post, there’s currently no means for administrators to control in which order any of these policies would be applied. We can with certainty say that it’s going to be random for each device. This brings us to the dilemma and the reason for writing this blog post. To setup a device as Hybrid Azure AD joined, we’ve mentioned that we need to configure a Domain Join profile, to control the computer naming among organizational unit placement. Also, to distribute a device certificate we need to have a SCEP Certificate profile as well. That gives us two profiles that will be added to the initial payload of policies the device receives after enrollment.
As you’ve probably figured out by now, the device being provisioned and targeted with both a Domain Join profile and a SCEP certificate profile, could potentially end up with the incorrect subject name, the computer name, in the certificate if the SCEP certificate profile is applied before the Domain Join profile is applied and have set a new computer name. Can we do anything about this problem? With native configuration options, there’s no way to ensure the certificate will contain the correct computer name as the subject name, however with a little bit of knowledge of the SCEP certificate distribution process and PowerShell, we can improve this and ensure our device ends up with the properly configured device certificate.
Solution overview
This post will provide all the necessary information required to improve the distribution of a device certificate for Hybrid Azure AD joined devices. The solution is based on a PowerShell script packaged as a Win32 application (so it’s possible to track it’s progress and have the Enrollment Status Page wait for it to complete) performs the following task in order:
- Check for device certificate where subject name matches either DESKTOP or LAPTOP, loops until certificate is found
- Removes existing device certificate previously matched
- Trigger a manual MDM policy sync
- Wait for event id 39 in the DeviceManagement-Enterprise-Diagnostics-Provider/Admin event log (means a SCEP certificate has been installed), loops until event has occurred
- Check the new device certificate is subject name matches desired prefix, e.g. CN=CORP, loop from triggering manual MDM policy sync if subject name did not match
- If subject name matches desired prefix, exit script with success
This describes the high-level steps that’s provided in the script for this solution. There’s one requirement though for this solution to function as expected, and that is that your computer naming standard contains a prefix (e.g. a country code or company name abbreviation). Without this prefix, the solution as it’s currently implemented would not work. However, if you wanted it’s possible to re-write the part of the script that handles the final validation to check if the subject name of the certificate contains DESKTOP or LAPTOP.
Let’s dig into how we can configure all of this. But before that, grab the required PowerShell scripts for this solution from our GitHub repository:
Prepare PowerShell scripts before packaging
As mentioned earlier in this post, the scripts in this solution requires a computer naming standard prefix that can be matched against the subject name property of the device certificate. The scripts have been built so that they support multiple prefix, to allow for various computer naming standards out there in the wild. Perform the following changes to comply with your requirements in your environment.
It’s important that you configure both scripts below to match for the same prefixes.
Update-SCEPCertificate.ps1
This is the script that’s responsible for updating the device certificate until it matches the desired prefixes. Add the necessary prefixes for the $SubjectNames variable beginning each item with CN= followed by e.g. a country code or suitable abbreviation for your environment. Logging output from this script can be found in the C:\Windows\Temp\SCEPCertificateUpdate.log file.

Get-SCEPCertificateDetection.ps1
This is the script used as a custom script based detection method for the Win32 application that will be created later in this post. Add the necessary prefixes for the $SubjectNames variable beginning each item with CN= followed by e.g. a country code or suitable abbreviation for your environment. In addition to the prefix changes, you’re also required to change the $TemplateName variable to match the name of the certificate template used when issuing the certificate to the device.

Package script content for Win32 application
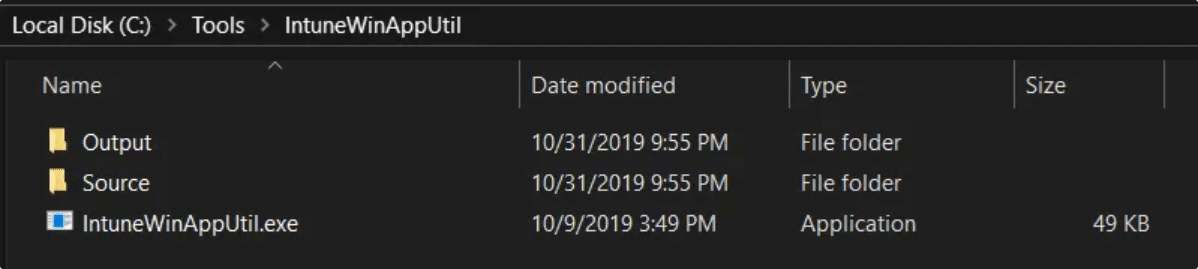
If this is the first time packaging a Win32 application, don’t worry, all steps required will be covered and the overall process if fairly simple. First of all, ensure that you have the latest version of the IntuneWinAppUtil.exe application, as that is the tool that will prepare the Win32 application package. You can grab the tool from the following URL:
Secondly, with the tool downloaded, create the following folder structure in a folder called IntuneWinAppUtil placed e.g. under C:\Tools. After that create two folder inside of the IntuneWinAppUtil folder named Source and Output. At this point the following file and folder structure should now have been created:
Place the modified version of the Update-SCEPCertificate.ps1 script inside the Source folder. After that, open up an elevated command prompt and run the following command:
IntuneWinAppUtil.exe -c C:\Tools\IntuneWinAppUtil\Source -s Update-SCEPCertificate.ps1 -o C:\Tools\IntuneWinAppUtil\Output
Once the tool completes the content packaging you should see a green progress bar that states 100% completed. Inside the Output folder, a new Update-SCEPCertificate.intunewim file has now been generated. This is the file that should be uploaded to Microsoft Intune in the next part of this blog post when the Win32 application is created.
Create the Win32 application in Microsoft Intune
Now that the Update-SCEPCertificate.ps1 has been downloaded and modified to fit your organizations requirements, packaged as content for a Win32 application, it’s time to create the application in Microsoft Intune.
- Begin by logging into the Azure portal and locate the Intune blade.
- In the Client Apps blade, select Apps, click Add and select the Windows app (Win32) as the app type.
- Configure the App package file by browsing to the C:\Tools\IntuneWinAppUtil\Output folder and select the Update-SCEPCertificate.intunewim file.

- Click OK.
- Click on the App information section and configure accordingly. Enter a name, the description and publisher. A recommended name for the Win32 application would be Update SCEP Certificate. Optionally, locate a logo image for better aesthetics.

- Click OK.
- Click on the Program section and configure the following as the Install command:
- powershell.exe -ExecutionPolicy Bypass -File .\Update-SCEPCertificate.ps1
- For the Uninstall command, enter cmd.exe /c as we don’t really want this application to be uninstalled. Install behavior is important that it’s set as System, as a standard user will not have the required permissions to update the device certificate. Configure the Device restart behavior with No specific action.

- Click OK.
- Click on the Requirements section and specify 64-bit as the Operating system architecture and select Windows 10 1607 as the Minimum operating system.

- Click OK.
- Click on the Detection rules section. This is where the second script, more specifically the Get-SCEPCertificateDetection.ps1, mentioned above in this blog post comes into play. Under Rules format, select Use a custom detection script and browse for the Get-SCEPCertificateDetection.ps1 script. Leave the two bottom configuration both set as No.

- Click OK.
- Click Add to complete the creation of the Win32 application.
Since this is a rather small application in terms of content size, the upload of the Update-SCEPCertificate.intunewim file should go fairly quick.
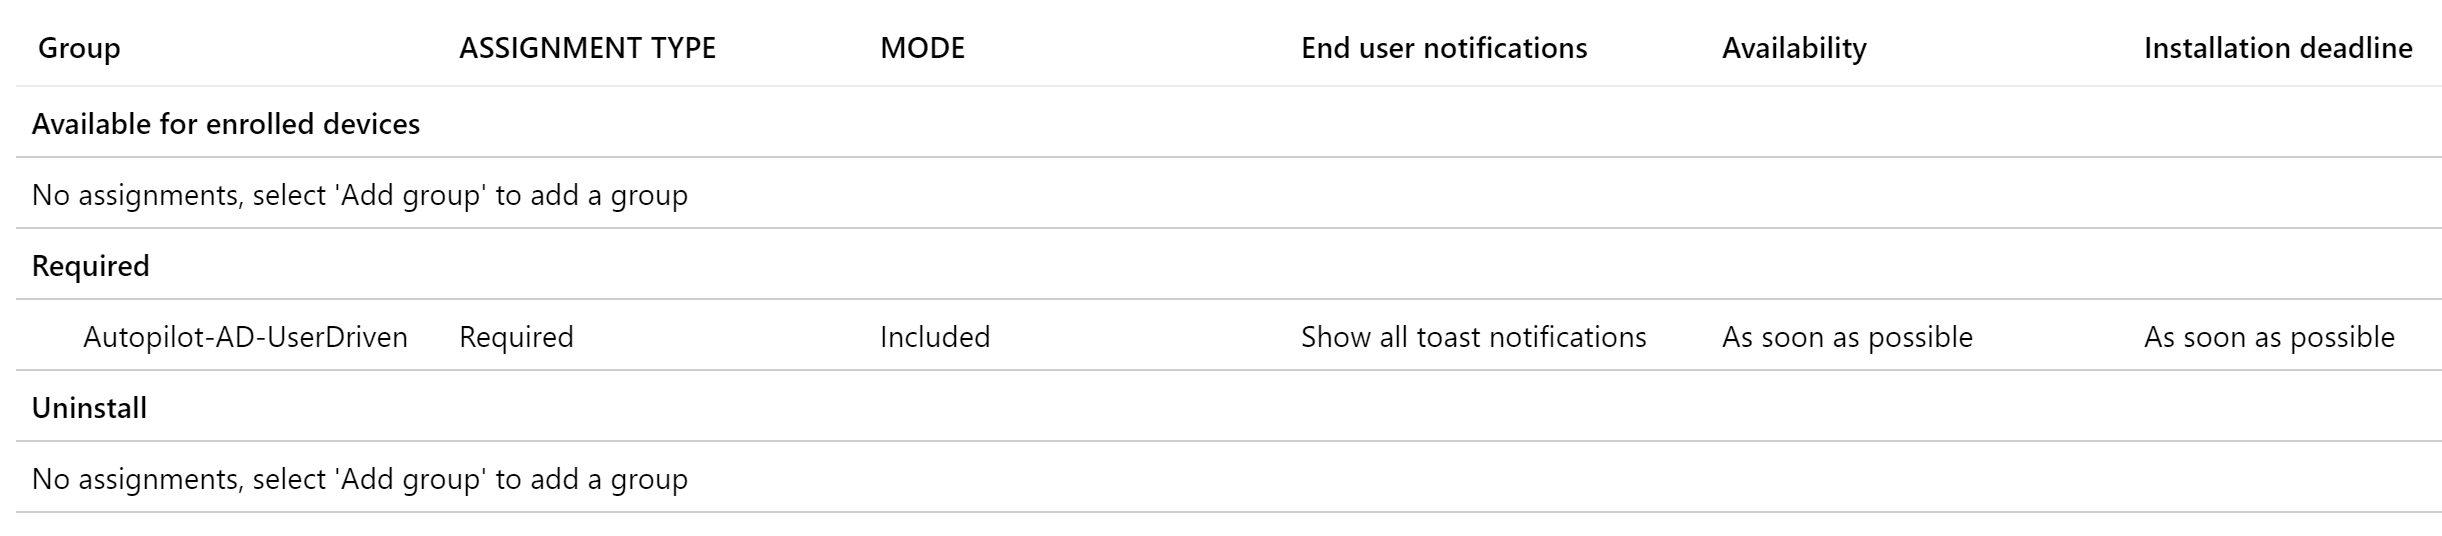
Before you continue to the next step in this post, remember to assign the newly created Win32 application with an assignment type of Required to your Azure AD dynamic group that contains all of your Hybrid Azure AD joined devices, for instance as below:
Configure Enrollment Status Page to track the Win32 application
The final required configuration for this solution to update SCEP distributed device certificates on Hybrid Azure AD joined devices, is to configure the Enrollment Status Page so that it will track the Win32 application and not let the provisioning continue until it has been successfully ensured the certificate’s subject name actually match the real computer name configured by the Domain Join profile.
- From within the Intune blade of the Azure portal, go to Device enrollment and select Windows enrollment.
- Click on the Enrollment Status Page.

- Depending on if you’ve created a different profile here, select your custom one, but if not select the Default profile associated with All users and all devices.
- Select Settings and ensure that Block device use until these required apps are installed if they’re assigned to the user/device is configured with Selected.
- Click the Select apps button and select the Update SCEP Certificate application.

- Save the configuration changes.
Summary and results
Let’s take a step back and recap what we’ve actually gone through in this blog post. The goal was to update the SCEP distributed device certificate subject name match the actual computer name set by the Domain Profile, for Hybrid Azure AD joined devices provisioned using Windows Autopilot. This is accomplished by using a script named Update-SCEPCertificate.ps1 that was packaged as a content file for a Win32 application to be deployed to Autopilot registered devices from Microsoft Intune.
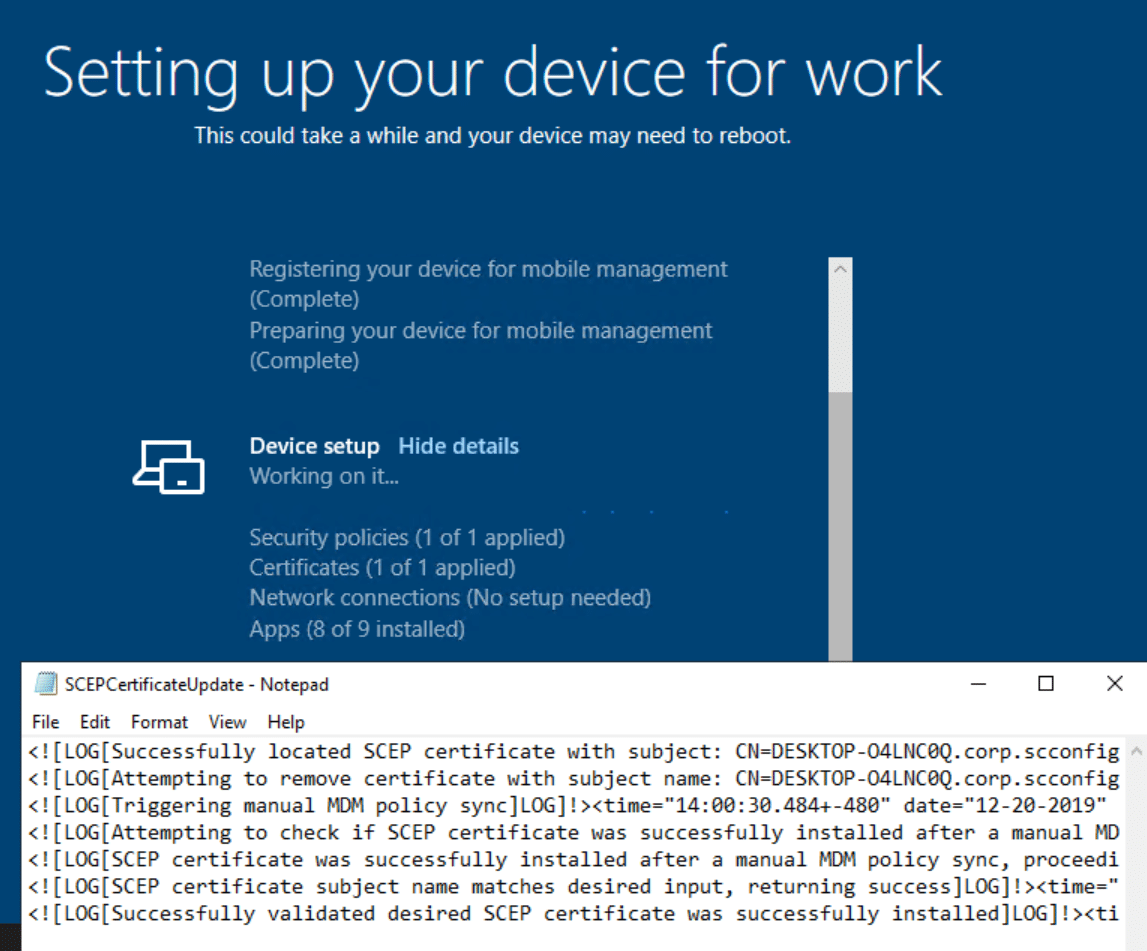
Now that’s all sweet, but how would I know that this solution has worked as expected and how can it be verified? Locally on each device that was provisioned and targeted for the Win32 application created in this blog post, a log file is created once the Win32 application starts during provisioning. If you want to keep track of it’s progress, you can hit SHIFT+F10 when the Enrollment Status Page is shown to open up a command prompt and open the log file using Notepad, as shown below:
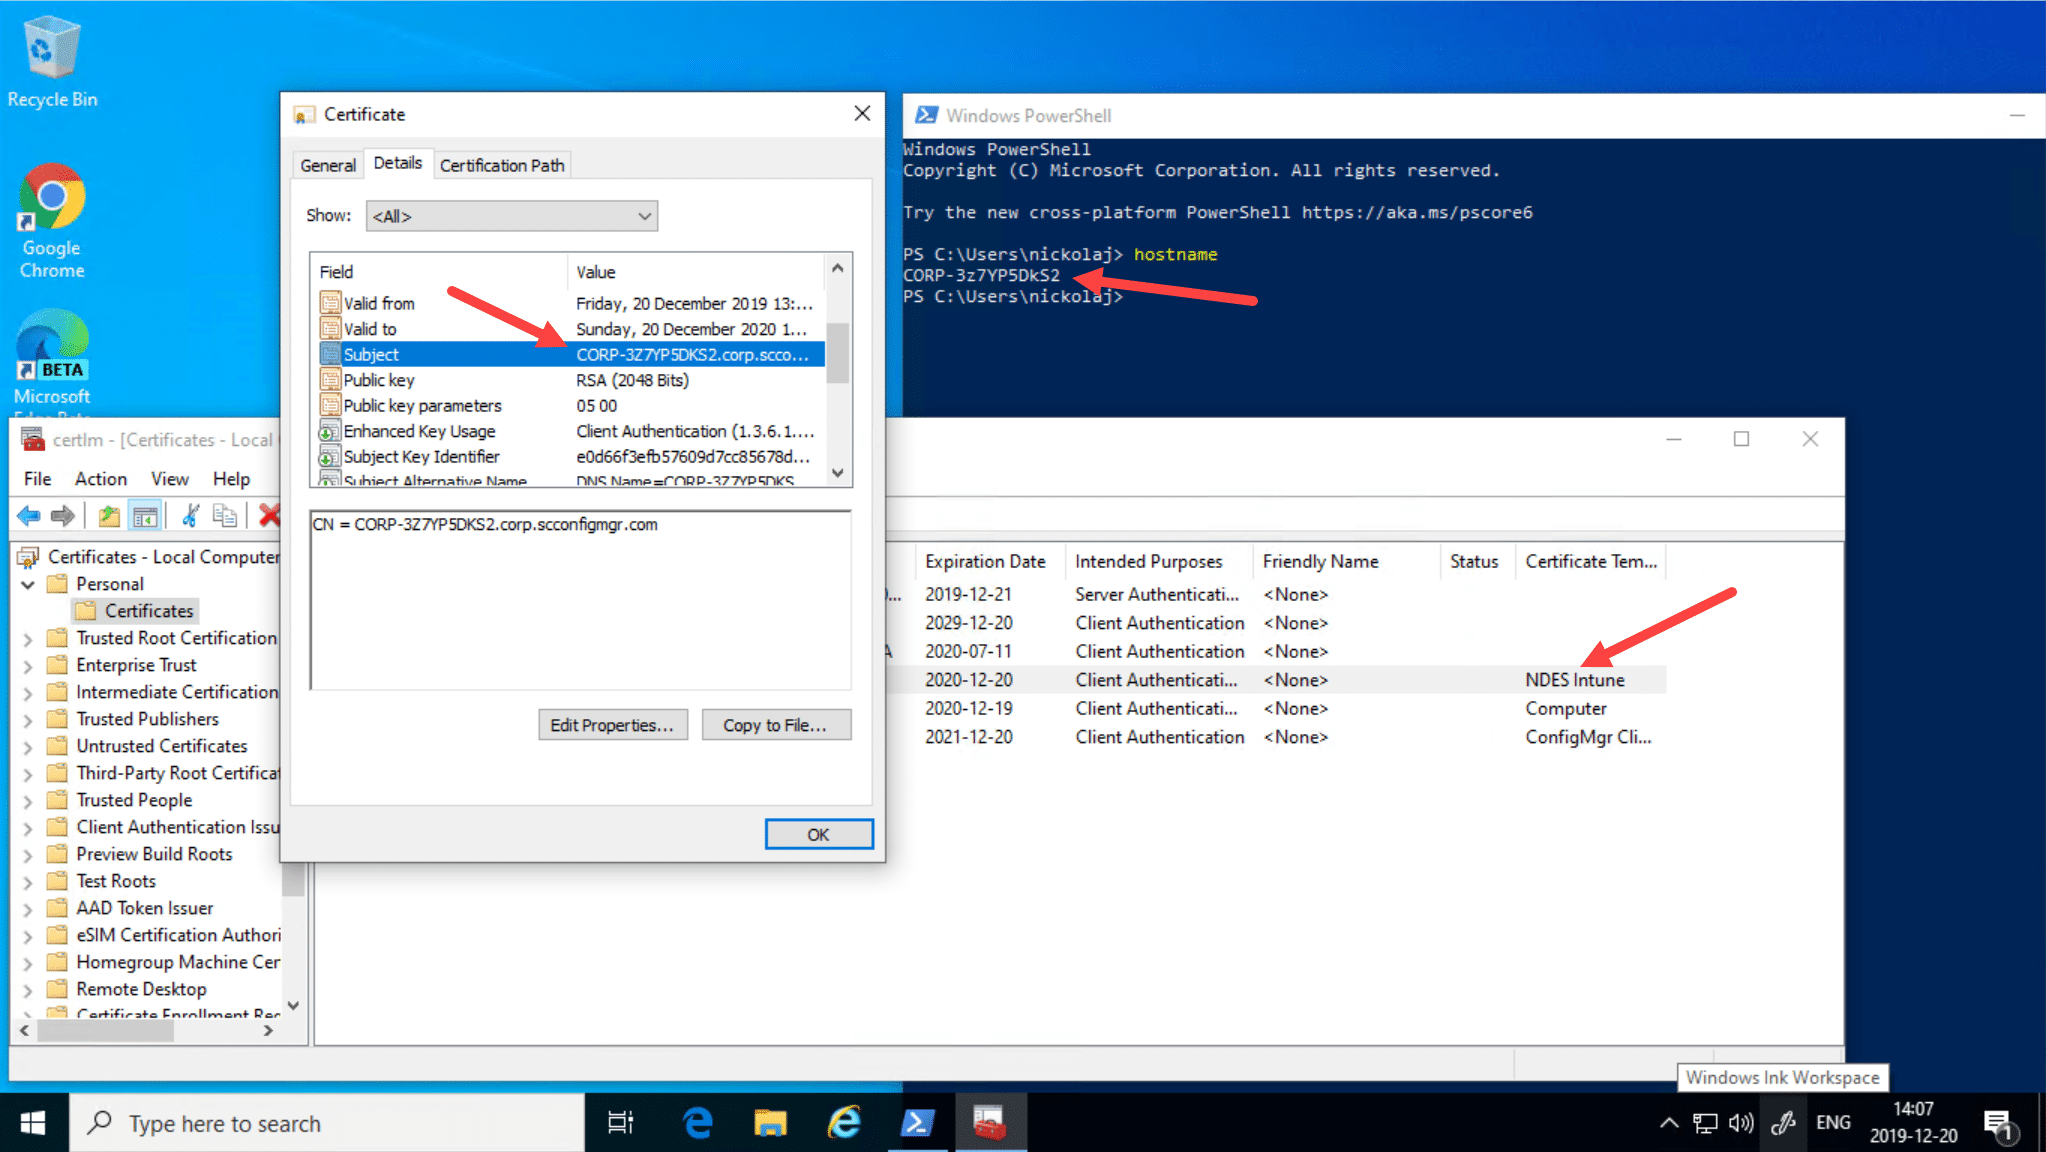
Additionally, we can of course verify that the actual device certificate on the device that was provisioning now contains the correct subject name matching the computer name. In my lab environment all of my provisioned Hybrid Azure AD joined devices gets a computer name that has CORP- as the prefix. Opening up a mmc.exe console for computer certificates, we can verify the subject name is now correct:
That completes this blog post, I hope Microsoft will fix this in the near future so that this solution is not required going forward.


Add comment