We often discuss what are the most blockers moving to Modern Management from Traditional Management? e.g. Deploy Win32 applications.
What about printers? Let’s say if customers only use web applications, they need to print out some paper work continually, they already have many on-premises network printers all over the building, and they want move their devices to Modern Management. So what solutions do we have?
(In this point I really wish that I had attend Ignite 🙂 Maybe someday…)
So what is Microsoft Hybrid Cloud Print?
I would say this in a simple way:
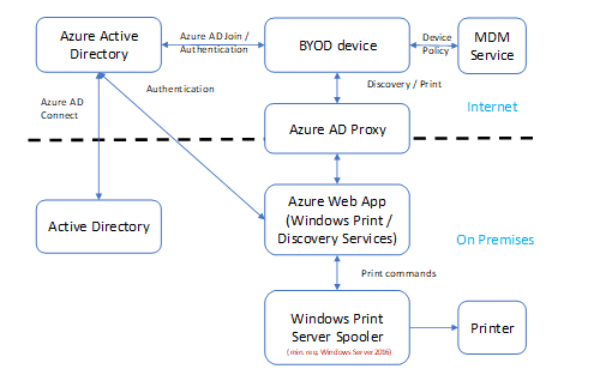
By using Hybrid Cloud Print, user can add and print to on-premises printers over internet or corporate network on a Azure AD joined Windows 10 device.
Quote from Microsoft:
Hybrid Cloud Print provides secure user access to on-premises printers by using Azure’s multi-factor authentication to validate user access. Single sign-on (SSO) functionality simplifies the user experience. Hybrid Cloud Print is built on Windows Print Server role, giving IT Pros an experience that is similar to managing printers and user access security.
Hybrid Cloud Print allows people in your organization to print from the devices they use to complete their work – even when they are away from their desk or workplace.
Hybrid Cloud Print is supported in Windows 10 Creators Update and Windows 10 S.
Does it work?
Oh yes! I tested that for the past three days! I couldn’t write about this if it didn’t work. 🙂
Requirements:
Azure AD premium subscription
MDM service, such as Intune or EMS
Windows Server running as Active Directory
Domain joined Windows Server 2016 running as Print Server
Azure AD Connect
Azure Application Proxy Connector
Two web apps and one Native app
Public facing domain name
Windows 10 Creators Update or Windows 10 S
Printer
My setups:
Domain controller: DC02.ZIT.local
Azure AD Connector: ADConnector01.ZIT.local
Print Server: PrintServer01.ZIT.local
Azure Application Proxy Connector: PrintServer01.ZIT.local (You should install that to a separated server, but I am running out of memories in my Hyper-V host, so I installed Azure Application Proxy Connector to same box as print server)
Azure AD joined Windows 10 1709 Enterprise: Client01-AAD
Network printer: Samsung ML-3310ND
Public domain name: smsboot.com
Internal domain name: ZIT.local
Azure Active Directory name: smsboot.onmicrosoft.com
A service account that has Print Server management rights and also synced to Azure AD: [email protected], I gave the service account administrator rights.
Steps by steps:
(Before you go though all the steps, please also take a look Chris Blackburn‘s comments about how to automated these complex processes with his PowerShell script, thanks Chris!)
Step 1 – Install Azure AD Connector
I don’t go through all the small details here, you will find lots of information all over internet, I use “Sync Password” and “Single Sign-on” settings.
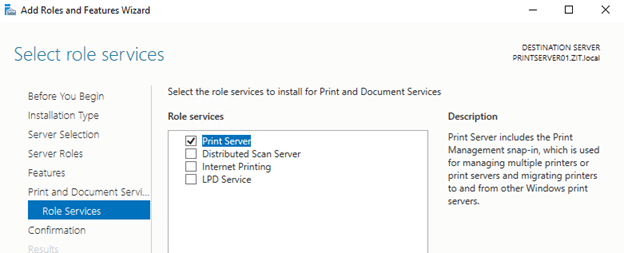
Step 2 – Install Print Server Role (PrintServer01.ZIT.local)
Install Print Server Role
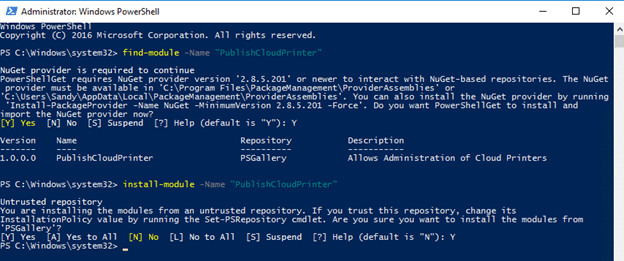
Install the Hybrid Cloud Print PowerShell modules
Run the following commands from an elevated PowerShell command prompt:
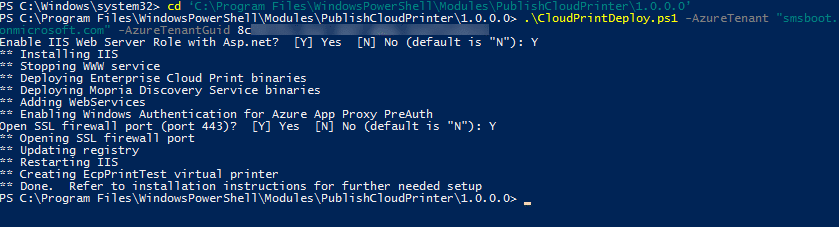
Install the Hybrid Cloud Print solution
Run the following commands from an elevated PowerShell command prompt:
cd 'C:\Program Files\WindowsPowerShell\Modules\PublishCloudPrinter\1.0.0.0'


.\CloudPrintDeploy.ps1 -AzureTenant <Domain name used by Azure AD Connect> -AzureTenantGuid <Azure AD Directory ID>
The SSL certificate can be a self-signed cert or one issued from some trusted Certificate Authority (CA).
Here I use self-signed certs as example, because not everyone want to buy SSL certs for test lab.
You will need two certificates, one for internal print server, another for application proxy public domain.
Run the following commands from an elevated PowerShell command prompt:
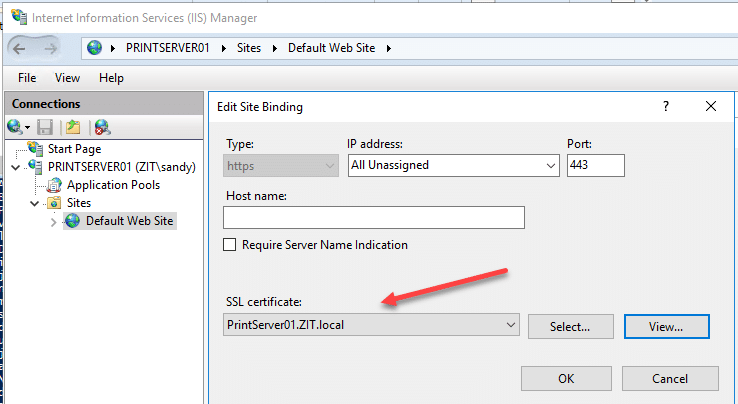
Certificate for printserver01.ZIT.local IIS.
Note: The SSL certificate can be a self-signed (as the PowerShell commend does) or issue from trusted certificate authority
If using a self-signed cert, you have to deploy the cert to your clients.
Create certificate for Application Proxy public domain (for later use), save it as smsboot.com.pfx Note: The SSL certificate can be a self-signed (as the PowerShell commend does) or issue from trusted certificate authority
If using a self-signed cert, you have to deploy the cert to your clients.
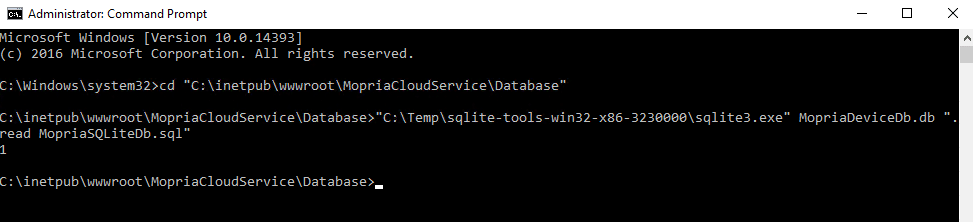
Run the following commands from an elevated command prompt (not in PowerShell):
cd "C:\inetpub\wwwroot\MopriaCloudService\Database"

"C:\Temp\sqlite-tools-win32-x86-3230000\sqlite3.exe" MopriaDeviceDb.db ".read MopriaSQLiteDb.sql"
You should see a new file MopriaDeviceDb.db is created.
Open up the MopriaDeviceDb.db file properties to add Users/Groups which are allowed to publish to Mopria database in the Security tab. Recommend only adding the required Admin user group.
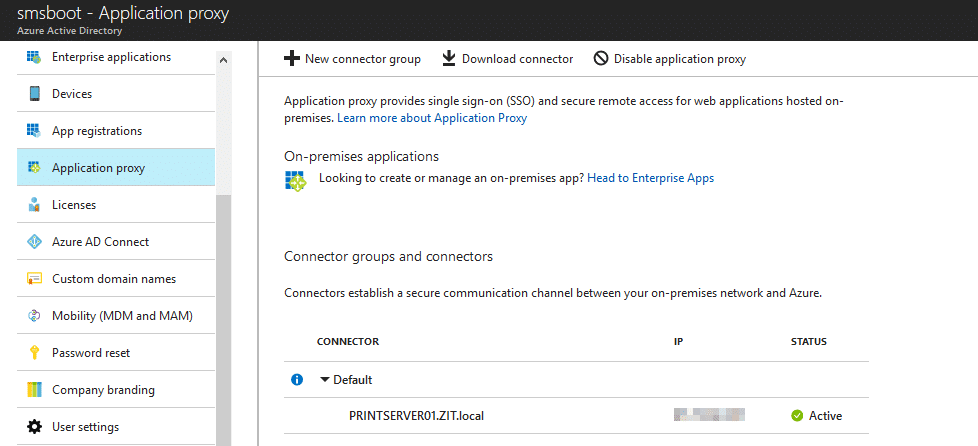
Go to Azure Active Directory – Application proxy, Click on Enable application proxy
Download the “Application Proxy Connector” to a domain joined Windows Server that will act as the Web Application Proxy (WAP), in my case I installed it to my print server
After application proxy connector is installed, you should see the connector in your portal.
Step 6 – Create Application proxies for Hybrid Cloud print
We will need create two enterprise applications, one for printer discovery, another one for printing.
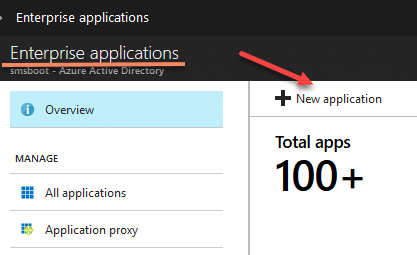
Create enterprise application for printer discovery
Go to Azure Active Directory – Enterprise applications, Click on New application
Choose On-premises application
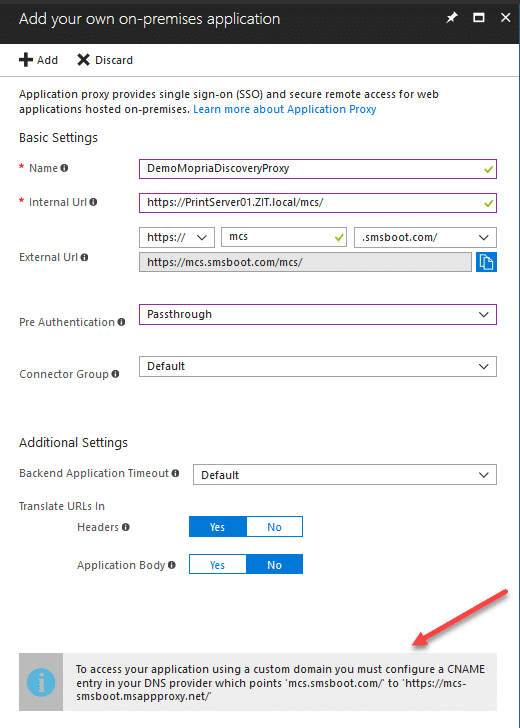
This proxy application is for printer discovery.
Fill the following information Name: DemoMopriaDiscoveryProxy Intenal Url: https://your print server/mcs/, in my case: https://PrintServer01.ZIT.local/mcs/ External Url: I change it to a shorter name example: mcs, and choose your public domain name, in my case smsboot.com
Update: You don’t have to use your public domain name, you can use the default generated msappproxy.net as well, so that you don’t need deploy the additional certs to your clients.
Pre Authentication: Passthrough Remember: Configure a CNAME entry in your DNS provider.
Click on Users and groups, assign this application DemoMopriaDiscoveryProxy to a user group that allow to use Cloud Print services VERYIMPORTANT: Assign this application DemoEnterpriseCloudPrintProxy to [email protected], because it need permission to use this enterprise application to publish printers.
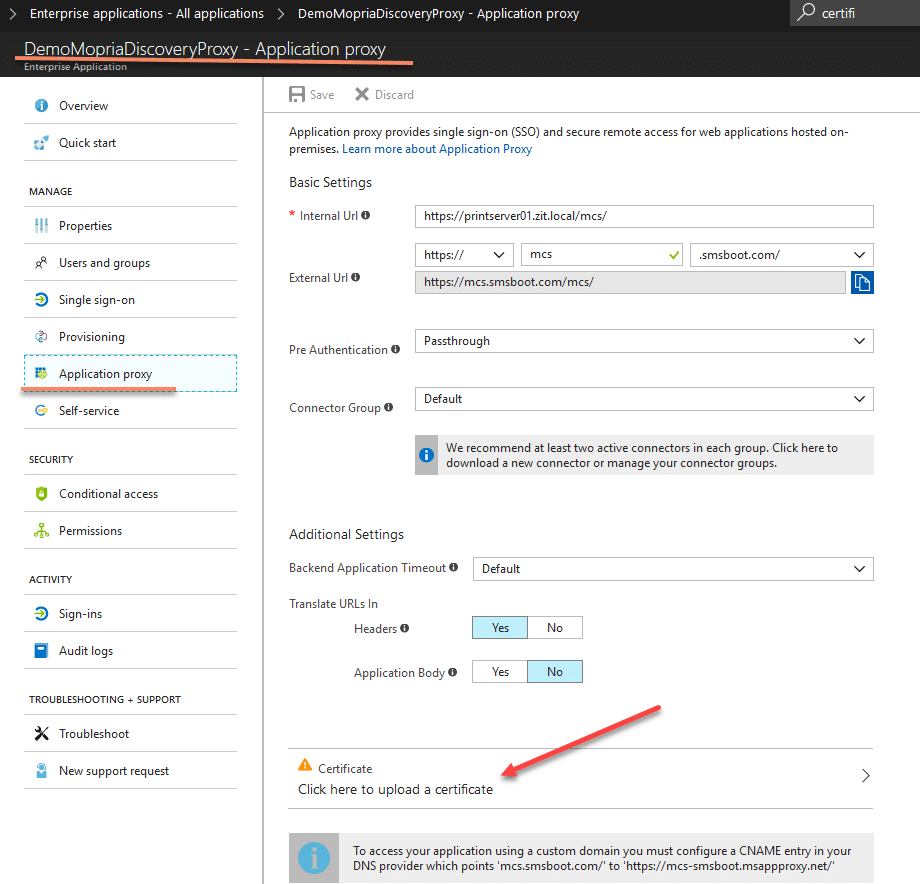
Click on Application proxy, Click on Click here to upload a certificate Choose the certificate smsboot.com.pfx what we created on above Step 3 – Create certificates
If you have a public certificate, you can import your public certificate.
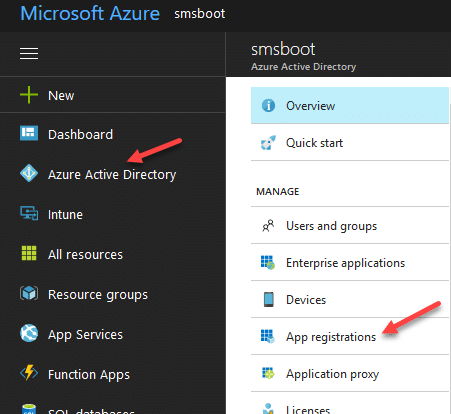
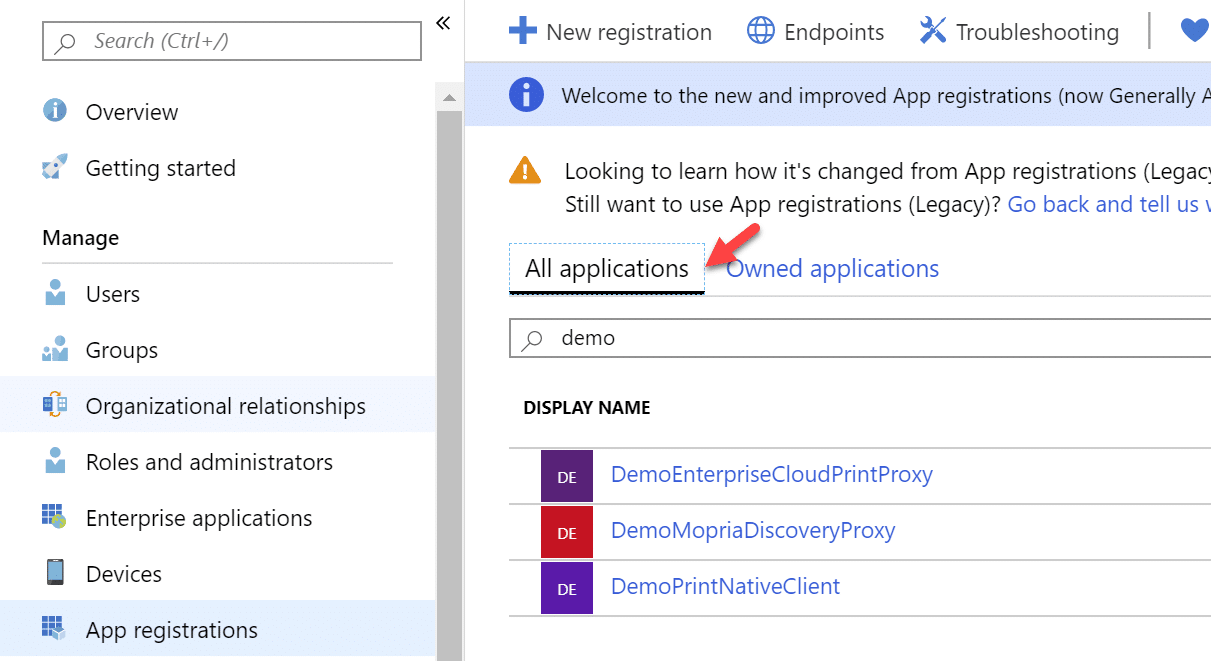
Go back to Azure Active Directory – App registrations
By default, it shows “Owned applications”, if you don’t see your cloud print applications, click on “All applications“
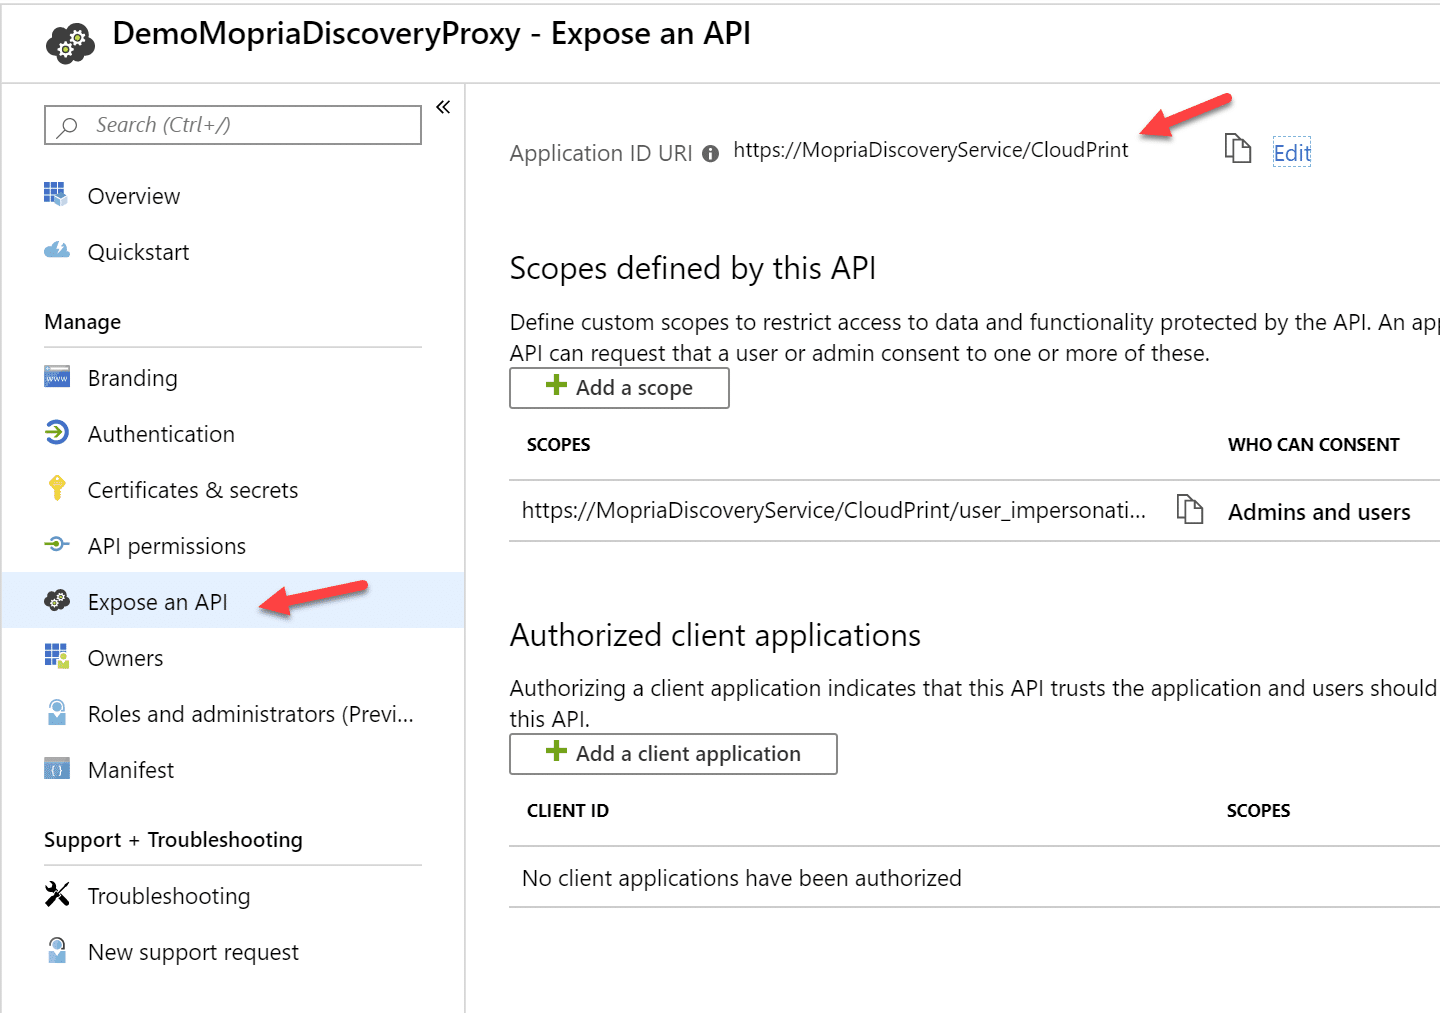
Click on DemoMopriaDiscoveryProxy Go to Expose an API Change Application ID URI to: https://MopriaDiscoveryService/CloudPrint
VERYIMPORTANT: If you change any settings from Enterprise Applications, you must check App registration settings again, and make sure Application ID URI is correct.
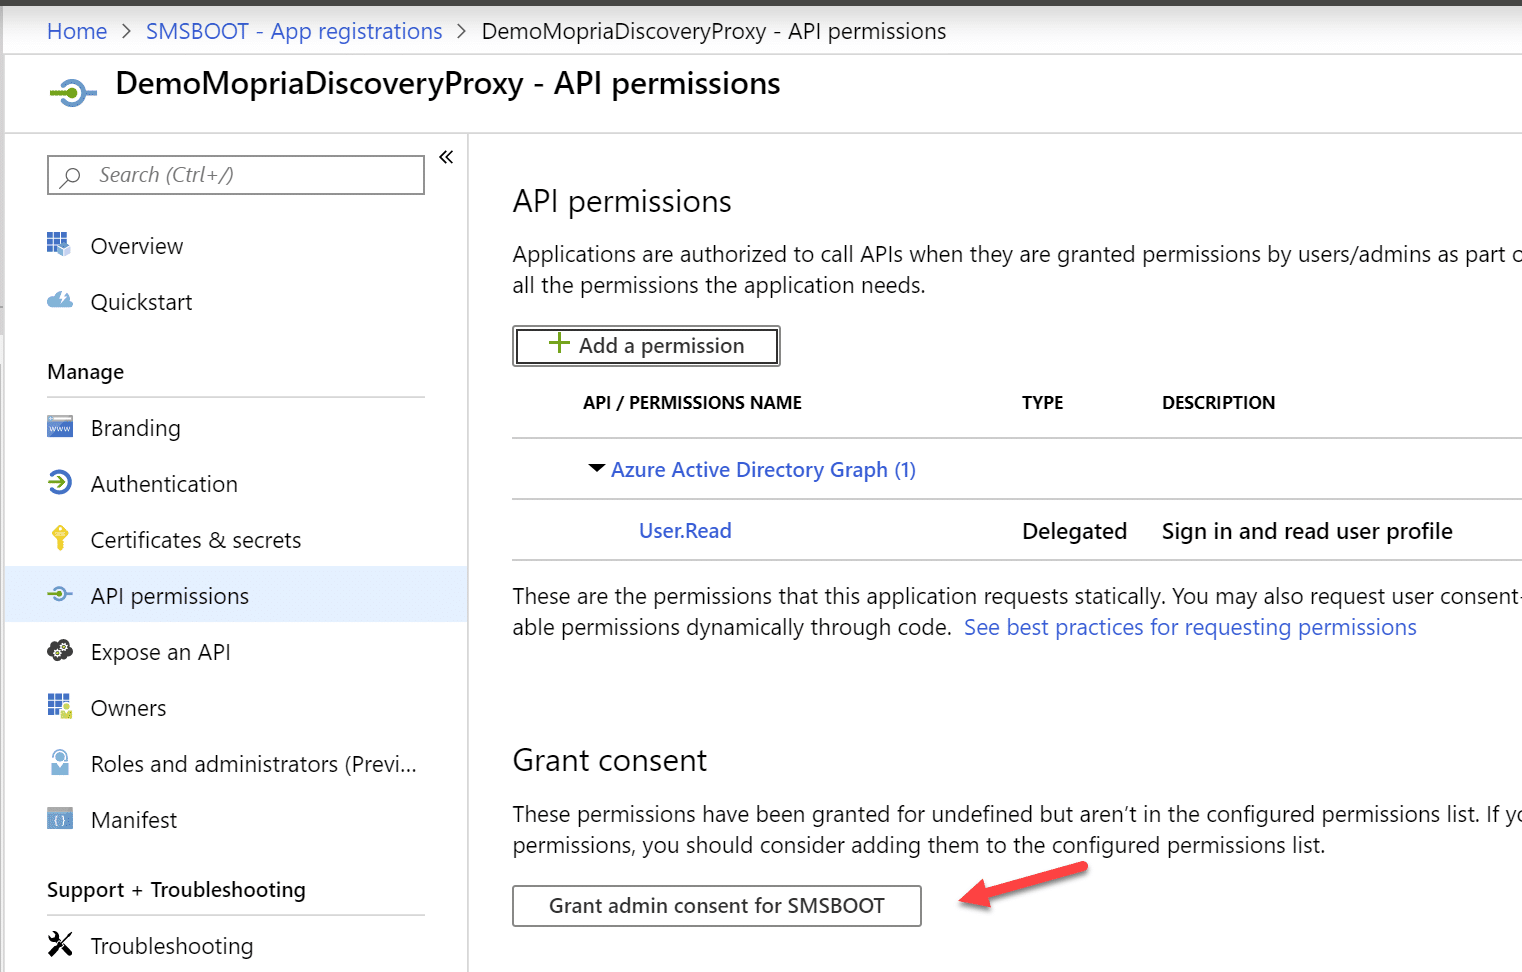
Click on Required permissions, make sure you have API permissions Azure Active Directory Graph delegated permissions to option Sign in and read user profile If you don’t see it there, Add the permission.
After permission is added, click on Grant admin consent, then click Yes
Create enterprise application for printing
Create a new Enterprise application
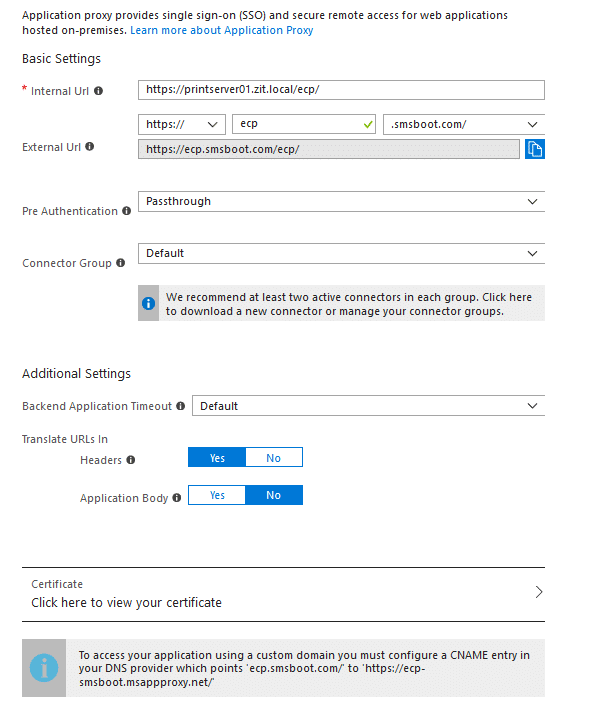
Fill the following information Name: DemoEnterpriseCloudPrintProxy Intenal Url: https://your print server/ecp/, in my case: https://PrintServer01.ZIT.local/ecp/ External Url: I change it to a shorter name example: ecp, and choose your public domain name, in my case smsboot.com
Update: You don’t have to use your public domain name, you can use the default generated msappproxy.net as well, so that you don’t need deploy the additional certs to your clients.
PreAuthentication: Passthrough Remember: Configure a CNAME entry in your DNS provider.
Click on Users and groups, assign this application DemoEnterpriseCloudPrintProxy to a user group that allow to use Cloud Print services
Click on Application proxy, Click on Click here to upload a certificate Choose the certificate smsboot.com.pfx what we created on above Step 3 – Create certificates
If you have a public certificate, you can import your public certificate.
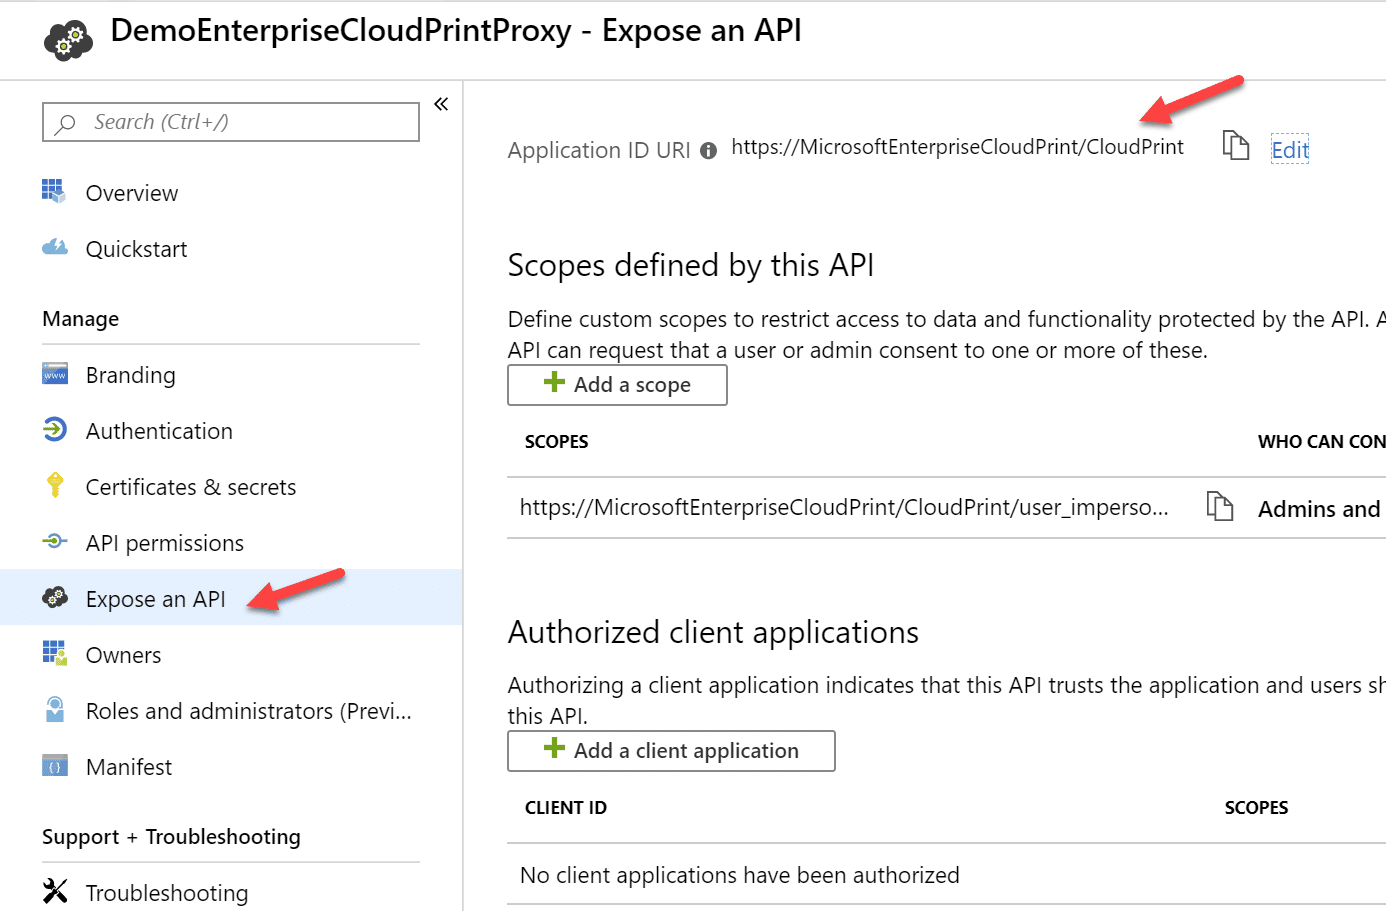
Go back to Azure Active Directory – App registrations
Click on DemoEnterpriseCloudPrintProxy Go to Expose an API Change App ID URI to: https://MicrosoftEnterpriseCloudPrint/CloudPrint
VERYIMPORTANT: If you change any settings from Enterprise Applications, you must check App registration settings again, and make sure App ID URI is correct.
Grant permissions. follow the same steps as DemoMopriaDiscoveryProxy (see above 8-9)
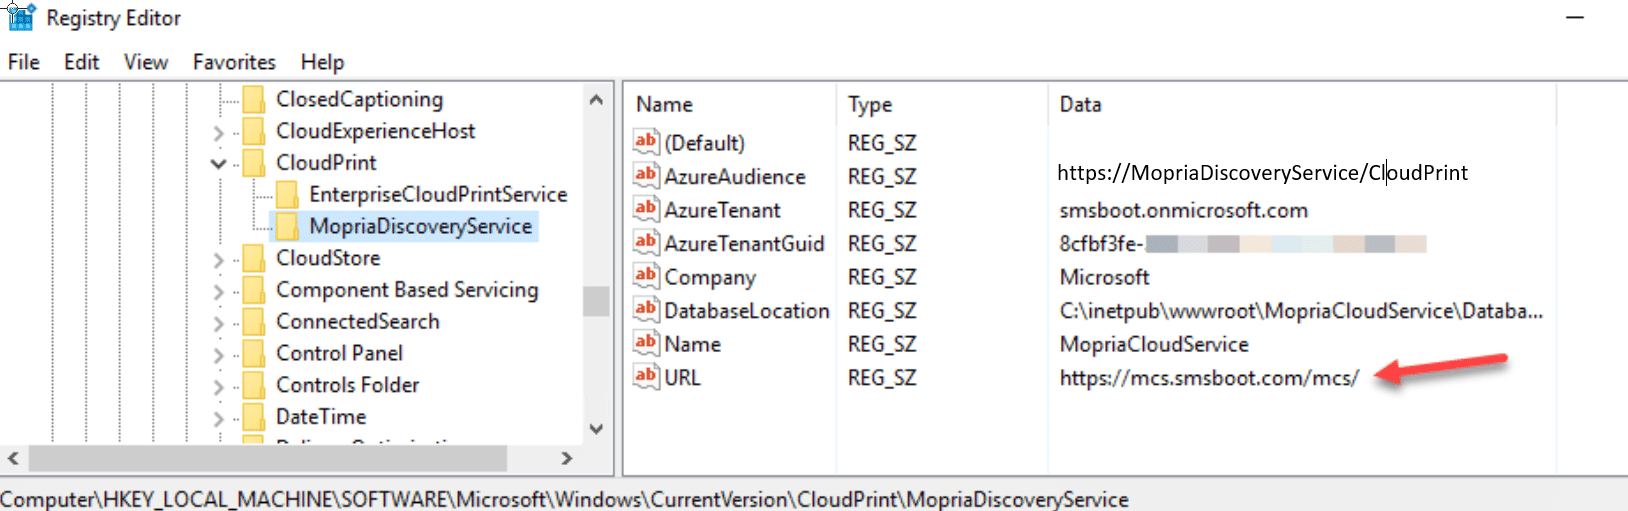
VERYIMPORTANT:
If your internal domain name is not same as the public domain name, log on to your print server, in my case: printserver01.zit.local, change this URL registry to your print discovery endpoint external address, because machines are in external network cannot access to the internal printer discovery address, it has to be the external address that match the MDM policy we assign to the machines later steps.
Then run command: iisreset (or restart your IIS services)
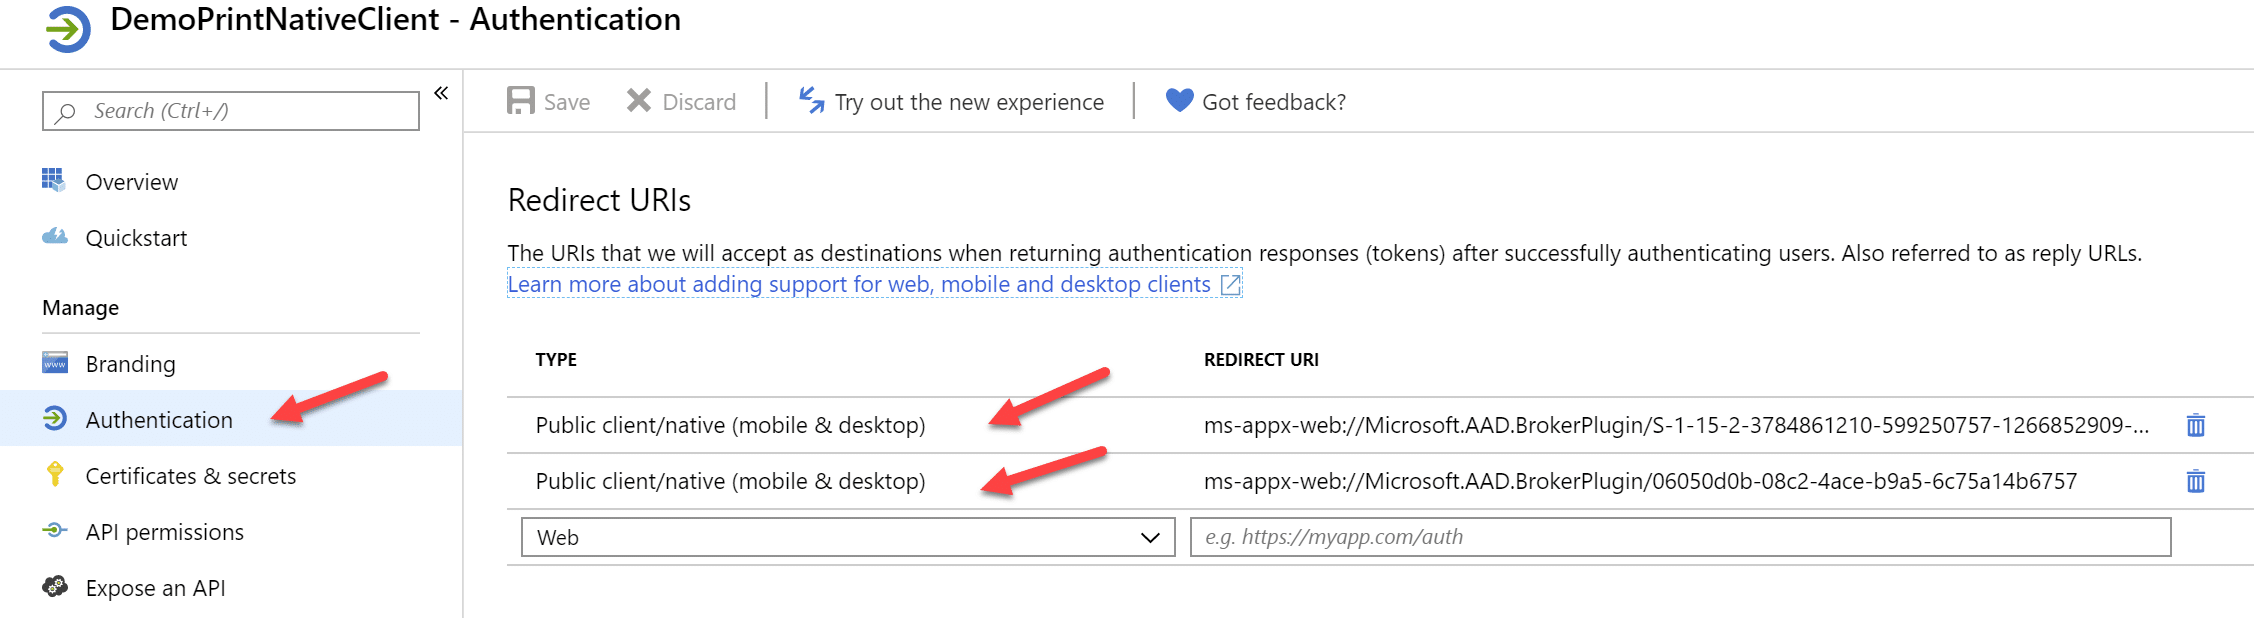
Step 7 – Create Native client application for cloud print
Go to Azure Active Directory – App Registration, click New application registration
Fill the flowing information, to create a native application
Name: DemoPrintNativeClient
Redirect URI:
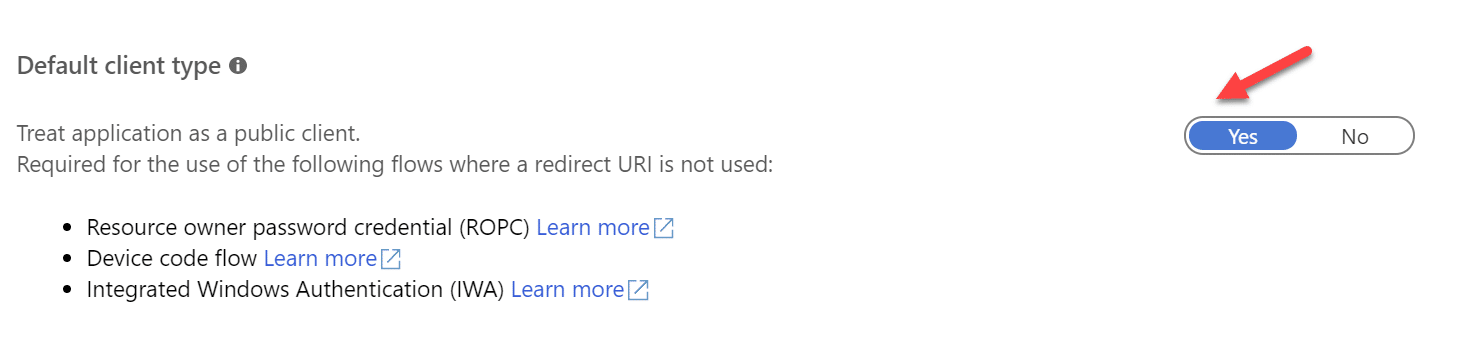
After application is created, open this DemoPrintNativeClient again. In Default client type, choose Yes to make this application as native public client
Click on Authentication, add the following redirect URIs to the list:
In my case: ms-appx-web://Microsoft.AAD.BrokerPlugin/06050d0b-xxxxx-xxxx-xxxx-xxxxx-xxxxx
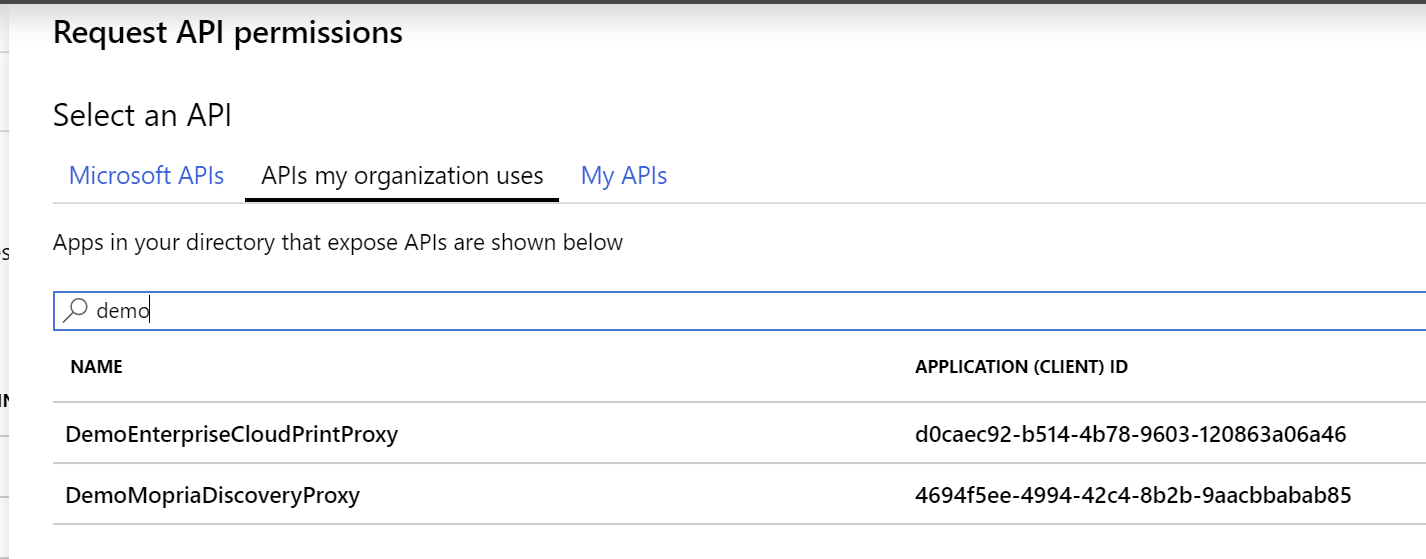
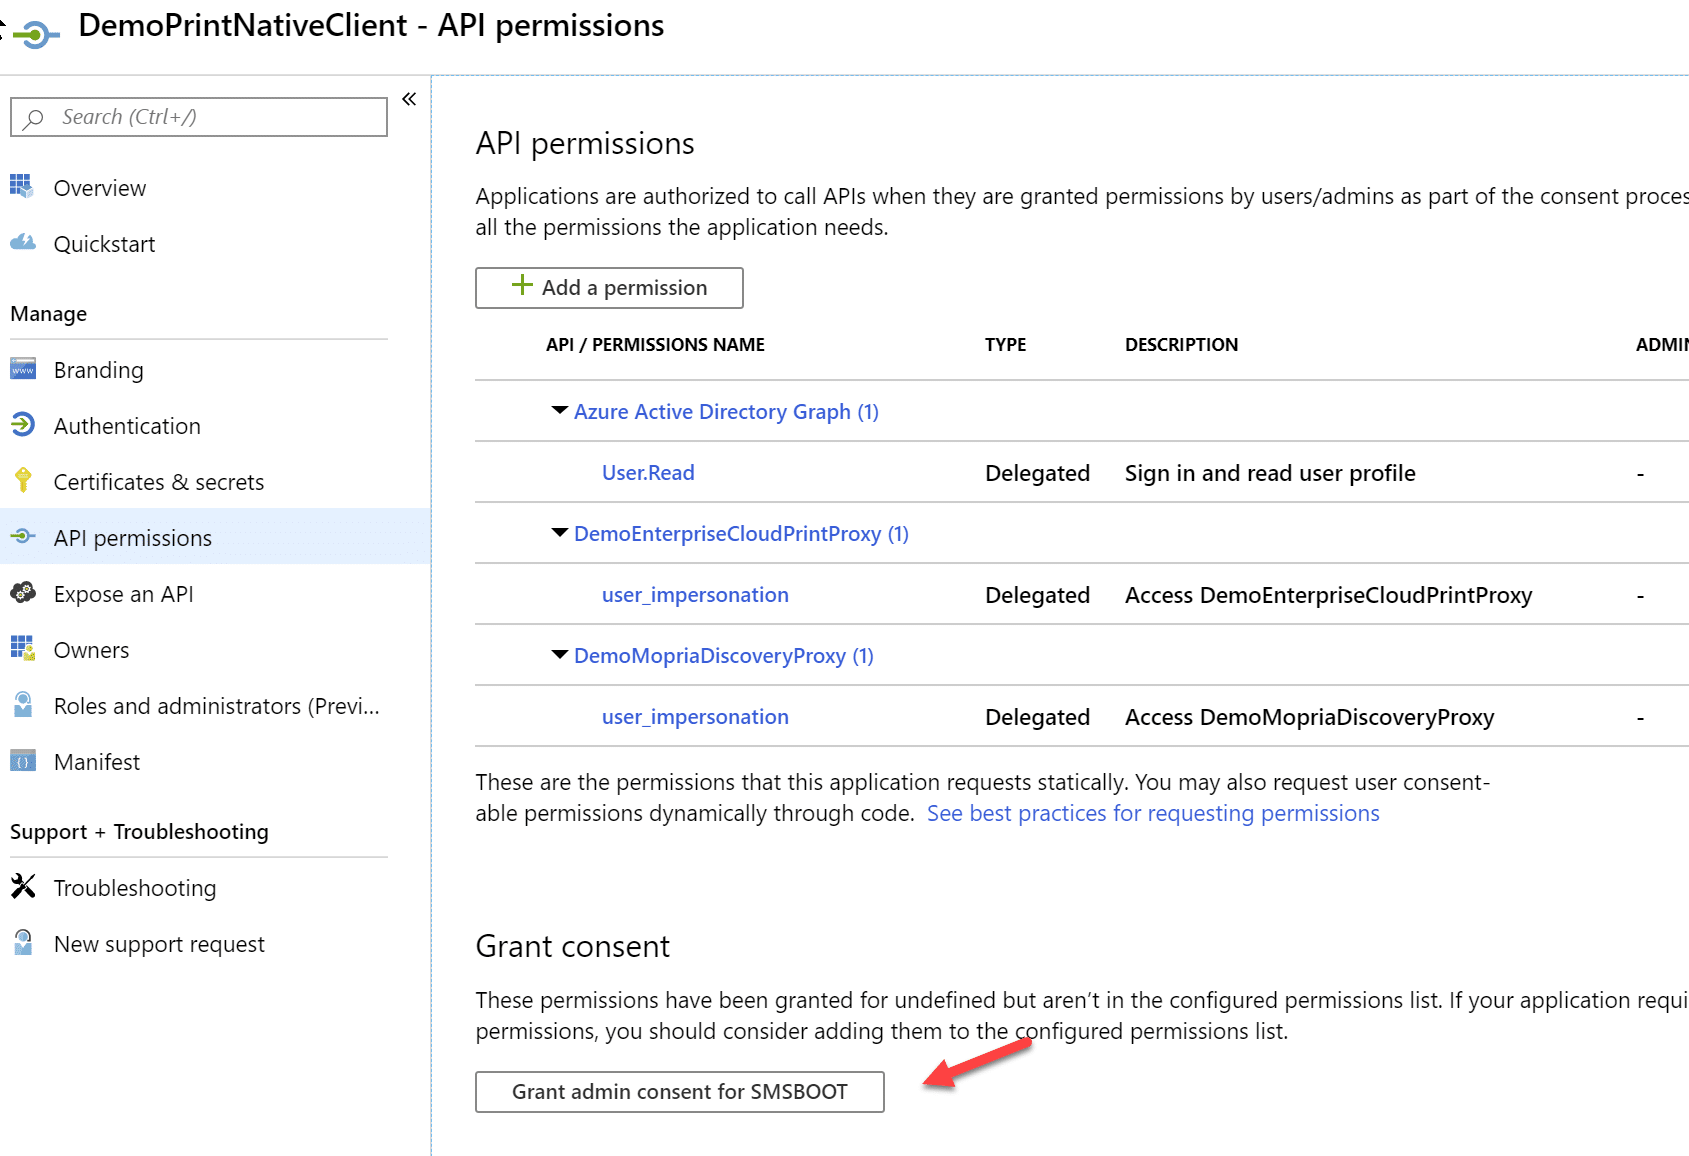
Click on API permissions – Add a permission, select APIs my organization uses, then addDemoMopriaDiscoveryProxy, DemoEnterpriseCloudPrintProxy .
Choose Azure Active Directory Graph (permission: Sign in and read user profile)
Then click on Grand Permissions, then click Yes
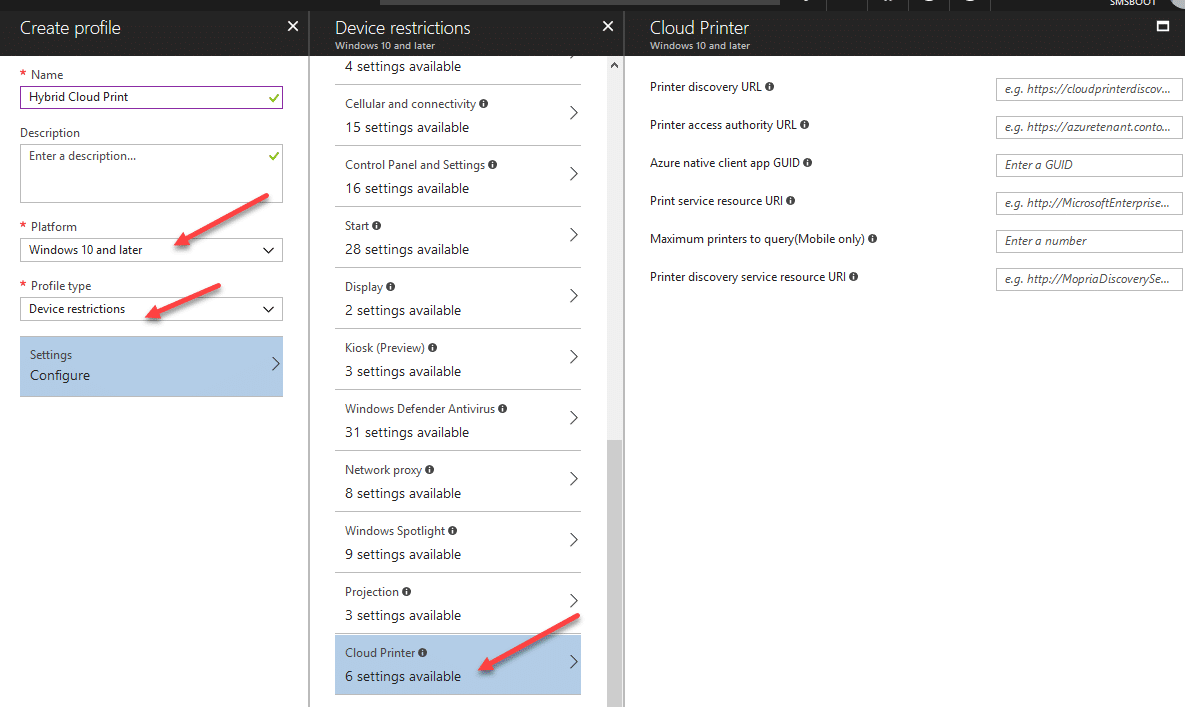
Step 8 – Configure the required MDM policies
Go to Intune – Device Configuration – Profiles – Create profile
Choose as flowing:
Platform: Windows 10 and later
Profile type: Device restrictions – Cloud Printer
Input the follow settings for Hybrid Cloud print: Printer discovery URL:External address of CloudPrinterDiscoveryEndPoint, in my case: https://mcs.smsboot.com/mcs/ Printer access authority URL:https://login.microsoftonline.com/<Your Azure AD Directory ID> Azure native client app GUID:NativeClientApplicationID Print service resource URL: https://MicrosoftEnterpriseCloudPrint/CloudPrint Maximum printers to query(Mobile only): a positive number Printer discovery service resource URI: https://MopriaDiscoveryService/CloudPrint
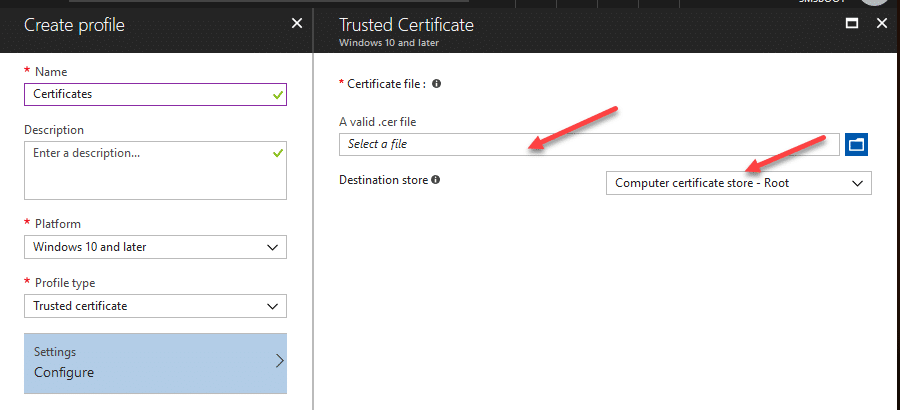
Create a new profile for deploy trust certificates that we created on above Step 3.
Both PrintServer01.cer and smsboot.com.cer
Assign the policy to a user group that allow to use Cloud Print services
Step 9 – Deploy Certificate to clients
If you are using self-signed certificates for your print server and Proxy enterprise application, you have to deploy those certificates (PrintServer01.cer and smsboot.com.cer) to clients via GPO or MDM (See from this post “deploy Root CA to clients”).
If you are using msappproxy.net as your Proxy enterprise application address and using public certificate to your print server, then you don’t need deploy additional certs to clients
Step 10 – Publish Shared Printers
VERY IMPORTANT:
Log on Azure AD joined Windows 10 as the user account that has print server print management rights, in my case: [email protected]
The account you use use needs to have administrator rights.
Install the Hybrid Cloud Print PowerShell modules
Run the following commands from an elevated PowerShell command prompt:
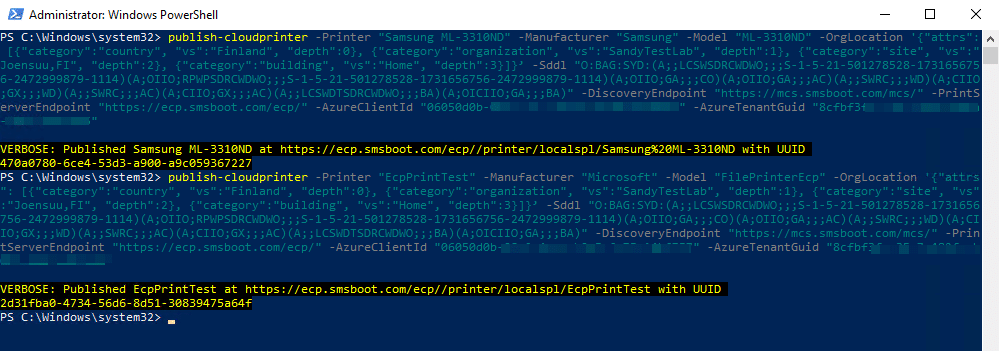
Run Publish-CloudPrinter command: Printer: The shared printer name that was defined Manufacturer: Printer manufacturer Model: Printer model OrgLocation: A JSON string specifying the printer location, e.g.:{“attrs”: [{“category”:”country”, “vs”:”Finland”, “depth”:0},
{“category”:”organization”, “vs”:”SandyTestLab”, “depth”:1},
{“category”:”site”, “vs”:”Joensuu,FI”, “depth”:2},
{“category”:”building”, “vs”:”Home”, “depth”:3}]}} Sddl: SDDL string representing permissions for the printer. This can be obtained by modifying the Printer Properties Security tab appropriately and then running the following command in PowerShell:
NOTE: You will need to add O:BA as prefix to the result from the command prompt command above before setting the value as the SDDL setting.
Example: SDDL = O:BAG:DUD:(A;OICI;FA;;;WD)
DiscoveryEndpoint: https://<services-machine-endpoint>/mcs, the external address of DiscoveryEndpointProxy application PrintServerEndpoint: https://<services-machine-endpoint>/ecp, the external address of PrintEndpointProxy application AzureClientId: Application ID of the registered Native Web Application AzureTenantGuid: Your Azure AD tenant Directory ID
This is my example:
(For testing purpose, you can use the virtual printer name EcpPrintTest)
NOTE: The printer share name need to be same as the printer name.
Step 11 – Test the results
Log on to a Azure AD joined Windows 10, sync user policies.
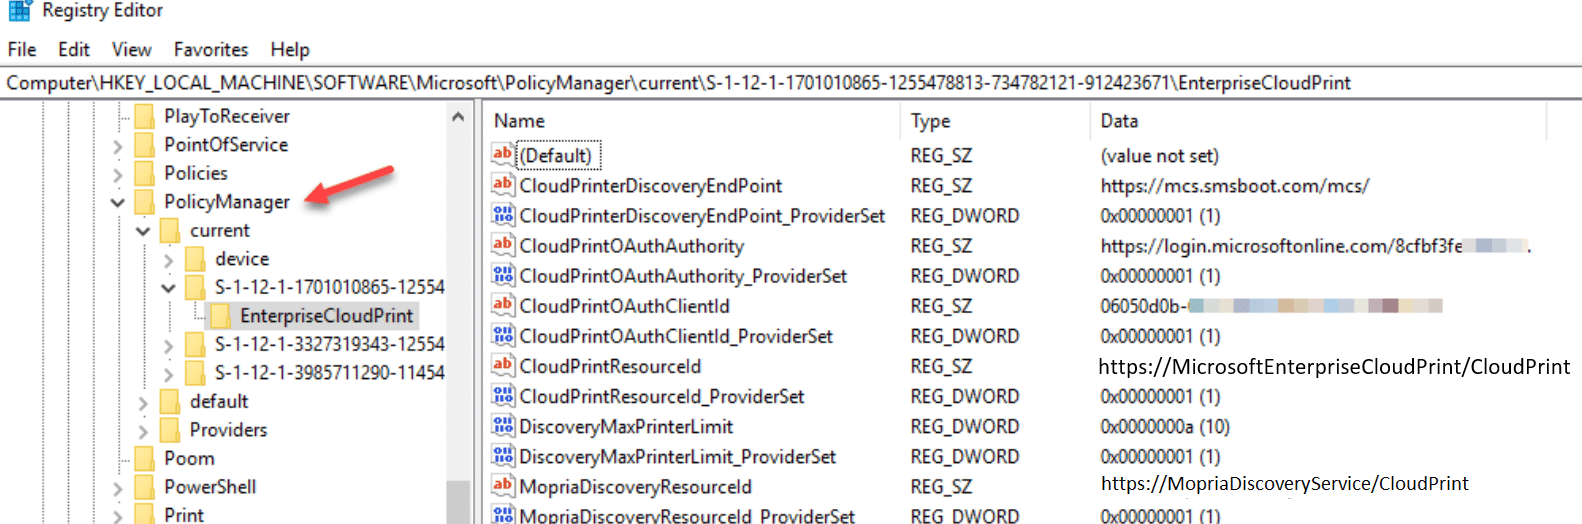
Check if Hybrid Cloud print MDM policies are applied, you should see these registries.
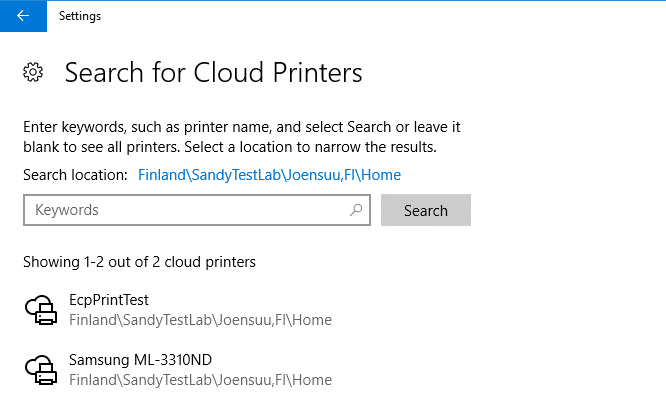
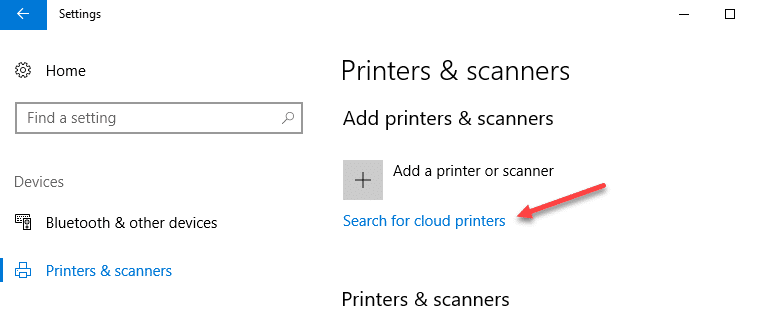
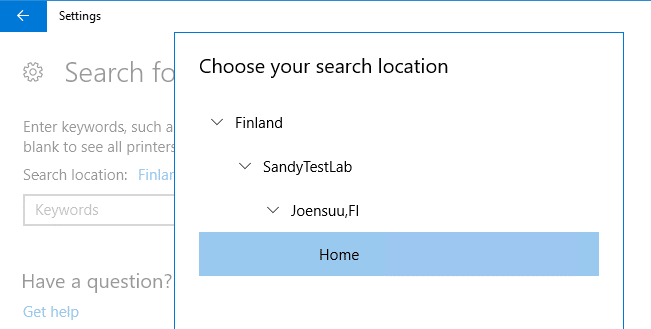
Open Printers & scanners, you should able to see a new setting show up Search for cloud printers In my experiences, after EnterpriseCloudPrint polices are applied, this setting page might crash, restart computer will fix that.
You can click on search location or just use Search
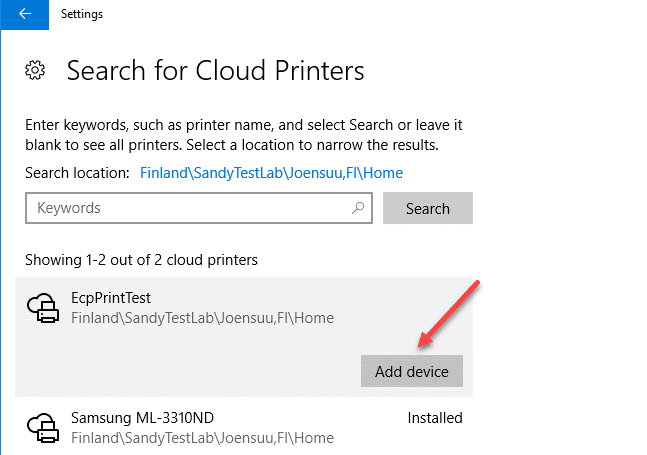
Install a printer
If you use EcpPrintTest (it is a virtual test printer) to print out something from your windows 10 machine, you will find a file EcpTestprint.xps created to C:\EcpTestOutput folder in your print server.
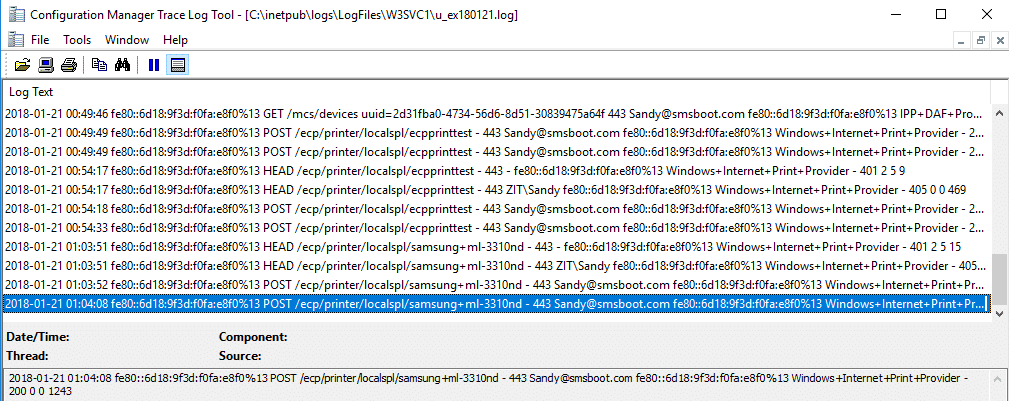
Print Server IIS log:
PowerShell command
Query cloud printer:
Publish-CloudPrinter -Query -DiscoveryEndpoint "External address of DiscoveryEndpoint" -AzureClientId "Natvie Client ID" -AzureTenantGuid "Azure AD ID"
Delete published cloud printer:
Publish-CloudPrinter -Unpublish -Printer "printer name" -DiscoveryEndpoint "external address of discovery endpoint" -PrintServerEndpoint "external address of printer serer endpoint" -AzureClientId "native client ID" -AzureTenantGuid "Azure AD ID"
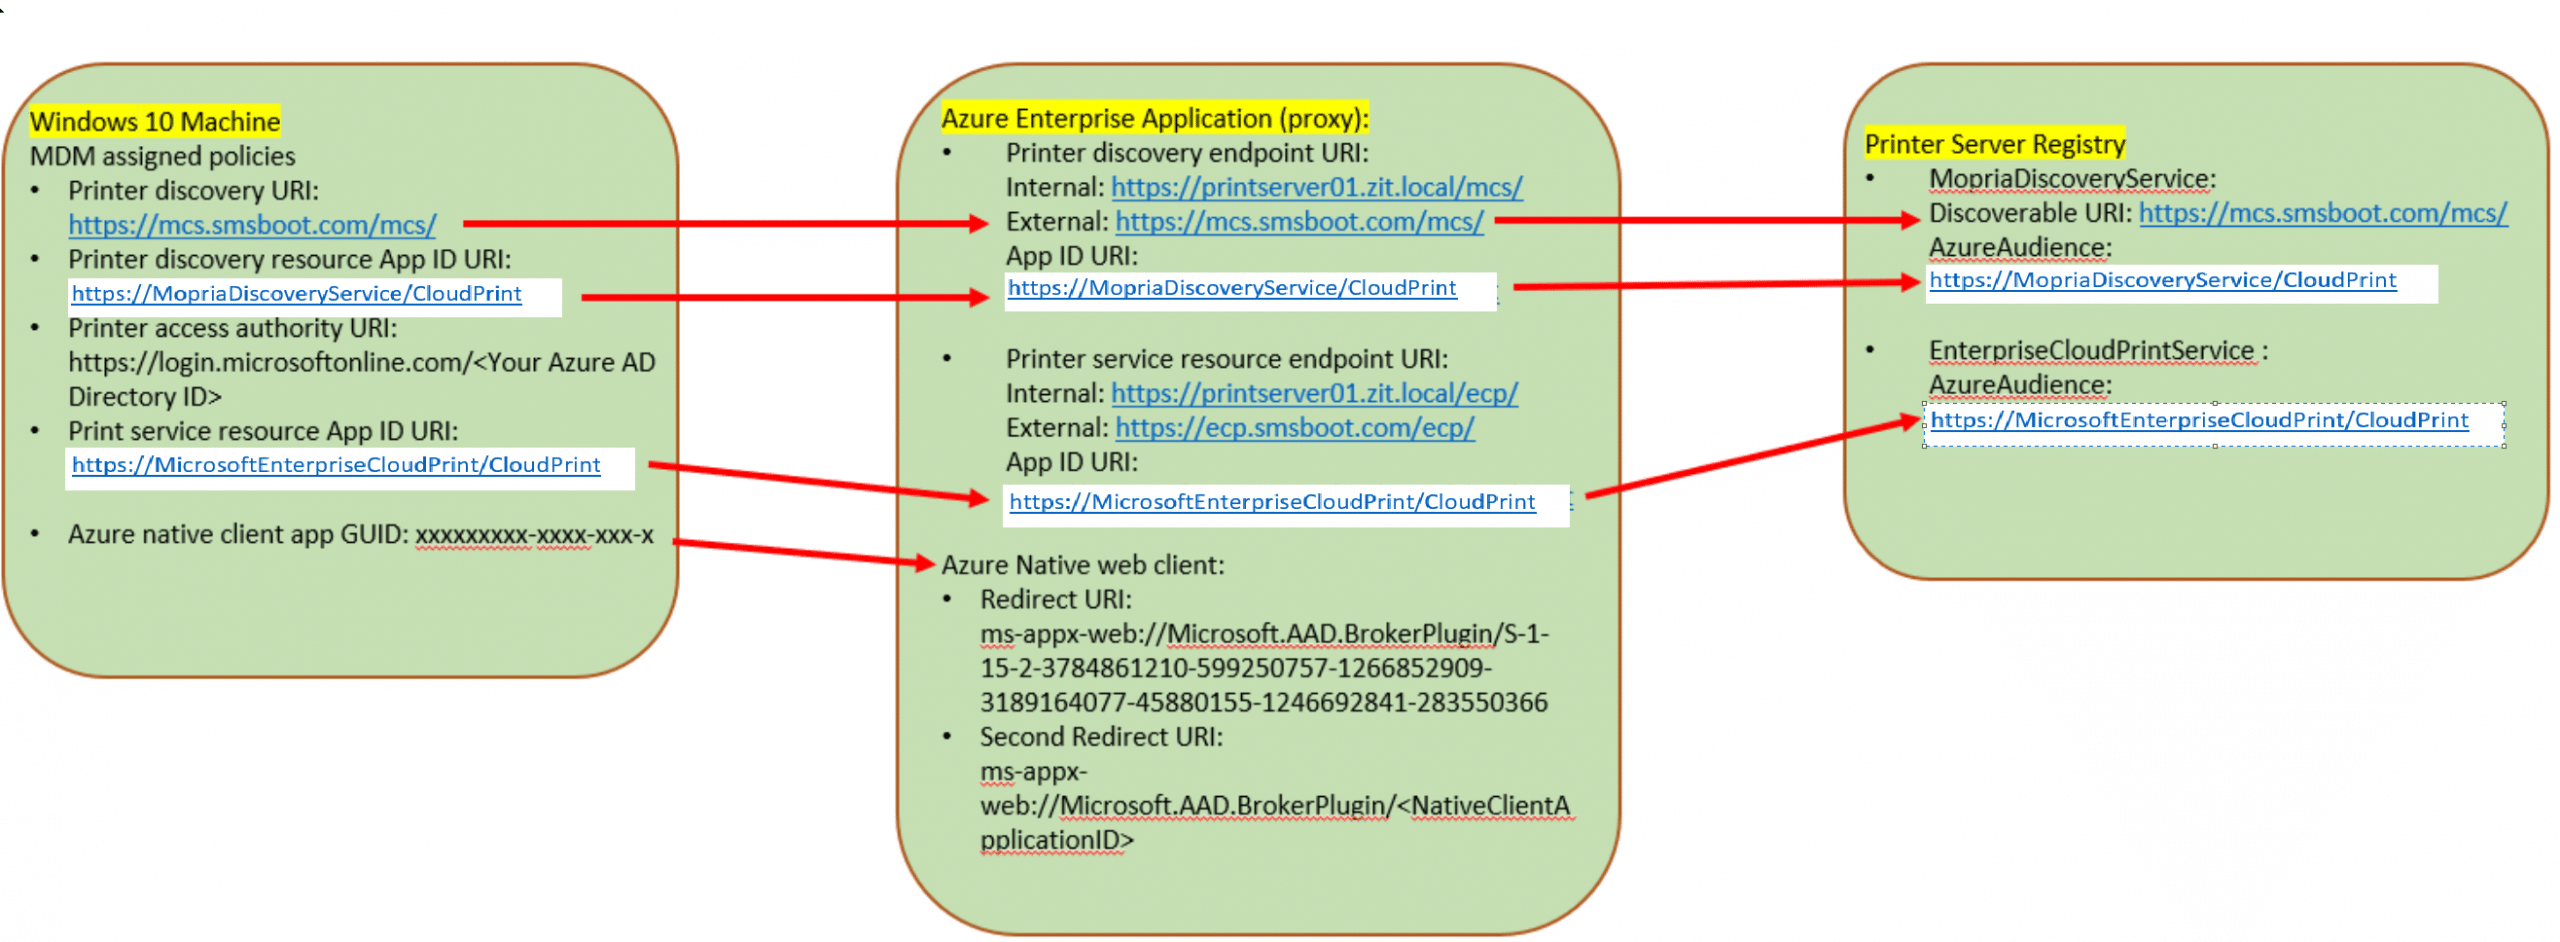
I know this a bit messy, so I draw this map, hopefully help a bit about those internal address, external address, App ID URI.
This show what URI need to be matched, if change URI, then need to change another one to match it.
Sandy is an Enterprise Mobility MVP since 2018. She is an experienced Information Technology Specialist for over 10 years. Skilled in Microsoft Endpoint Manager (ConfigMgr and Intune), Windows 10 and security. Sandy's interests are mostly related to Microsoft Technologies, she has passions learning new skill sets to improve her professional career and also as her hobbies. She uses her expertise to help customers achieve their goals and solve their issues.
Sandy founded the https://sandyzeng.com blog and is now a blogger on MSEndPointMgr.
I am facing some issues on Step 11 to find the printer. I am using the default Test Printer “EcpPrintTest”. Manage to publish the device successfully but I am unable to find the printer.
Will you or anyone have any ideas or face the same issues and managed to resolve it?
I have followed the guide till Step 10 successfully. Alot better than Microsoft guide which create more errors.
The only issues I face now is I am at Step 11 and I am able to publish the default “EcpPrintTest” but I couldn’t find the cloud printer on my pc
Publish-CloudPrinter : Exception calling “RetrieveOAuthToken” with “3” argument(s): “System.AggregateException: One or more errors occurred. —> System.Exception: Error requesting OAuth token. WebTokenRequestStatus: UserInteractionRequired, error: 3399614476, message: AADSTS50076: Due to a configuration change made by your administrator, or because you moved to a new location, you must use multi-factor authentication to access ‘http://MopriaDiscoveryService/CloudPrint’. Trace ID: f9b031b1-2bae-45d0-bb28-d967ebe44700 Correlation ID: f9e6a2b2-20a6-454d-b031-543bb5379bc4 Timestamp: 2020-01-31 08:03:00Z at CloudPublishHelpers.d_0.MoveNext() — End of inner exception stack trace — at System.Threading.Tasks.Task.ThrowIfExceptional(Boolean includeTaskCanceledExceptions) at System.Threading.Tasks.Task`1.GetResultCore(Boolean waitCompletionNotification) at System.Threading.Tasks.Task`1.get_Result() at CloudPublishHelpers.RetrieveOAuthToken(String resourceId, String clientId, String azureTenantGuid) —> (Inner Exception #0) System.Exception: Error requesting OAuth token. WebTokenRequestStatus: UserInteractionRequired, error: 3399614476, message: AADSTS50076: Due to a configuration change made by your administrator, or because you moved to a new location, you must use multi-factor authentication to access ‘http://MopriaDiscoveryService/CloudPrint’. Trace ID: f9b031b1-2bae-45d0-bb28-d967ebe44700 Correlation ID: f9e6a2b2-20a6-454d-b031-543bb5379bc4 Timestamp: 2020-01-31 08:03:00Z at CloudPublishHelpers.d_0.MoveNext()<— " At line:1 char:1 + Publish-CloudPrinter -Printer "EcpPrintTest" -Manufacturer "Microsoft … + ~~~~~~~~~~~~~~~~~~~~~~~~~~~~~~~~~~~~~~~~~~~~~~~~~~~~~~~~~~~~~~~~~~~~~ + CategoryInfo : NotSpecified: (:) [Publish-CloudPrinter], MethodInvocationException + FullyQualifiedErrorId : Exception,Publish-CloudPrinter
I have MFA enabled so I tried to connect to Azure through the powershell so I can login with mfa but still I keep getting the same error. If MFA supported for this feature or can it give issues? Is there a work around this?
I would suggest you make a comment in Microsoft doc page or create an issue in their GitHub, request them modified the script to support MFA. Or if you can use a credential that doesn’t enforced MFA. It might be possible just modify the script by ourselves, but I haven’t look into that.
so i am trying this and i get to the part where i have to install sqlite but powershell gives a error seems the link to get it doesnt work any more any other way of getting this to work
Hi
I received a lot of OAuth errors when trying to use Active directory authentication, instead of pass through on the proxy settings. I switched back to pass through and rebuilt the print server, do not change any of the IIS settings, anonymous must be off and that is the default after using the .\CloudPrintDeploy.ps1 script.
I used a corporate CA cert on the IIS server, I used the external URI s in the proxy settings ending in msappproxy.net/ecp/ and msappproxy.net/MCS/ so I did not need to import or use certs anywhere except in the bindings on IIS of the print serer.
Great blog, Followed and got the printers discovered and installed
But was getting printing error – Diagnosed using fiddler “Request Entity is too large”
Fix for me was using IIS Manager
Select Default Web Site
Select Configuration Editor
Within Section Dropdown, select “system.webServer/serverRuntime”
Enter a higher value for “uploadReadAheadSize” such as 1048576 bytes. Default is 49152 byte
Got everything working using this guide, but now my jobs get spooled twice. First time by the user who sends the job, second time it get spooled by the user SYSTEM.
No problem for our direct release queue’s but our FollowMe printer doesn’t recognize the user SYSTEM and drops the job.
Great document. two importance notices:
1. to install nuget with succes i had to add other nuget packages (find via internet link)
Register-PackageSource -Name nuget.org -ProviderName NuGet -Location https://www.nuget.org/api/v2/ -Trusted -Force
I’ve followed the article and I’m able to install the printer on my Intune managed device. The ECP printer does make a file on the server as expected but when I publish a printer with an IP address, the job disappears. It DOES appear in the logfile but it doesn’t come out of the printer. The eventlog is empy also
When I print a testpage from the server, it does work.. What am I missing here?
thank you very much for the instructions. It seems like the information in the Microsoft article are quiet dated. Since App registration legacy is deprecated and will be removed soon it would be nice if someone could get an “up-to-date” version of the deployment guide.
Anyone already upgraded to Windows 10 1903 ?
We had Hybrid Cloud Printing working via Intune but since the upgrade to Windows 10 1903, the option to search for cloud printers has been lost in the printers and scanners option.
Anyone having trouble publishing? When i try to publish i get an HTML document in the output followed by a success message but no printers seem to be published. The output is extensive but i’m adding the first few lines to this comment. If anyone has any insight i would be greatly appreciative.
OK this is because you try to Setup the whole Thing with Azure AD Preauthentication but I have the Feeling that this is currently not working. The author of the article also stated in one of her comments above that she was unable to Setup the whole Thing with Azure AD Preauthentication (neither was I). With preauthentication I am able to publish a Printer.
Hello. A little late to this party. Have setup this 4 times now and still not able to get this working. When attempting to publish a printer, I receive the following. Please help.
I am getting same error too. I created my on-prim domain that is unverified on the Azure AD directory in the custom domain. Will this has something to do with it?
Hello Chris, i have exactly the same error, did you manage to fix this?
I’ve been stuck on locating the MopriaSQLiteDb.sql file. It hasn’t downloaded with any of the packages. I have searched the nuget and SQLite3 sites and haven’t found the file. Where can I find the file?
That file is not from nuget or SQLite3 package, it is installed with PublishCloudPrinter module, the file should be found in C:\inetpub\wwwroot\MopriaCloudService\Database
+1 for this guy… Http is the way to go, its also the URL that is in the Registry on the Hybrid Cloud Print Server @ HKEY_LOCAL_MACHINE\SOFTWARE\Microsoft\Windows\CurrentVersion\CloudPrint\MopriaDiscoveryService\AzureAudience
Do you have any idea whether Microsoft will update Hybrid Cloud Print with new features? Features like change color or black&white, select a Tray to print and see the preferences of the Cloud Printer that you service? I think it’s very much work to setup for so little you get for it.
I got 1 question, Why is azure ad connect required? if you put server in the domain then it should sync the users am i right? i got 2 DC’s + azure ad connect and i thought that i could add additional servers without the AD role installed and without azure ad connect.
Has it something to do with the AAD and the hybrid cloud print server syncing?
I am getting same error too. I created my on-prim domain that is unverified on the Azure AD directory in the custom domain. Will this has something to do with it?
Thank you Sandy, this is probably the most through guide I’ve seen, however the process is still so complex and leaves a lot of room for “simplification” and I’m working on one but wanted to share how I’ve made the download of the SQLITE tools and creation of the database easier!
#How to run in Powershell – Start-Process
#https://docs.microsoft.com/en-us/powershell/module/microsoft.powershell.management/start-process?view=powershell-6
Thank you Chris. Your script looks great. I will added comments in the post. I do hope they will have better cloud print solution than this one, indeed the process is too complex still.
After another few weeks of work I’ve been able to script everything up to the Intune policy and actual printer creation. The only problem is, figuring out the Powershell to script in the AppIds of the Endpoints and publishing them in the Native App. Hope you enjoy https://github.com/thetootall/adscripts/blob/master/BuildHybridPrint.ps1
Thank you Chris for posting this! I quickly look your script, you have done so good job on this! Not sure if when I can test this, but will let you know.
Regards, Sandy
Chris, I would like to give you a shout out in Twitter, but I couldn’t find your twitter alias, are you on Twitter?
Never mind. I found you Chris. 😀
HI Zheng, Thanks so much for the excellent docu! I am able to publish a printer in the print server but unable to do in a Windows 10 machine. I am very novice Sys Ad so I would like to check with you if you know possible cause?
Error:
Invoke-RestMethod : Unable to connect to the remote server
At C:\Program Files\WindowsPowerShell\Modules\PublishCloudPrinter\1.0.0.0\PublishCloudPrinter.psm1:125 char:5
+ Invoke-RestMethod -Uri $PublishUrl -Method $HttpMethod -ContentTy …
+ ~~~~~~~~~~~~~~~~~~~~~~~~~~~~~~~~~~~~~~~~~~~~~~~~~~~~~~~~~~~~~~~~~
+ CategoryInfo : NotSpecified: (:) [Invoke-RestMethod], WebException
+ FullyQualifiedErrorId : System.Net.WebException,Microsoft.PowerShell.Commands.InvokeRestMethodCommand
Sadly, not yet. I am thinking it might be related to Certificates but I am not sure how to fix or check.
Fixed it.. I followed the MS documentation. The documentation says “./Vendor/MSFT/Policy/Config/EnterpriseCloudPrint/CloudPrintOAuthAuthority” but I added “./User/Vendor/MSFT/Policy/Config/EnterpriseCloudPrint/CloudPrintOAuthAuthority” and the settings are now succesfully deployed.
That’s good, but you can also use the UI to configure those settings as in my post mentioned. Policy CSP works too, indeed those are user settings, you can actually submit a pull request Microsoft doc to fix those documentations. 🙂
I followed your post and I am able to publish a printer, to search for a cloud printer and print via a cloud printer but only for one user. If I log in with another user on the same laptop I cannot find the printer via “Search for cloud printers”.
This issue was fixed by entering the correct -Orglocation. I use the -Orglocation from the original MS documentation which is incorrect.
Hi there,
Great post it helped us a lot!
I followed your post and I am able to publish a printer, add a printer, search for a printer and print via the printer but only for one user…
When I logon with another user on the same AD joined laptop the option to search for cloud printers is not available. The cloudprint settings are in the register.
I tried to use the OMA-URI settings with Intune in Azure but I get this “-2016281112 – 0x87D1FDE8 – Remediation failed” error in Azure.
When I am attempting to publish a printer from an Azure AD joined Windows 10 device I receive this error:
Invoke-RestMethod : {“Message”:”An error has occurred.”}
At C:\Program Files\WindowsPowerShell\Modules\PublishCloudPrinter\1.0.0.0\PublishCloudPrinter.psm1:177 char:5
+ Invoke-RestMethod -Uri $url -Method Get -ContentType “application …
+ ~~~~~~~~~~~~~~~~~~~~~~~~~~~~~~~~~~~~~~~~~~~~~~~~~~~~~~~~~~~~~~~~~
+ CategoryInfo : InvalidOperation: (System.Net.HttpWebRequest:HttpWebRequest) [Invoke-RestMethod], WebException
+ FullyQualifiedErrorId : WebCmdletWebResponseException,Microsoft.PowerShell.Commands.InvokeRestMethodCommand
Have you heard of anybody that has seen this issue be able to fix it?
Hello Colton, glad you found your issues, can you give us a bit more details of this? Can be very useful for others. thanks. 🙂
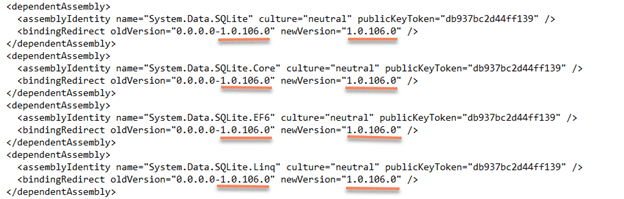
At step 4.4 when updating the C:\inetpub\wwwroot\MopriaCloudService\web.config file, if your System.Data.SQLite and System.Data.SQLite.Core are different versions than your System.Data.SQLite.EF6 and System.Data.SQLite.Linq they should all have the same version number behind oldVersion and newVersion. For example System.Data.SQLite and System.Data.SQLite.Core were 1.0.109.2 while System.Data.SQLite.EF6 and System.Data.SQLite.Linq were 1.0.109.0, so behind oldVersion and newVersion put 1.0.109.0 for all four.
I don’t know, haven’t find time to test server 2019 yet, but maybe it support hybrid cloud print better than server 2016. Perhaps can get more official information if ask in Microsoft doc. 🙂
Great post on Cloud Printing. I did hit a error when deploying the printers to Azure and I was wondering if you have scene this error before.
publish-cloudprinter : Exception calling “RetrieveOAuthToken” with “3” argument(s): “System.AggregateException: One or
more errors occurred. —> System.Exception: Error requesting OAuth token. WebTokenRequestStatus:
UserInteractionRequired, error: 3400073247, message: Integrated Windows authentication supported only in federation
flow.
at CloudPublishHelpers.d__0.MoveNext()
— End of inner exception stack trace —
at System.Threading.Tasks.Task`1.GetResultCore(Boolean waitCompletionNotification)
at CloudPublishHelpers.RetrieveOAuthToken(String resourceId, String clientId, String azureTenantGuid)
—> (Inner Exception #0) System.Exception: Error requesting OAuth token. WebTokenRequestStatus:
UserInteractionRequired, error: 3400073247, message: Integrated Windows authentication supported only in federation
flow.
at CloudPublishHelpers.d__0.MoveNext()<—
"
At line:1 char:1
+ publish-cloudprinter -printer "Admin Printer" -Manufacturer "Dell" -M …
+ ~~~~~~~~~~~~~~~~~~~~~~~~~~~~~~~~~~~~~~~~~~~~~~~~~~~~~~~~~~~~~~~~~~~~~
+ CategoryInfo : NotSpecified: (:) [Publish-CloudPrinter], MethodInvocationException
+ FullyQualifiedErrorId : Exception,Publish-CloudPrinter
When i publish the printer, it says, published and i can see the verbose like what you had here. However, the only difference is that before the verbose message, it shows some html scripts, pretty lengthy.
Then, when I browse to the discoveryProxy web link, it asked me to sign in, then instead of downloading the json file, it is opened on the browser showing its content.
Basing this from what you have above, something is wrong on my config.
Hello Eric, did you get it working? It’s properly depends on your browser settings, it might just show the contents of json in browser or download it as json file. If you search a cloud printer, can you see anything? Martin mentioned in earlier comments, that “SW_DVD9_Win_Server_STD_CORE_2016_64Bit_English_-4_DC_STD_MLF_X21-70526.iso” works with hybrid cloud print without issue. I don’t know if your issue related to the server version or something else. If this is a test lab, maybe can try server 2019. I am planning to set up my cloud print server again when I have more time on this.
Hi Eric, did you got this working OK. I seem to have the same issue. Loads of HTML code before the verbose that the printer is published. However, I do not see the printer anywhere so something is not right.
Within the HTML code, I do see some lines with “Sign in to your account” so I assume it is asking me to sign in while I did deactivated MFA completely.
I was able to publish the printer with a verbose response on a AAD joined Win10 machine. I can’t however see it in “search for cloud printers”. Any suggestions?
Hello, Charlie. Very difficult to say. When you click search for cloud printers, did you see it try to search from your discovery endpoint address? If you open you discovery endpoint in browser, what do you see?
did you successfully publish your printer? use process monitor or network monitor capture the traffic when you click on search cloud printers, see if it try communicate with your cloud print client app. Can you check if you can open you DiscoveryProxy web link in Azure AD joined machines? It should be able to download a json file when open discoveryProxy web link.
Got this working but print quality leaves a lot to be desired. Pages come out at a fraction of their size. For example, the Windows Printer Test Page only fills up the top quarter of the page. Driver used is “Microsoft Enterprise Cloud Print Class Driver”. The printer is an HP E87650. Print driver on the on-premises server is the HP87650 PCL 6 driver. Am I missing something?
Hello, I have only tested in my old Samsung ML-331x printer, it prints standard quality of black and white documents. I don’t think you missing anything, unfortunately I don’t have more information about this, not sure if Server 2019 will bring any new feature on this, didn’t have time follow those Ignite session yet.
Hi All,
I fixed the DISM Error 87 by removing all WSUS Settings:
HKEY_LOCAL_MACHINE\Software\Policies\Microsoft\Windows\WindowsUpdate
Thanks Sandy for this great article !
Michael
Hi Sandy,
Thank you for the extensive breakdown of this feature. I have followed it to the letter and works as expected.
It took me some time to find the right Windows Image to get the capabilities downloadable. But I managed to get it going with the latest ISO image from Microsoft. For other people searching for it:
SW_DVD9_Win_Server_STD_CORE_2016_64Bit_English_-4_DC_STD_MLF_X21-70526.iso is doing the trick.
As the procedure is quite complex and very hard to maintain I still hope Microsoft will come up with an easier way of having on-prem print queue’s published for cloud users..
The future will learn, thanks again.
Martin
HTTP Error 401.2 – Unauthorized
You are not authorized to view this page due to invalid authentication headers.
Most likely causes:
No authentication protocol (including anonymous) is selected in IIS. Only integrated authentication is enabled, and a client browser was used that does not
support integrated authentication. Integrated authentication is enabled and the request was sent through a proxy that changed the authentication headers before
they reach the Web server. The Web server is not configured for anonymous access and a required authorization header was not received. The
“configuration/system.webServer/authorization” configuration section may be explicitly denying the user access.
Enabled anonymous for testing purposes on IIS and then got error:
Invoke-RestMethod : {“Message”:”Authorization has been denied for this request.”}
At C:\Program Files\WindowsPowerShell\Modules\PublishCloudPrinter\1.0.0.0\PublishCloudPrinter.psm1:125 char:5
+ Invoke-RestMethod -Uri $PublishUrl -Method $HttpMethod -ContentTy …
+ ~~~~~~~~~~~~~~~~~~~~~~~~~~~~~~~~~~~~~~~~~~~~~~~~~~~~~~~~~~~~~~~~~
+ CategoryInfo : InvalidOperation: (System.Net.HttpWebRequest:HttpWebRequest) [Invoke-RestMethod], WebException
+ FullyQualifiedErrorId : WebCmdletWebResponseException,Microsoft.PowerShell.Commands.InvokeRestMethodCommand
Any ideas? What permissions am I missing. I’m using a admin account in the on-prem domain that has also been granted permission to the PrintProxy Enterprise app.
Are you running the script in a Azure AD joined Windows 10? There are many places need to granted permissions, there are totally three enterprise apps.
I’ve tried to set this up using your instructions, but like some of the other posts, the directories are never created under wwwroot
i.e: C:\inetpub\wwwroot\MopriaCloudService\
the only output folder I can see from the install process is C:\ECPTestOutput and the ECP + MCS entries in IIS (though exploring the folders gives the error: “the system cannot find the file specified”
Has anyone had issues publishing the printers and getting OAuth errors ? I am getting the below error everytime I try to publish a printer from an Azure Joined machine, I also tried from the Print Server (got a different error but OAuth related)…
Publish-CloudPrinter : Exception calling “RetrieveOAuthToken” with “3” argument(s): “System.AggregateException: One or more errors occurred. —> System.Exception: A specified logon session does not exist. It may already have been terminated. (Exception
from HRESULT: 0x80070520)
.
.
at CloudPublishHelpers.RetrieveOAuthToken(String resourceId, String clientId, String azureTenantGuid)
—> (Inner Exception #0) System.Exception: A specified logon session does not exist. It may already have been terminated. (Exception from HRESULT: 0x80070520)
Tried everything you suggested, also changed the sddl ofcourse and disabled MFA on this account, no luck yet. Today I should have a screensharing session with Microsoft to troubleshoot it.
I will keep you posted.
very strange indeed.
I tried your publish command and changed the endpoints and clientid and tenantguid and get the same error message.
it is on a Windows 10 which is aad joined with the correct user.
going to try on another w10 now.
the native client app is the only one i have besides my 2 web apps and the ID is the Application ID, not the object id, right?
Hi, you need to change -Sddl value as well. The account you are using, is it a service account? I saw in your log that it trying to login, and there is something about reset password. So don’t enforce that account with MFA or reset password or anything, just a service account what have printer admin rights.
I understand this is complicate, I have tried it so many times myself, and reinstall my servers again. If this is your test lab, you can try set up one more server and see what is the result. 🙂
For your privacy, I don’t approve your comments that has your personal information, includes your email address.
We followed your post. We are happy to be able to publish our printer. Clients are able to browse with the “search for cloudprinter” and successfully install the published printer.
But when trying to print from a application or sending a test page, a non-descriptive error occurs: Error Printing 🙁 Nothing useable in de eventlog
Any suggestions anyone, please?
Hello Tanya, Sorry didn’t reply earlier, seems I missed your comments. Did you get it working? Do you see anything in printer server IIS log? I have not seen this issue before.
I followed your post and am able to publish a printer but my clients are not able to find that printer. Have been through your post and the MS post a few times and can´t seem to find any problems with my setup.
Hey, First of all, great post!
Like my co-posters say, better then Microsoft’s article.
@Michael i’m having the same issue, did you get it solved?
Problem is that it gives me the “Verbose: Published EcpPrinterTest … “-output, however there is a lot of javascript output before it gives this message.
so it looks like it has been published, but it didn’t. the DB is still empty (verified with DB Browser for SQLite).
and offcourse the printer doesn’t show up on the clients.. which makes scense..
@Michael: When you click search for cloud printers, can you see from where it is trying to get printers? User process monitor any tool that can catch the process or network traffic. If you run query printer, can you see your published printer? If you try put your client in internal network, does it work?
@Tom: If it gave you error message when publish your printer, it is not published. Can you read the verbose message again or upload that somewhere share me a link?
Sorry, it is quite difficult trying to guess what went wrong remotely, there are so many steps and details in this setup.
@Tom: I checked your log. You are using depth 4 and 5.
Try don’t change the category name, make it same as the sample in Microsoft doc.
So like this:
{“category”:”floor\_number”, “vn”:1, “depth”:4}, {“category”:”room\_name”, “vs”:”1111″, “depth”:5}]}
I am not sure if the vn is typo or not, I haven’t test that, other category are using vs.
If that doesn’t work, try this one:
{“category”:”floor\_number”, “vs”:”1″, “depth”:4}, {“category”:”room\_name”, “vs”:”1111″, “depth”:5}]}
Remember check the double quote format when doing copy paste.
I will test again tomorrow if I have time.
Hey goodmorning, thx for pointing out to these mistakes.
I’ve changed them (the vn to vs) and the category names also.
even tried with replacing every double quote by a new one.. it keeps giving me first the javascript output before giving me the message that it has published it.. however still not published in my opinion.
Just tested and still works for me. I am using this:
In your log, I saw some resetpassword link, very strange. Can you check again you are using correct native client apps, and you are publishing the printer in Azure AD joined Windows 10 machine?
Hello, did you get it working? This issue usually cause by print discovery endpoint external address is not correctly set in registry, or typo. Please those 3 application you created in Azure that configuration are correct, no typo.
Ok, so I got passed the issue with not being able to find the path. When I added the server to the domain, it removed the optional features, so couldn’t install the binaries properly. However, I am trying to publish a printer but just getting a run time error at my */mcs application.
Did you manage to sort this issue? I’m stuck with /mcs error and can’t publish printers.
Seems there is an issue with Printing Preferences, suspecting that it is Microsoft enterprise cloud print class driver. So from Windows 10 can’t change color or black&white, or select a Tray to print..
Finally, worked, used new server actually 🙂 Would be great if Azure Authentication can be checked too. Did try use Microsoft Article, but it fail as they seems has some issue in documentation.
Anyone know why the directory for ECP and MCS never gets created when running CloudPrintDeploy.ps1, I’m unable to proceed with deployment steps. I’ve tried on a fresh install of Server 2016 with same results. Any ideas?
Could not find a part of the path
‘C:\inetpub\wwwroot\EnterpriseCloudPrint’
‘C:\inetpub\wwwroot\MopriaCloudService’
Same with the underlying web.config…
Did anyone find a resolution to this? I have exactly the same issue – the applications are created in IIS, but the folder structure and supporting files are not. I don’t know how to progress without these?!?
Hello,
Does it help if you run the these commands (open cmd or powershell as administrator, then run those commands)
Thanks for the reply. I’ve tried the remove and add steps you mentioned above, this returns:
“Error: 87
No Windows features were specified on the command line.
Use the /Get-Features option to find the name of the feature in the image and try the command again.
The DISM log file can be found at C:\Windows\Logs\DISM\dism.log.
They don’t appear to be “features” within Windows Server 2016 that I can install / update / use.
The server is a brand new install of 2016 Standard edition, is patched up to latest release and has the print server role installed.
I saws some bug report in https://github.com/MicrosoftDocs/windowsserverdocs/issues/505, one comment is need to make use using Server 2016 RTM, not preview. I am not sure if this makes any different, I have all my servers default installed .net framework 3.5, can you try install that also? Or then maybe need to download a server 2016 installation media and try again.
Hi,
One of your print screens of has “Azure authentication” one has “pass-through”.
In this article: “https://docs.microsoft.com/en-us/windows-server/administration/hybrid-cloud-print/hybrid-cloud-print-deploy” it stay code as “ms-appx-web://Microsoft.AAD.BrokerPlugin/S-1-15-2-3784861210-599250757-1266852909-3189164077-45880155-1246692841-283550366” but in yours it is ending with digit 7. Like why all that differences?
Any chance you tested in pre-auth mode? The ms docs seem to indicate it works but in past testing it did not (windows enumeration didn’t handle it). Before I try all the steps to make it work wanted to see if you had tried that
Great blog by the way!
hello Jeff, thanks! I have tried pre-auth mode many times, but I didn’t get it work.
I love how you added “Printer” to the requirements! LOL
Superb blog although I haven’t tested this scenario but quite often you get question from customer around printing on premises on an Azure AD joined W10 machine…
Intune App Factory was originally developed and instructions for how to set it up were written when Azure DevOps didn’t support Managed Identities or Workload identity federation. However, recently, users of...
Recently there have been concerns raised around Autopilot methods being used to side step security measures, and even leave organisations vulnerable to rogue onboarding of devices with no security sanity check measures...
Are you looking to cut mailbox licensing costs for your Office 365 tenants admin mail accounts? Well, look no further, and I will share a few ways for you to save money on Exchange Online licensing fees for your admin...


Dear Sandy,
Thank you for the guide.
I am facing some issues on Step 11 to find the printer. I am using the default Test Printer “EcpPrintTest”. Manage to publish the device successfully but I am unable to find the printer.
Will you or anyone have any ideas or face the same issues and managed to resolve it?
Hi Sandy,
I have followed the guide till Step 10 successfully. Alot better than Microsoft guide which create more errors.
The only issues I face now is I am at Step 11 and I am able to publish the default “EcpPrintTest” but I couldn’t find the cloud printer on my pc
I wonder how do i get proper location for printer? It seems like error message that publish-cloudprinter is location related(or is it?)
Invoke-RestMethod : {“version”:”1.0″,”service_name”:”MopriaCloudService”,”code”:”err_invalid_format”,”http_code”:400,”description”:”Invalid property identifier character: “. Path
‘devices_to_publish[0].device.locations[0]’, line 14, position 32.”}
At C:\Program Files\WindowsPowerShell\Modules\PublishCloudPrinter\1.0.0.0\PublishCloudPrinter.psm1:125 char:5
Hello,
Very good article indeed.
I have everything setup and when I publish my printer I have a success.
But when I try to find my printer I can’t see it.
Is there any location where can I find my printer publishing (like a log or eventviewer)
Thank You
anybody have a suggestion to this problem
I followed step by step the guide and managed to work until the publish of the printer. When I try to run the below command to publish the printer:
Publish-CloudPrinter -Printer “EcpPrintTest” -Manufacturer “Microsoft” -Model “FilePrintEcp” -OrgLocation ‘{“attrs”: [{“category”:”country”, “vs”:”USA”, “depth”:0}, {“category”:”organization”, “vs”:”MyCompany”, “depth”:1}, {“category”:”site”, “vs”:”MyCity, State”, “depth”:2}, {“category”:”building”, “vs”:”Building 1″, “depth”:3}, {“category”:”floor_name”, “vs”:1, “depth”:4}, {“category”:”room_name”, “vs”:”1111″, “depth”:5}]}’ -Sddl “G:SYD:(A;;LCSWSDRCWDWO;;;S-1-5-21-1851353556-2084108129-372898645-25425)(A;OIIO;RPWPSDRCWDWO;;;S-1-5-21-1851353556-2084108129-372898645-25425)(A;OIIO;GA;;;CO)(A;OIIO;GA;;;AC)(A;;SWRC;;;WD)(A;CIIO;GX;;;WD)(A;;SWRC;;;AC)(A;CIIO;GX;;;AC)(A;;LCSWDTSDRCWDWO;;;BA)(A;OICIIO;GA;;;BA)(A;OIIO;GA;;;S-1-15-3-1024-4044835139-2658482041-3127973164-329287231-3865880861-1938685643-461067658-1087000422)(A;;SWRC;;;S-1-15-3-1024-4044835139-2658482041-3127973164-329287231-3865880861-1938685643-461067658-1087000422)(A;CIIO;GX;;;S-1-15-3-1024-4044835139-2658482041-3127973164-329287231-3865880861-1938685643-461067658-1087000422)” -DiscoveryEndpoint “https://mopriadiscoveryproxy-xxxxx.msappproxy.net/mcs/” -PrintServerEndpoint “https://enterprisecloudprint-xxxx.msappproxy.net/ecp/” -AzureClientId “xxxxxxxxxxxxxxxxxxx” -AzureTenantGuid “xxxxxxxxxxxxxxx”
I get the below error:
Publish-CloudPrinter : Exception calling “RetrieveOAuthToken” with “3” argument(s): “System.AggregateException: One or more errors occurred. —> System.Exception: Error requesting OAuth token. WebTokenRequestStatus: UserInteractionRequired, error: 3399614476, message: AADSTS50076: Due to a configuration change made by your administrator, or because you moved to a new location, you must use multi-factor authentication to access ‘http://MopriaDiscoveryService/CloudPrint’. Trace ID: f9b031b1-2bae-45d0-bb28-d967ebe44700 Correlation ID: f9e6a2b2-20a6-454d-b031-543bb5379bc4 Timestamp: 2020-01-31 08:03:00Z at CloudPublishHelpers.d_0.MoveNext() — End of inner exception stack trace — at System.Threading.Tasks.Task.ThrowIfExceptional(Boolean includeTaskCanceledExceptions) at System.Threading.Tasks.Task`1.GetResultCore(Boolean waitCompletionNotification) at System.Threading.Tasks.Task`1.get_Result() at CloudPublishHelpers.RetrieveOAuthToken(String resourceId, String clientId, String azureTenantGuid) —> (Inner Exception #0) System.Exception: Error requesting OAuth token. WebTokenRequestStatus: UserInteractionRequired, error: 3399614476, message: AADSTS50076: Due to a configuration change made by your administrator, or because you moved to a new location, you must use multi-factor authentication to access ‘http://MopriaDiscoveryService/CloudPrint’. Trace ID: f9b031b1-2bae-45d0-bb28-d967ebe44700 Correlation ID: f9e6a2b2-20a6-454d-b031-543bb5379bc4 Timestamp: 2020-01-31 08:03:00Z at CloudPublishHelpers.d_0.MoveNext()<— " At line:1 char:1 + Publish-CloudPrinter -Printer "EcpPrintTest" -Manufacturer "Microsoft … + ~~~~~~~~~~~~~~~~~~~~~~~~~~~~~~~~~~~~~~~~~~~~~~~~~~~~~~~~~~~~~~~~~~~~~ + CategoryInfo : NotSpecified: (:) [Publish-CloudPrinter], MethodInvocationException + FullyQualifiedErrorId : Exception,Publish-CloudPrinter
I have MFA enabled so I tried to connect to Azure through the powershell so I can login with mfa but still I keep getting the same error. If MFA supported for this feature or can it give issues? Is there a work around this?
I would suggest you make a comment in Microsoft doc page or create an issue in their GitHub, request them modified the script to support MFA. Or if you can use a credential that doesn’t enforced MFA. It might be possible just modify the script by ourselves, but I haven’t look into that.
so i am trying this and i get to the part where i have to install sqlite but powershell gives a error seems the link to get it doesnt work any more any other way of getting this to work
Hi
I received a lot of OAuth errors when trying to use Active directory authentication, instead of pass through on the proxy settings. I switched back to pass through and rebuilt the print server, do not change any of the IIS settings, anonymous must be off and that is the default after using the .\CloudPrintDeploy.ps1 script.
I used a corporate CA cert on the IIS server, I used the external URI s in the proxy settings ending in msappproxy.net/ecp/ and msappproxy.net/MCS/ so I did not need to import or use certs anywhere except in the bindings on IIS of the print serer.
Great blog, Followed and got the printers discovered and installed
But was getting printing error – Diagnosed using fiddler “Request Entity is too large”
Fix for me was using IIS Manager
Select Default Web Site
Select Configuration Editor
Within Section Dropdown, select “system.webServer/serverRuntime”
Enter a higher value for “uploadReadAheadSize” such as 1048576 bytes. Default is 49152 byte
Hi,
Got everything working using this guide, but now my jobs get spooled twice. First time by the user who sends the job, second time it get spooled by the user SYSTEM.
No problem for our direct release queue’s but our FollowMe printer doesn’t recognize the user SYSTEM and drops the job.
Got a solution for this ??
Fixed. It was driver related!
Getting same error as you Nicolas.
Install-Package : Dependency loop detected for package ‘System.Data.SQLite’.
Download the packages manualy, unzip them with 7zip and place them in the c:\Program Files\PackageManagement\NuGet\Packages folder
I had the dependency problem
I used https://dist.nuget.org/win-x86-commandline/latest/nuget.exe to install dependent modules into C:\Program Files\PackageManagement\NuGet\Packages. Then copied the DLLs into the website
Great document. two importance notices:
1. to install nuget with succes i had to add other nuget packages (find via internet link)
Register-PackageSource -Name nuget.org -ProviderName NuGet -Location https://www.nuget.org/api/v2/ -Trusted -Force
install-package system.diagnostics.diagnosticsource -requiredversion 4.5.1 -provider nuget
install-package system.net.http -provider nuget
install-package system.diagnostics.diagnosticsource -provider nuget
Install-Package system.data.sqlite -providername NuGet
2. issue with dism. when using server with sccm/wsus for patching
Error 87 find , gpo solved my issue:
http://memphistech.net/journey-in-hybrid-cloud-print/
Hello,
When i execute : Install-Package system.data.sqlite -providername nuget, i got this error :
Install-Package : Dependency loop detected for package ‘System.Data.SQLite’.
At line:1 char:1
+ Install-Package system.data.sqlite -providername nuget
+ ~~~~~~~~~~~~~~~~~~~~~~~~~~~~~~~~~~~~~~~~~~~~~~~~~~~~~~
+ CategoryInfo : Deadlock detected: (System.Data.SQLite:String) [Install-Package], Exception
+ FullyQualifiedErrorId : DependencyLoopDetected,Microsoft.PowerShell.PackageManagement.Cmdlets.InstallPackage
Can anyone please help
Nicolas
You need to install this package first with the following version:
Install-Package System.Diagnostics.DiagnosticSource -RequiredVersion 4.5.1 -Provider nuget
https://github.com/dotnet/corefx/issues/41532
Hi Nicolas, any update of this? i get the same error.
Download the packages manualy, unzip them with 7zip and place them in the c:\Program Files\PackageManagement\NuGet\Packages folder
Worked for me!
Hello Zeng, Do you know if it is possible to add more than 1 Print Server?
I am not sure, haven’t try that, but I will ask around see if I can get some answers.
Such a great post ……..Thanks for this info its very helpful…………
I’ve followed the article and I’m able to install the printer on my Intune managed device. The ECP printer does make a file on the server as expected but when I publish a printer with an IP address, the job disappears. It DOES appear in the logfile but it doesn’t come out of the printer. The eventlog is empy also
When I print a testpage from the server, it does work.. What am I missing here?
Never mind, I figured it out.. I was using the wrong printer driver.. Replaced that one and it all works like clockwork! 🙂
Hi Sandy,
I got this error message after trying to publish printer on the Window 10 azure joined machine. I would like your expertise on this. Thank you 🙂
Publish-CloudPrinter : Exception calling “RetrieveOAuthToken” with “3” argument(s): “System.AggregateException: One or more errors occurred. —> System.Exception: Error
requesting OAuth token. WebTokenRequestStatus: ProviderError, error: 3399614473, message: AADSTS7000218: The request body must contain the following parameter:
‘client_assertion’ or ‘client_secret’.
Trace ID: 266b91c5-c2b1-4a85-bdb8-b0f39ab24400
Correlation ID: e6e4925f-d20d-4c26-aa07-e4444a0068f6
Timestamp: 2019-08-22 20:01:44Z
at CloudPublishHelpers.d__0.MoveNext()
— End of inner exception stack trace —
at System.Threading.Tasks.Task`1.GetResultCore(Boolean waitCompletionNotification)
at CloudPublishHelpers.RetrieveOAuthToken(String resourceId, String clientId, String azureTenantGuid)
—> (Inner Exception #0) System.Exception: Error requesting OAuth token. WebTokenRequestStatus: ProviderError, error: 3399614473, message: AADSTS7000218: The request body
must contain the following parameter: ‘client_assertion’ or ‘client_secret’.
Trace ID: 266b91c5-c2b1-4a85-bdb8-b0f39ab24400
Correlation ID: e6e4925f-d20d-4c26-aa07-e4444a0068f6
Timestamp: 2019-08-22 20:01:44Z
at CloudPublishHelpers.d__0.MoveNext()<—
"
At line:2 char:1
+ Publish-CloudPrinter -Printer EcpPrintTest -Manufacturer Microsoft -M …
+ ~~~~~~~~~~~~~~~~~~~~~~~~~~~~~~~~~~~~~~~~~~~~~~~~~~~~~~~~~~~~~~~~~~~~~
+ CategoryInfo : NotSpecified: (:) [Publish-CloudPrinter], MethodInvocationException
+ FullyQualifiedErrorId : Exception,Publish-CloudPrinter
I am not sure what went wrong, can you double check your AzureClientId, if it is correct using the native app id?
Hey
thank you very much for the instructions. It seems like the information in the Microsoft article are quiet dated. Since App registration legacy is deprecated and will be removed soon it would be nice if someone could get an “up-to-date” version of the deployment guide.
Hi all,
Anyone already upgraded to Windows 10 1903 ?
We had Hybrid Cloud Printing working via Intune but since the upgrade to Windows 10 1903, the option to search for cloud printers has been lost in the printers and scanners option.
Anyone else have this issue ?
Erik
Hi Erik, Did you resolve the missing “Search for cloud printers” in 1903
If you search for printers Windows 1903 is automatically searching for Cloud Printers (No need for the link anymore)
thanks Hauke for helping out! I haven’t got time test this again still.
Regards,
Sandy
Thank you for the guidance..
Anyone having trouble publishing? When i try to publish i get an HTML document in the output followed by a success message but no printers seem to be published. The output is extensive but i’m adding the first few lines to this comment. If anyone has any insight i would be greatly appreciative.
Sign in to your account
I have the same issue but not able to resolve it yet. Starting over now.
OK this is because you try to Setup the whole Thing with Azure AD Preauthentication but I have the Feeling that this is currently not working. The author of the article also stated in one of her comments above that she was unable to Setup the whole Thing with Azure AD Preauthentication (neither was I). With preauthentication I am able to publish a Printer.
Allright. Copied the -OrgLocation from this guide, adjusted for our Org and works fine now. Why is MS docs incorrect?
Hello. A little late to this party. Have setup this 4 times now and still not able to get this working. When attempting to publish a printer, I receive the following. Please help.
PS C:\Program Files\WindowsPowerShell\Modules\PublishCloudPrinter\1.0.0.0> Publish-CloudPrinter -Printer “FO-COPIER” -Manufacturer “Xerox” -Model “7970” -OrgLocation `{“attrs”: [{“category”:”organization”, “vs”:”MARIST SCHOOL”, “depth”:0}, {“category”:”building”, “vs”:”Front Office”, “depth”:1}]}’ -Sddl “O:BAG:SYD:(A;;SWRC;;;WD)(A;CIIO;RC;;;AC)(A;OIIO;RPWPSDRCWDWO;;;AC)(A;;SWRC;;;AC)(A;CIIO;RC;;;CO)(A;OIIO;RPWPSDRCWDWO;;;CO)(A;;SWRC;;;S-1-5-21-3111921641-3320535562-1408452529-326603)(A;CIIO;RC;;;S-1-5-21-3111921641-3320535562-1408452529-326603)(A;OIIO;RPWPSDRCWDWO;;;S-1-5-21-3111921641-3320535562-1408452529-326603)(A;OIIO;RPWPSDRCWDWO;;;S-1-5-21-3111921641-3320535562-1408452529-22494)(A;;LCSWSDRCWDWO;;;S-1-5-21-3111921641-3320535562-1408452529-22494)(A;OIIO;RPWPSDRCWDWO;;;S-1-5-21-3111921641-3320535562-1408452529-326604)(A;;LCSWSDRCWDWO;;;S-1-5-21-3111921641-3320535562-1408452529-326604)(A;OIIO;RPWPSDRCWDWO;;;BA)(A;;LCSWSDRCWDWO;;;BA)” -DiscoveryEndpoint “https://printerdiscovery-maristcom.msappproxy.net/mcs/” -PrintServerEndpoint “https://printerproxyecp-maristcom.msappproxy.net/ecp/” -AzureClientId “ef397d20-9ade-4fc6-9e19-ce2501540dc4” -AzureTenantGuid “d1dcd510-546c-493f-9cb5-63719b2fb732”
Invoke-RestMethod : {“version”:”1.0″,”service_name”:”MopriaCloudService”,”code”:”err_invalid_format”,”http_code”:400,”description”:”Invalid property identifier character: “. Path ‘devices_to_publish[0].device.locations[0]’, line 14,
position 32.”}
At C:\Program Files\WindowsPowerShell\Modules\PublishCloudPrinter\1.0.0.0\PublishCloudPrinter.psm1:125 char:5
+ Invoke-RestMethod -Uri $PublishUrl -Method $HttpMethod -ContentTy …
+ ~~~~~~~~~~~~~~~~~~~~~~~~~~~~~~~~~~~~~~~~~~~~~~~~~~~~~~~~~~~~~~~~~
+ CategoryInfo : InvalidOperation: (System.Net.HttpWebRequest:HttpWebRequest) [Invoke-RestMethod], WebException
+ FullyQualifiedErrorId : WebCmdletWebResponseException,Microsoft.PowerShell.Commands.InvokeRestMethodCommand
PS C:\Program Files\WindowsPowerShell\Modules\PublishCloudPrinter\1.0.0.0>
I am also getting the same error..
PS C:\windows\system32> Publish-CloudPrinter -Printer “EcpPrintTest” -Manufacturer “Microsoft” -Model “FilePrinterEcp” -OrgLocation ‘{“attrs”: [{“category”:”country”, “vs”:”Finland”, “depth”:0}, {“category”:”organization”, “vs”:”SandyTestLab”, “depth”:1}, {“category”:”site”, “vs”:”Joensuu,FI”, “depth”:2}, {“category”:”building”, “vs”:”Home”, “depth”:3}]}’ -Sddl “O:BAG:SYD:(A;;LCSWSDRCWDWO;;;S-1-5-21-501278528-1731656756-2472999879-1114)(A;OIIO;RPWPSDRCWDWO;;;S-1-5-21-501278528-1731656756-2472999879-1114)(A;OIIO;GA;;;CO)(A;OIIO;GA;;;AC)(A;;SWRC;;;WD)(A;CIIO;GX;;;WD)(A;;SWRC;;;AC)(A;CIIO;GX;;;AC)(A;;LCSWDTSDRCWDWO;;;BA)(A;OICIIO;GA;;;BA)” -DiscoveryEndpoint “https://mopriadiscoveryproxy-michelindev.msappproxy.net/mcs/” -PrintServerEndpoint “https://enterprisecloudprintproxy-michelindev.msappproxy.net/ecp/” -AzureClientId “e175bc75-d26c-4b67-bf6c-4bf49619f33d” -AzureTenantGuid “85aac7a2-fd09-485f-b86e-bb2d5b0259e5”
Invoke-RestMethod : You don’t have permission to Publish.
At C:\Program Files\WindowsPowerShell\Modules\PublishCloudPrinter\1.0.0.0\PublishCloudPrinter.psm1:125 char:5
+ Invoke-RestMethod -Uri $PublishUrl -Method $HttpMethod -ContentTy …
+ ~~~~~~~~~~~~~~~~~~~~~~~~~~~~~~~~~~~~~~~~~~~~~~~~~~~~~~~~~~~~~~~~~
+ CategoryInfo : InvalidOperation: (System.Net.HttpWebRequest:HttpWebRequest) [Invoke-RestMethod], WebException
+ FullyQualifiedErrorId : WebCmdletWebResponseException,Microsoft.PowerShell.Commands.InvokeRestMethodCommand
Can anyone please help..
I am getting same error too. I created my on-prim domain that is unverified on the Azure AD directory in the custom domain. Will this has something to do with it?
Hello Chris, i have exactly the same error, did you manage to fix this?
I’ve been stuck on locating the MopriaSQLiteDb.sql file. It hasn’t downloaded with any of the packages. I have searched the nuget and SQLite3 sites and haven’t found the file. Where can I find the file?
That file is not from nuget or SQLite3 package, it is installed with PublishCloudPrinter module, the file should be found in C:\inetpub\wwwroot\MopriaCloudService\Database
Great guide. It worked great when testing it this week.
Only thing I noticed is that in the text it says https on https://MopriaDiscoveryService/CloudPrint
and https://MicrosoftEnterpriseCloudPrint/CloudPrint. I used https at first and it failed when trying to publish printers, after changing it to http it worked fine.
+1 for this guy… Http is the way to go, its also the URL that is in the Registry on the Hybrid Cloud Print Server @ HKEY_LOCAL_MACHINE\SOFTWARE\Microsoft\Windows\CurrentVersion\CloudPrint\MopriaDiscoveryService\AzureAudience
Thank you Christoffer! You are right, it should be http://MopriaDiscoveryService/CloudPrint http://MicrosoftEnterpriseCloudPrint/CloudPrint . All my screenshots are right, but I type it wrong in my post. It’s now fixed.
Hi Sandy,
Do you have any idea whether Microsoft will update Hybrid Cloud Print with new features? Features like change color or black&white, select a Tray to print and see the preferences of the Cloud Printer that you service? I think it’s very much work to setup for so little you get for it.
Hello Ben, Sorry I don’t have answer for this, don’t know. 🙂
I got 1 question, Why is azure ad connect required? if you put server in the domain then it should sync the users am i right? i got 2 DC’s + azure ad connect and i thought that i could add additional servers without the AD role installed and without azure ad connect.
Has it something to do with the AAD and the hybrid cloud print server syncing?
Hello, you don’t need setup extra Azure AD connect if you already have. This is only for if people haven’t setup anything sync users to the cloud.
Hi Zeng
Great post, one of the best I’ve seen! I am receiving the below error when trying to publish a printer. Any help would be appreciated.
Invoke-RestMethod : You don’t have permission to Publish.
At C:\Program Files\WindowsPowerShell\Modules\PublishCloudPrinter\1.0.0.0\PublishCloudPrinter.psm1:125 char:5
+ Invoke-RestMethod -Uri $PublishUrl -Method $HttpMethod -ContentTy …
+ ~~~~~~~~~~~~~~~~~~~~~~~~~~~~~~~~~~~~~~~~~~~~~~~~~~~~~~~~~~~~~~~~~
+ CategoryInfo : InvalidOperation: (System.Net.HttpWebRequest:HttpWebRequest) [Invoke-RestMetho
d], WebException
+ FullyQualifiedErrorId : WebCmdletWebResponseException,Microsoft.PowerShell.Commands.InvokeRestMethodCo
mmand
I am getting same error too. I created my on-prim domain that is unverified on the Azure AD directory in the custom domain. Will this has something to do with it?
Thank you Sandy, this is probably the most through guide I’ve seen, however the process is still so complex and leaves a lot of room for “simplification” and I’m working on one but wanted to share how I’ve made the download of the SQLITE tools and creation of the database easier!
#download the Management Tool
$temp = “C:\temp\download”
$extract = $temp + “\sqlite-tools”
$file = “sqlite-tools-win32-x86-3230000.zip”
$filepath = $temp + “\” + $file
New-Item -Path $temp -ItemType Directory -Verbose
$url = “https://www.sqlite.org/2018/sqlite-tools-win32-x86-3230000.zip” #download path for SQLLite Tools
Start-BitsTransfer -Source $url -Destination $temp
Expand-Archive -Path $filepath -DestinationPath $extract
cd “C:\inetpub\wwwroot\MopriaCloudService\Database”
$installer = “\sqlite3.exe”
$installpath = $extract + “\sqlite-tools-win32-x86-3230000” + $installer
#How to run in Powershell – Start-Process
#https://docs.microsoft.com/en-us/powershell/module/microsoft.powershell.management/start-process?view=powershell-6
$invokecmd = “cmd.exe /c $installpath MopriaDeviceDb.db ‘.read MopriaSQLiteDb.sql'”
Invoke-Expression $invokecmd
Thank you Chris. Your script looks great. I will added comments in the post. I do hope they will have better cloud print solution than this one, indeed the process is too complex still.
After another few weeks of work I’ve been able to script everything up to the Intune policy and actual printer creation. The only problem is, figuring out the Powershell to script in the AppIds of the Endpoints and publishing them in the Native App. Hope you enjoy
https://github.com/thetootall/adscripts/blob/master/BuildHybridPrint.ps1
Thank you Chris for posting this! I quickly look your script, you have done so good job on this! Not sure if when I can test this, but will let you know.
Regards, Sandy
Chris, I would like to give you a shout out in Twitter, but I couldn’t find your twitter alias, are you on Twitter?
Never mind. I found you Chris. 😀
HI Zheng, Thanks so much for the excellent docu! I am able to publish a printer in the print server but unable to do in a Windows 10 machine. I am very novice Sys Ad so I would like to check with you if you know possible cause?
Error:
Invoke-RestMethod : Unable to connect to the remote server
At C:\Program Files\WindowsPowerShell\Modules\PublishCloudPrinter\1.0.0.0\PublishCloudPrinter.psm1:125 char:5
+ Invoke-RestMethod -Uri $PublishUrl -Method $HttpMethod -ContentTy …
+ ~~~~~~~~~~~~~~~~~~~~~~~~~~~~~~~~~~~~~~~~~~~~~~~~~~~~~~~~~~~~~~~~~
+ CategoryInfo : NotSpecified: (:) [Invoke-RestMethod], WebException
+ FullyQualifiedErrorId : System.Net.WebException,Microsoft.PowerShell.Commands.InvokeRestMethodCommand
Hi Dee, did you have any luck resolving this issue?
Hi Greg,
Sadly, not yet. I am thinking it might be related to Certificates but I am not sure how to fix or check.
Fixed it.. I followed the MS documentation. The documentation says “./Vendor/MSFT/Policy/Config/EnterpriseCloudPrint/CloudPrintOAuthAuthority” but I added “./User/Vendor/MSFT/Policy/Config/EnterpriseCloudPrint/CloudPrintOAuthAuthority” and the settings are now succesfully deployed.
That’s good, but you can also use the UI to configure those settings as in my post mentioned. Policy CSP works too, indeed those are user settings, you can actually submit a pull request Microsoft doc to fix those documentations. 🙂
Hi there,
I followed your post and I am able to publish a printer, to search for a cloud printer and print via a cloud printer but only for one user. If I log in with another user on the same laptop I cannot find the printer via “Search for cloud printers”.
Has anyone the same issue?
Hi Kevin,
I followed this post which got me lot further then the original from MS. @Zeng, thanks for this nice post.
I am running into the same issue as you Kevin. Did you manage to fix this issue?
My error log:
Invoke-RestMethod :
{“version”:”1.0″,”service_name”:”MopriaCloudService”,”code”:”err_invalid_format”,”http_code”:400,”description”:”Bad JSON escape
sequence: \\_. Path ‘devices_to_publish[0].device.locations[0].attrs[4].category’, line 14, position 286.”}
At C:\Program Files\WindowsPowerShell\Modules\PublishCloudPrinter\1.0.0.0\PublishCloudPrinter.psm1:125 char:5
+ Invoke-RestMethod -Uri $PublishUrl -Method $HttpMethod -ContentTy …
+ ~~~~~~~~~~~~~~~~~~~~~~~~~~~~~~~~~~~~~~~~~~~~~~~~~~~~~~~~~~~~~~~~~
+ CategoryInfo : InvalidOperation: (System.Net.HttpWebRequest:HttpWebRequest) [Invoke-RestMethod], WebException
+ FullyQualifiedErrorId : WebCmdletWebResponseException,Microsoft.PowerShell.Commands.InvokeRestMethodCommand
All tips will be appreciated. I really want to see this working.
Btw. I am running it on Windows Server 2019
Thanks in advance
This issue was fixed by entering the correct -Orglocation. I use the -Orglocation from the original MS documentation which is incorrect.
Hi there,
Great post it helped us a lot!
I followed your post and I am able to publish a printer, add a printer, search for a printer and print via the printer but only for one user…
When I logon with another user on the same AD joined laptop the option to search for cloud printers is not available. The cloudprint settings are in the register.
I tried to use the OMA-URI settings with Intune in Azure but I get this “-2016281112 – 0x87D1FDE8 – Remediation failed” error in Azure.
Has anybody also ran in to this?
Hi there,
First of all great post, this is really helpful.
During the publishing of the printers i’m facing this error:
Invoke-RestMethod : {“version”:”1.0″,”service_name”:”MopriaCloudService”,”code”:”err_invalid_format”,”http_code”:400,”d
escription”:”Bad JSON escape sequence: \\_. Path ‘devices_to_publish[0].device.locations[0].attrs[4].category’, line 14
, position 274.”}
At C:\Program Files\WindowsPowerShell\Modules\PublishCloudPrinter\1.0.0.0\PublishCloudPrinter.psm1:125 char:5
+ Invoke-RestMethod -Uri $PublishUrl -Method $HttpMethod -ContentTy …
+ ~~~~~~~~~~~~~~~~~~~~~~~~~~~~~~~~~~~~~~~~~~~~~~~~~~~~~~~~~~~~~~~~~
+ CategoryInfo : InvalidOperation: (System.Net.HttpWebRequest:HttpWebRequest) [Invoke-RestMethod], WebExc
eption
+ FullyQualifiedErrorId : WebCmdletWebResponseException,Microsoft.PowerShell.Commands.InvokeRestMethodCommand
Has anybody also ran in to this? Any help or tips are highly appreciated.
Thank you
When I am attempting to publish a printer from an Azure AD joined Windows 10 device I receive this error:
Invoke-RestMethod : {“Message”:”An error has occurred.”}
At C:\Program Files\WindowsPowerShell\Modules\PublishCloudPrinter\1.0.0.0\PublishCloudPrinter.psm1:177 char:5
+ Invoke-RestMethod -Uri $url -Method Get -ContentType “application …
+ ~~~~~~~~~~~~~~~~~~~~~~~~~~~~~~~~~~~~~~~~~~~~~~~~~~~~~~~~~~~~~~~~~
+ CategoryInfo : InvalidOperation: (System.Net.HttpWebRequest:HttpWebRequest) [Invoke-RestMethod], WebException
+ FullyQualifiedErrorId : WebCmdletWebResponseException,Microsoft.PowerShell.Commands.InvokeRestMethodCommand
Have you heard of anybody that has seen this issue be able to fix it?
I have found the issue with my problem. It is the version on the Web.config, be sure to double check the web.config file.
Hello Colton, glad you found your issues, can you give us a bit more details of this? Can be very useful for others. thanks. 🙂
At step 4.4 when updating the C:\inetpub\wwwroot\MopriaCloudService\web.config file, if your System.Data.SQLite and System.Data.SQLite.Core are different versions than your System.Data.SQLite.EF6 and System.Data.SQLite.Linq they should all have the same version number behind oldVersion and newVersion. For example System.Data.SQLite and System.Data.SQLite.Core were 1.0.109.2 while System.Data.SQLite.EF6 and System.Data.SQLite.Linq were 1.0.109.0, so behind oldVersion and newVersion put 1.0.109.0 for all four.
Please see my screenshots to the answer here: https://techcommunity.microsoft.com/t5/Azure-Active-Directory/Azure-Hybrid-Cloud-Print/m-p/291319#M2314
Is this a new feature in Windows server 2019. I did not find any information about Hybrid Cloud Print and Windows server 2019.
I don’t know, haven’t find time to test server 2019 yet, but maybe it support hybrid cloud print better than server 2016. Perhaps can get more official information if ask in Microsoft doc. 🙂
Regards, Sandy
Hey Sandy,
Great post on Cloud Printing. I did hit a error when deploying the printers to Azure and I was wondering if you have scene this error before.
publish-cloudprinter : Exception calling “RetrieveOAuthToken” with “3” argument(s): “System.AggregateException: One or
more errors occurred. —> System.Exception: Error requesting OAuth token. WebTokenRequestStatus:
UserInteractionRequired, error: 3400073247, message: Integrated Windows authentication supported only in federation
flow.
at CloudPublishHelpers.d__0.MoveNext()
— End of inner exception stack trace —
at System.Threading.Tasks.Task`1.GetResultCore(Boolean waitCompletionNotification)
at CloudPublishHelpers.RetrieveOAuthToken(String resourceId, String clientId, String azureTenantGuid)
—> (Inner Exception #0) System.Exception: Error requesting OAuth token. WebTokenRequestStatus:
UserInteractionRequired, error: 3400073247, message: Integrated Windows authentication supported only in federation
flow.
at CloudPublishHelpers.d__0.MoveNext()<—
"
At line:1 char:1
+ publish-cloudprinter -printer "Admin Printer" -Manufacturer "Dell" -M …
+ ~~~~~~~~~~~~~~~~~~~~~~~~~~~~~~~~~~~~~~~~~~~~~~~~~~~~~~~~~~~~~~~~~~~~~
+ CategoryInfo : NotSpecified: (:) [Publish-CloudPrinter], MethodInvocationException
+ FullyQualifiedErrorId : Exception,Publish-CloudPrinter
Hi Joseph. I can’t recall get the same error. Did you publish your printer from a Azure AD joined Windows 10?
Regards, Sandy
Hi Sandy,
Thank you so much for getting back.
When i publish the printer, it says, published and i can see the verbose like what you had here. However, the only difference is that before the verbose message, it shows some html scripts, pretty lengthy.
Then, when I browse to the discoveryProxy web link, it asked me to sign in, then instead of downloading the json file, it is opened on the browser showing its content.
Basing this from what you have above, something is wrong on my config.
Thank you.
Hello Eric, did you get it working? It’s properly depends on your browser settings, it might just show the contents of json in browser or download it as json file. If you search a cloud printer, can you see anything? Martin mentioned in earlier comments, that “SW_DVD9_Win_Server_STD_CORE_2016_64Bit_English_-4_DC_STD_MLF_X21-70526.iso” works with hybrid cloud print without issue. I don’t know if your issue related to the server version or something else. If this is a test lab, maybe can try server 2019. I am planning to set up my cloud print server again when I have more time on this.
Regards, Sandy
Hi Eric, did you got this working OK. I seem to have the same issue. Loads of HTML code before the verbose that the printer is published. However, I do not see the printer anywhere so something is not right.
Within the HTML code, I do see some lines with “Sign in to your account” so I assume it is asking me to sign in while I did deactivated MFA completely.
Hey Zeng Yinghua,
I was able to publish the printer with a verbose response on a AAD joined Win10 machine. I can’t however see it in “search for cloud printers”. Any suggestions?
Hello, Charlie. Very difficult to say. When you click search for cloud printers, did you see it try to search from your discovery endpoint address? If you open you discovery endpoint in browser, what do you see?
Regards, Sandy
Hi Sandy,
Would you know why i dont see any cloud printers when i try to search or select location? It did not detect printer i published.
Thanks.
did you successfully publish your printer? use process monitor or network monitor capture the traffic when you click on search cloud printers, see if it try communicate with your cloud print client app. Can you check if you can open you DiscoveryProxy web link in Azure AD joined machines? It should be able to download a json file when open discoveryProxy web link.
Regards, Sandy
Hi Sandy,
I got the verbose when i tried again. This time i used Azure Active Directory instead of Passthrough. I need my machine to get enrolled to Intune.
Btw, would you know if I should publish the printers to each device who will be using the cloud print?
Thanks.
Hello Eric, you publish your printer to cloud print services, not each devices. Enterprise cloud printer Policy is user policy, not devices policy. https://docs.microsoft.com/en-us/windows/client-management/mdm/policy-csp-enterprisecloudprint
Regards, Sandy
Got this working but print quality leaves a lot to be desired. Pages come out at a fraction of their size. For example, the Windows Printer Test Page only fills up the top quarter of the page. Driver used is “Microsoft Enterprise Cloud Print Class Driver”. The printer is an HP E87650. Print driver on the on-premises server is the HP87650 PCL 6 driver. Am I missing something?
Hello, I have only tested in my old Samsung ML-331x printer, it prints standard quality of black and white documents. I don’t think you missing anything, unfortunately I don’t have more information about this, not sure if Server 2019 will bring any new feature on this, didn’t have time follow those Ignite session yet.
Hi All,
I fixed the DISM Error 87 by removing all WSUS Settings:
HKEY_LOCAL_MACHINE\Software\Policies\Microsoft\Windows\WindowsUpdate
Thanks Sandy for this great article !
Michael
Hi Michael. Thanks for the information. Couldn’t guess WSUS setting affect this feature. Glad that you got it working!
Hi Sandy,
Thank you for the extensive breakdown of this feature. I have followed it to the letter and works as expected.
It took me some time to find the right Windows Image to get the capabilities downloadable. But I managed to get it going with the latest ISO image from Microsoft. For other people searching for it:
SW_DVD9_Win_Server_STD_CORE_2016_64Bit_English_-4_DC_STD_MLF_X21-70526.iso is doing the trick.
As the procedure is quite complex and very hard to maintain I still hope Microsoft will come up with an easier way of having on-prem print queue’s published for cloud users..
The future will learn, thanks again.
Martin
Hi Martin. Thanks for sharing your findings. And I am totally agree with you.
Got error when publishing printer:
Invoke-RestMethod :
IIS 10.0 Detailed Error – 401.2 – Unauthorized
HTTP Error 401.2 – Unauthorized
You are not authorized to view this page due to invalid authentication headers.
Most likely causes:
No authentication protocol (including anonymous) is selected in IIS. Only integrated authentication is enabled, and a client browser was used that does not
support integrated authentication. Integrated authentication is enabled and the request was sent through a proxy that changed the authentication headers before
they reach the Web server. The Web server is not configured for anonymous access and a required authorization header was not received. The
“configuration/system.webServer/authorization” configuration section may be explicitly denying the user access.
Enabled anonymous for testing purposes on IIS and then got error:
Invoke-RestMethod : {“Message”:”Authorization has been denied for this request.”}
At C:\Program Files\WindowsPowerShell\Modules\PublishCloudPrinter\1.0.0.0\PublishCloudPrinter.psm1:125 char:5
+ Invoke-RestMethod -Uri $PublishUrl -Method $HttpMethod -ContentTy …
+ ~~~~~~~~~~~~~~~~~~~~~~~~~~~~~~~~~~~~~~~~~~~~~~~~~~~~~~~~~~~~~~~~~
+ CategoryInfo : InvalidOperation: (System.Net.HttpWebRequest:HttpWebRequest) [Invoke-RestMethod], WebException
+ FullyQualifiedErrorId : WebCmdletWebResponseException,Microsoft.PowerShell.Commands.InvokeRestMethodCommand
Any ideas? What permissions am I missing. I’m using a admin account in the on-prem domain that has also been granted permission to the PrintProxy Enterprise app.
Are you running the script in a Azure AD joined Windows 10? There are many places need to granted permissions, there are totally three enterprise apps.
Yes, it’s a Azure AD joined Windows 10. Have to double check every setting once more…
Matt, did you solve this? I am stuck with the same error. Not sure where to look.
Hey Fellas, I’m receiving the same error (401), also checked all 3 applications. Do you have any idea why is it happing?
Hi Matt,
Have you figured out yet what caused this issue? I have the exact same error message.
Did anybody figure why this happen? I have same issue.
Hi,
I’ve tried to set this up using your instructions, but like some of the other posts, the directories are never created under wwwroot
i.e: C:\inetpub\wwwroot\MopriaCloudService\
the only output folder I can see from the install process is C:\ECPTestOutput and the ECP + MCS entries in IIS (though exploring the folders gives the error: “the system cannot find the file specified”
Any ideas why this woudl fail?
thanks
Hello,
Does it help if you run the these commands (open cmd or powershell as administrator, then run those commands)
dism /online /Remove-Capability /CapabilityName:Print.EnterpriseCloudPrint~~~~0.0.1.0
dism /online /Remove-Capability /CapabilityName:Print.MopriaCloudService~~~~0.0.1.0
dism /online /Add-Capability /CapabilityName:Print.EnterpriseCloudPrint~~~~0.0.1.0
dism /online /Add-Capability /CapabilityName:Print.MopriaCloudService~~~~0.0.1.0
Has anyone had issues publishing the printers and getting OAuth errors ? I am getting the below error everytime I try to publish a printer from an Azure Joined machine, I also tried from the Print Server (got a different error but OAuth related)…
Publish-CloudPrinter : Exception calling “RetrieveOAuthToken” with “3” argument(s): “System.AggregateException: One or more errors occurred. —> System.Exception: A specified logon session does not exist. It may already have been terminated. (Exception
from HRESULT: 0x80070520)
.
.
at CloudPublishHelpers.RetrieveOAuthToken(String resourceId, String clientId, String azureTenantGuid)
—> (Inner Exception #0) System.Exception: A specified logon session does not exist. It may already have been terminated. (Exception from HRESULT: 0x80070520)
I am not 100% sure, error code might related to certificate. What DiscoveryEndpoint and PrintServerEndpoint are you using, your own domain address or msappproxy.net? do you see anything from printer server IIS log? Also read about Michael Niehaus’s post, he has a bit different setup than mine https://blogs.technet.microsoft.com/mniehaus/2018/04/04/printing-to-on-prem-printers-from-azure-ad-joined-devices/
would you have time.. i’m on s4b [email protected]
just tried on another windows 10 and the same issue
Hey,
Tried everything you suggested, also changed the sddl ofcourse and disabled MFA on this account, no luck yet. Today I should have a screensharing session with Microsoft to troubleshoot it.
I will keep you posted.
Please do share the results. Thanks.
very strange indeed.
I tried your publish command and changed the endpoints and clientid and tenantguid and get the same error message.
it is on a Windows 10 which is aad joined with the correct user.
going to try on another w10 now.
the native client app is the only one i have besides my 2 web apps and the ID is the Application ID, not the object id, right?
Hi, you need to change -Sddl value as well. The account you are using, is it a service account? I saw in your log that it trying to login, and there is something about reset password. So don’t enforce that account with MFA or reset password or anything, just a service account what have printer admin rights.
I understand this is complicate, I have tried it so many times myself, and reinstall my servers again. If this is your test lab, you can try set up one more server and see what is the result. 🙂
For your privacy, I don’t approve your comments that has your personal information, includes your email address.
Hello,
We followed your post. We are happy to be able to publish our printer. Clients are able to browse with the “search for cloudprinter” and successfully install the published printer.
But when trying to print from a application or sending a test page, a non-descriptive error occurs: Error Printing 🙁 Nothing useable in de eventlog
Any suggestions anyone, please?
Hello Tanya, Sorry didn’t reply earlier, seems I missed your comments. Did you get it working? Do you see anything in printer server IIS log? I have not seen this issue before.
Hi,
I followed your post and am able to publish a printer but my clients are not able to find that printer. Have been through your post and the MS post a few times and can´t seem to find any problems with my setup.
Any ideas on where to search for the error?
Regards
Hey, First of all, great post!
Like my co-posters say, better then Microsoft’s article.
@Michael i’m having the same issue, did you get it solved?
Problem is that it gives me the “Verbose: Published EcpPrinterTest … “-output, however there is a lot of javascript output before it gives this message.
so it looks like it has been published, but it didn’t. the DB is still empty (verified with DB Browser for SQLite).
and offcourse the printer doesn’t show up on the clients.. which makes scense..
anyone an idea?
thx guys & girls
Tom Speijer
[email protected]
@Michael: When you click search for cloud printers, can you see from where it is trying to get printers? User process monitor any tool that can catch the process or network traffic. If you run query printer, can you see your published printer? If you try put your client in internal network, does it work?
@Tom: If it gave you error message when publish your printer, it is not published. Can you read the verbose message again or upload that somewhere share me a link?
Sorry, it is quite difficult trying to guess what went wrong remotely, there are so many steps and details in this setup.
@Tom: I checked your log. You are using depth 4 and 5.
{“category”:”2de”, “vn”:1, “depth”:4}, {“category”:”room\_name”, “vs”:”1111″, “depth”:5}]}’
Try don’t change the category name, make it same as the sample in Microsoft doc.
So like this:
{“category”:”floor\_number”, “vn”:1, “depth”:4}, {“category”:”room\_name”, “vs”:”1111″, “depth”:5}]}
I am not sure if the vn is typo or not, I haven’t test that, other category are using vs.
If that doesn’t work, try this one:
{“category”:”floor\_number”, “vs”:”1″, “depth”:4}, {“category”:”room\_name”, “vs”:”1111″, “depth”:5}]}
Remember check the double quote format when doing copy paste.
I will test again tomorrow if I have time.
Hey goodmorning, thx for pointing out to these mistakes.
I’ve changed them (the vn to vs) and the category names also.
even tried with replacing every double quote by a new one.. it keeps giving me first the javascript output before giving me the message that it has published it.. however still not published in my opinion.
Just tested and still works for me. I am using this:
publish-cloudprinter -Printer “EcpPrintTest” -Manufacturer “Microsoft” -Model “Virtual Printer” -OrgLocation ‘{“attrs”: [{“category”:”country”, “vs”:”Finland”, “depth”:0}, {“category”:”organization”, “vs”:”SandyTestLab”, “depth”:1}, {“category”:”site”, “vs”:”Joensuu,FI”, “depth”:2}, {“category”:”building”, “vs”:”Home”, “depth”:3},{“category”:”floor_number”, “vn”:2, “depth”:4}, {“category”:”room_name”, “vs”:”1111″, “depth”:5}]}’ -Sddl “O:BAG:SYD:(A;;LCSWSDRCWDWO;;;S-1-5-21-501278528-1731656756-2472999879-1114)(A;OIIO;RPWPSDRCWDWO;;;S-1-5-21-501278528-1731656756-2472999879-1114)(A;OIIO;GA;;;CO)(A;OIIO;GA;;;AC)(A;;SWRC;;;WD)(A;CIIO;GX;;;WD)(A;;SWRC;;;AC)(A;CIIO;GX;;;AC)(A;;LCSWDTSDRCWDWO;;;BA)(A;OICIIO;GA;;;BA)” -DiscoveryEndpoint “https://mcs.smsboot.com/mcs/” -PrintServerEndpoint “https://ecp.smsboot.com/ecp/” -AzureClientId “06050d0b-08c2-xxxx-xxxx-xxxx-xxx” -AzureTenantGuid “8cfbf3fe-xxxxxxx-xxxxxx-xxxxx-xxxx”
In your log, I saw some resetpassword link, very strange. Can you check again you are using correct native client apps, and you are publishing the printer in Azure AD joined Windows 10 machine?
Hello, did you get it working? This issue usually cause by print discovery endpoint external address is not correctly set in registry, or typo. Please those 3 application you created in Azure that configuration are correct, no typo.
I’m getting the same issues at Julien, could not find the paths.
Ok, so I got passed the issue with not being able to find the path. When I added the server to the domain, it removed the optional features, so couldn’t install the binaries properly. However, I am trying to publish a printer but just getting a run time error at my */mcs application.
James, did you manage get it work?
Did you manage to sort this issue? I’m stuck with /mcs error and can’t publish printers.
Seems there is an issue with Printing Preferences, suspecting that it is Microsoft enterprise cloud print class driver. So from Windows 10 can’t change color or black&white, or select a Tray to print..
Finally, worked, used new server actually 🙂 Would be great if Azure Authentication can be checked too. Did try use Microsoft Article, but it fail as they seems has some issue in documentation.
@Oscar: I am very happy to heard that it works. If anything in my post need to be update or fix, please let me know.
Hi,
Great post, better than MS own docs.
Have you had any experience in utilizing this to access printers across domains that have a two way trust?
Regads
Hi, I have not tested that in across domains scenarios. 🙂
Anyone know why the directory for ECP and MCS never gets created when running CloudPrintDeploy.ps1, I’m unable to proceed with deployment steps. I’ve tried on a fresh install of Server 2016 with same results. Any ideas?
Could not find a part of the path
‘C:\inetpub\wwwroot\EnterpriseCloudPrint’
‘C:\inetpub\wwwroot\MopriaCloudService’
Same with the underlying web.config…
Julien, did you managed to sort this?
Hi, did you manage solve your issue? I did try it again, and no issues. Did you run those commands in elevated PowerShell?
Did anyone find a resolution to this? I have exactly the same issue – the applications are created in IIS, but the folder structure and supporting files are not. I don’t know how to progress without these?!?
Hello,
Does it help if you run the these commands (open cmd or powershell as administrator, then run those commands)
dism /online /Remove-Capability /CapabilityName:Print.EnterpriseCloudPrint~~~~0.0.1.0
dism /online /Remove-Capability /CapabilityName:Print.MopriaCloudService~~~~0.0.1.0
dism /online /Add-Capability /CapabilityName:Print.EnterpriseCloudPrint~~~~0.0.1.0
dism /online /Add-Capability /CapabilityName:Print.MopriaCloudService~~~~0.0.1.0
Hi Zeng,
Thanks for the reply. I’ve tried the remove and add steps you mentioned above, this returns:
“Error: 87
No Windows features were specified on the command line.
Use the /Get-Features option to find the name of the feature in the image and try the command again.
The DISM log file can be found at C:\Windows\Logs\DISM\dism.log.
They don’t appear to be “features” within Windows Server 2016 that I can install / update / use.
The server is a brand new install of 2016 Standard edition, is patched up to latest release and has the print server role installed.
I’ve tried running the /Get-Features command and they don’t appear as options in that list either, so presumably it’s never going to be able to install the cloud print elements. Is there a way of sideloading these? I can’t seem to find them as downloadable components. According to MS they’re clearly meant to be available, as shown here: https://docs.microsoft.com/en-us/windows-hardware/manufacture/desktop/features-on-demand-non-language-fod#printing
I saws some bug report in https://github.com/MicrosoftDocs/windowsserverdocs/issues/505, one comment is need to make use using Server 2016 RTM, not preview. I am not sure if this makes any different, I have all my servers default installed .net framework 3.5, can you try install that also? Or then maybe need to download a server 2016 installation media and try again.
I had a similar Issue , I solved it using this solution from Chis Balckburn
http://memphistech.net/journey-in-hybrid-cloud-print/
Hi,
One of your print screens of has “Azure authentication” one has “pass-through”.
In this article: “https://docs.microsoft.com/en-us/windows-server/administration/hybrid-cloud-print/hybrid-cloud-print-deploy” it stay code as “ms-appx-web://Microsoft.AAD.BrokerPlugin/S-1-15-2-3784861210-599250757-1266852909-3189164077-45880155-1246692841-283550366” but in yours it is ending with digit 7. Like why all that differences?
Hi, Yes I am using passthrough authentication, end of my post links to Microsoft doc https://docs.microsoft.com/en-us/windows-server/administration/hybrid-cloud-print/hybrid-cloud-print-deploy-passthrough. I don’t know why I had ending digit 7 in my post, my tenant has ending digit 6, must by a typo, thanks for pointing it out. Updated the post.
Any chance you tested in pre-auth mode? The ms docs seem to indicate it works but in past testing it did not (windows enumeration didn’t handle it). Before I try all the steps to make it work wanted to see if you had tried that
Great blog by the way!
hello Jeff, thanks! I have tried pre-auth mode many times, but I didn’t get it work.
I love how you added “Printer” to the requirements! LOL
Superb blog although I haven’t tested this scenario but quite often you get question from customer around printing on premises on an Azure AD joined W10 machine…