


Ever since the first public announcement of Desktop Analytics back at Microsoft Ignite in September 2018, companies have been asking for this cloud service for a while now and it’s finally here (although in Public Preview). In this blog post we’re going to have a look at how we can setup and connect ConfigMgr with Desktop Analytics including the requirements for this.
What’s Desktop Analytics
For those of you who looked into Upgrade Analytics back in the days, that later was renamed to Windows Analytics and includes Upgrade Readiness with a somewhat of an integration with ConfigMgr to get a grasp of how your estate of devices was doing and if they were ready to be upgraded to the next eligible version of Windows 10, Desktop Analytics is the successor of that functionality, including other features from Windows Analytics. And the best of all, it’s now more tightly integrated into ConfigMgr than any of the previously cloud services have been in the past.
To give you an overview of what Desktop Analytics is, here’s a few bullet points that describes the feature set of the cloud service:
- Create deployment plans for Windows 10 pilot and production groups
- Inventory of apps running in your organization
- Identify compatibility issues and receive mitigation suggestions based on cloud-enabled data insights
And more, the above is just a subset of the features you get. Check out the Microsoft documentation for more information:
https://docs.microsoft.com/en-us/sccm/desktop-analytics/overview
Requirements before you get started
Before we jump into the pieces of setting it all up, let’s first go through what’s required for connecting ConfigMgr with Desktop Analytics. It’s important that you know that there’s two ways of getting started with Desktop Analytics, once you’ve decided to start. You can either re-use the same Log Analytics workspace that you’ve been using for Windows Analytics, if you’ve used that before (this is also the recommended approach for existing Windows Analytics environments). The other way is to setup everything from the scratch, which should preferably be performed if you’ve never connected any of the previous cloud services that Desktop Analytics is the successor of.
The list below is pretty substantial, so make sure you read through all of it and ensure you have it all in place before you continue, especially with the required permissions:
- ConfigMgr version 1902 with Hotfix Rollup (4500571)
- A user with Full Administrator permissions in the hierarchy
- A user with Global Admin permissions
- Azure Subscription permission requirements
- A user with Owner or Contributor and User Access Administrator permissions on the Azure Subscription for creating a new Log Analytics workspace
- A user with Log Analytics Contributor and User Access Administrator on the Resource Group where an existing Log Analytics workspace exists
- Device requirements
- Any of the following operating systems: Windows 7, Windows 8 or Windows 10
- See the following for more information about down-level operating systems:
- Diagnostic data level configuration and telemetry level, see more here:
- Internet access for sending diagnostic data
There’s also a well documented page that covers Desktop Analytics data privacy, which is available here:
https://docs.microsoft.com/en-us/sccm/desktop-analytics/privacy
What about licensing for Desktop Analytics
From a license side perspective, this is what you need to have in order to be eligible for using Desktop Analytics:
- Windows 10 Enterprise E3 or E5, or Microsoft 365 F1, E3, or E5
- Windows 10 Education A3 or A5, or Microsoft 365 A3 or A5
- Windows VDA E3 or E5
This information comes straight from the Microsoft docs article mentioned in the beginning.
Setup Desktop Analytics workspace
Now with all of the requirements and licensing taken care of, it’s time to setup Desktop Analytics. The following instructions you’ll see below outlines the initial steps for Desktop Analytics using an existing Log Analytics workspace that was previously used with Windows Analytics.
- First of all, login to the Desktop Analytics portal with a Global Admin account.
- In the first page, Accept service agreement, click Accept.

- On the second page, select Yes in the slider if you have any of the mentioned license subscriptions and click Next.

- On the third page, Give users and apps access, Desktop Analytics will be able to help you with managing Directory roles required for your users that should have access to the service. In accordance with your policies around Azure AD directory role assignment and management, decide whether you want to allow Desktop Analytics to manage this for you or not. For this demonstration, I’ll allow Desktop Analytics to manage it for me.

Under Workspace owners, add a user that is given access to create and manage the Desktop Analytics workspace. Consider adding Workspace contributors at this point, or you can add them at a later stage by adding them to a security group named M365 Analytics Client Admins. Click Next.
- On the last page, Set up your workspace, select your Azure Subscription and wait for any existing workspaces to be shown in the list below. At this point you can either create a new workspace, or re-use an existing workspace that was used with Windows Analytics.

- Select an existing workspace, as in this example the CMWindowsAnalytics workspace and click Set as Desktop Analytics workspace.

- In the prompt that appears, click Continue and accept the permissions for the MALogAnalyticsReader app is requesting.

- After the permissions have been granted, you’re redirected back to the last page of the Desktop Analytics setup. Click Next.

- That’s it, Desktop Analytics have now been successfully configured. You’ll see a button that will take you to the Desktop Analytics dashboard.

- Initially, you’ll have to wait up to 72 hours before you’re able to see any data in Desktop Analytics, like shown in the screenshot below.

- At this point, you could either wait for the time it takes for the workspace to have successfully completed processing data, or start directly with connecting ConfigMgr to Desktop Analytics. I recommend that you do the latter. However, when the processing has completed, this is how the workspace will look initially under Connected services.

- As you may have noticed, there’s no devices enrolled, and that’s what we’re going to take care of right now.
Connect ConfigMgr with Desktop Analytics
Assuming you’ve completed all the requirements for Desktop Analytics, set up the workspace like in the previous section and successfully upgraded ConfigMgr to version 1902 with the Hotfix Rollup (KB4500571), you’re all set to continue. ConfigMgr client’s don’t need the update from the Hotfix Rollup, they’ll work fine as long as they’re on the 1902 level or above.
- From within the ConfigMgr console, go to Administration – Cloud Services, right-click on Azure Services and select Configure Azure Services.

- Select Desktop Analytics and click Next.

- On the App page, you will need to either select an existing app that should be re-used or create a new one. For demonstration purposes, this post will cover the steps of setting up a new app. Either way, you’ll need to click Browse.

- Click Create.

- Give the new app a name, e.g. ConfigMgr-DesktopAnalytics and configure both the HomePage URL and App ID URI with https://ConfigMgrService as shown in the picture below. Regarding the Secret key validity period, choose what best suits your environment policy and requirements. After that, click Sign in.

- Sign in with a Global Admin credentials. Once signed in, the window should present a signed in successfully message and show the Azure AD tenant name in the text field. Click OK.

- Back in the Server App window, select the newly created app and click OK.

- In the Azure Services Wizard window, click Next.

- For the Diagnostic Data page, notice the Commercial ID being shown. It’s recommended to select Enhanced (Limited) as the Windows 10 diagnostic data level. However, select accordingly to your organizational requirements. Enhanced (Limited) will only share the minimum required diagnostic data for Desktop Analytics. Also, consider enabling Allow Device Name in diagnostic data, to show the name of the device in Desktop Analytics. From Windows 10 version 1803 and above, you need to enable this in order to have the device name show up in the cloud service. Click Next when ready.

- In the Office Diagnostic Data page, click Next.

- Click Next on the Available Functionality page.

- Next we need to give this ConfigMgr environment a memorable name in Desktop Analytics. After that, click Browse to select a Target collection. This collection should contain all of the devices that you wish to configure and enroll into Desktop Analytics.

- Click the Add button at the bottom at the Collection page to select device collections that will be synchronized to Desktop Analytics. These collections are used to associate devices from ConfigMgr to a Deployment Plan in Desktop Analytics. Add as many as you wish, as shown in the picture below, I’ve added two collections. One that contains all my Pilot group devices and one with everything else. Click Next.

- At this point we’re ready to configure the Desktop Analytics service in ConfigMgr. Click Next.

- At the Completion page, click Close.

That’s it, a configuration policy has now been created for Desktop Analytics. Devices eligible for enrollment should soon start to become available in the Desktop Analytics dashboard.
Logging and monitoring
From within the ConfigMgr console, we can monitor the enrollment of devices into Desktop Analytics from the Software Library – Desktop Analytics Servicing – Connection Health node. Here we get an overview of what’s been configured for Desktop Analytics in terms of Connection details, Last sync details and Connection health.
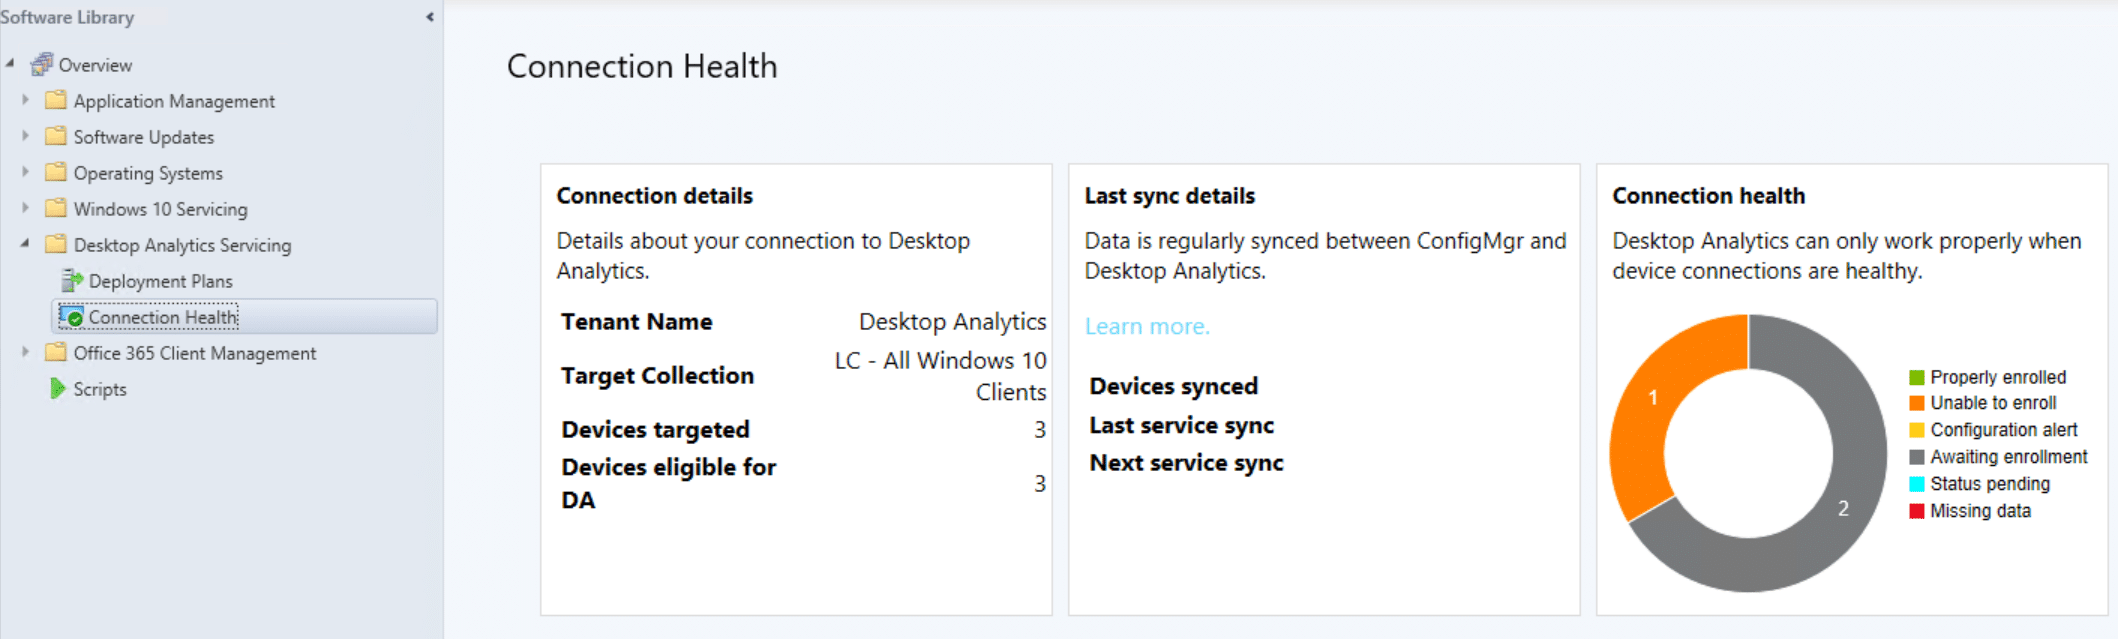
If we want to see the status of the 2 devices at this point that’s awaiting enrollment, simply click that section of the chart to get a more detailed view for those device.

From a logging perspective, we can inspect a log named M365AUploadWorker.log available on the Primary Site server, that will give us more information about what’s being sent to Desktop Analytics. On the client side of things, the M365AHandler.log should provide more detailed information if the client for instance fails to collection diagnostic data.
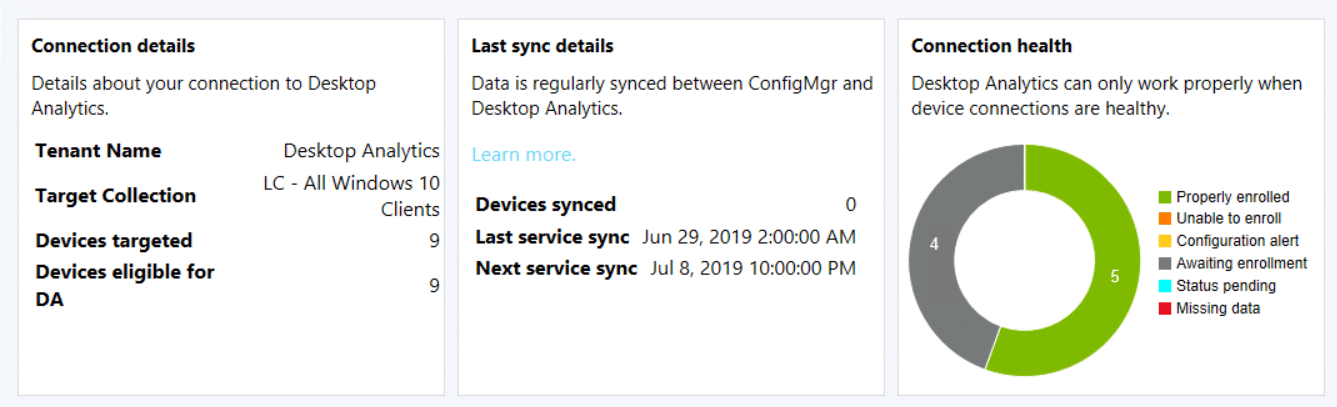
Eventually when devices start to successfully enroll, the Connection Health dashboard looks similar to the below:
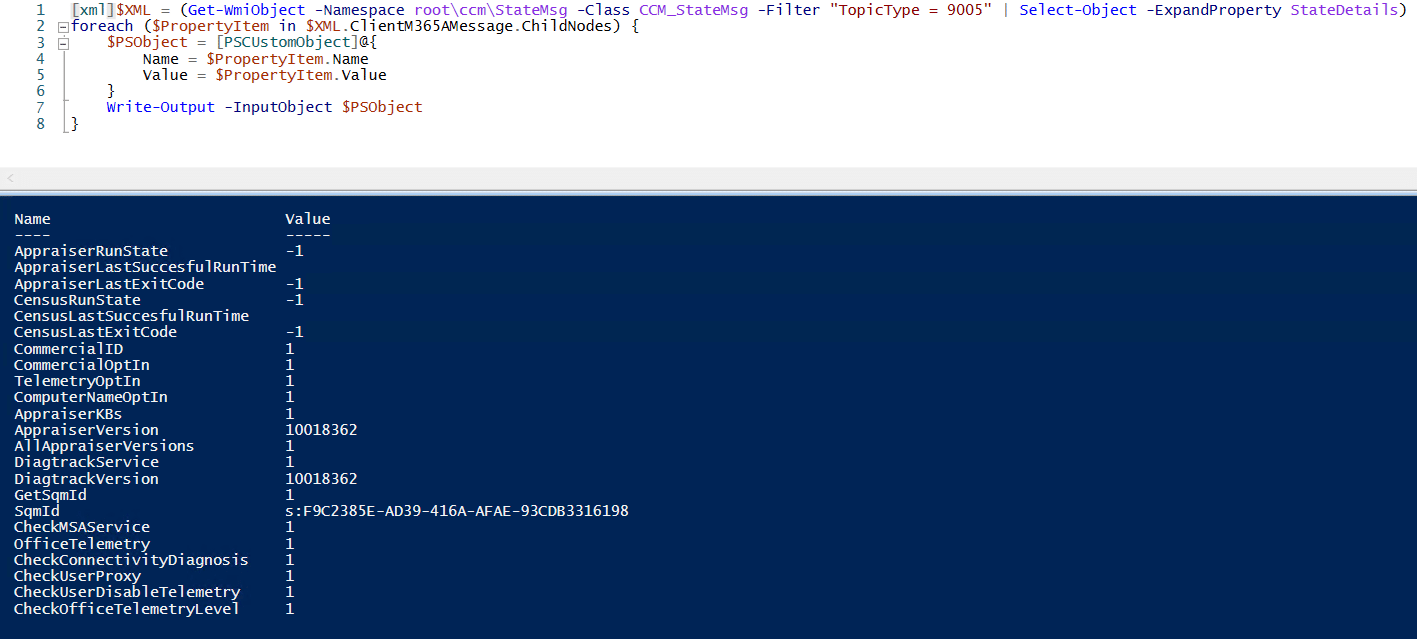
On the client side of things, the data collected are sent back as state messages, and can be easily be explored with PowerShell:
[xml]$XML = (Get-WmiObject -Namespace root\ccm\StateMsg -Class CCM_StateMsg -Filter "TopicType = 9005" | Select-Object -ExpandProperty StateDetails)
foreach ($PropertyItem in $XML.ClientM365AMessage.ChildNodes) {
    $PSObject = [PSCUstomObject]@{
        Name = $PropertyItem.Name
        Value = $PropertyItem.Value
    }
    Write-Output -InputObject $PSObject
}
Running the above code snippet would return the following showing the different values and states of the various collected data and when they last successfully ran.
Remember, this is still in public preview, and if you run into any issues, use the built-in Help and Support from within the Desktop Analytics portal by clicking on the question mark in the top right corner.


great post – the code snippet needs [xml]$xml added for it to output the information correctly 😉
Don’t think that’s possible yet but I think that it’s on the DA-Roadmap. Hopefully Intune-only will be able to utilize this great tool in the future.
I see ConfigMgr listed as a prereq. If going cloud only and the client does not have ConfigMgr can we still use Desktop Analytics?