


Upgrade Analytics is a solution in OMS that can help you to analyze and assess device readiness and compatibility with Windows 10 for migration or servicing scenarios. Recently, Microsoft released ConfigMgr Current Branch (version 1610) that now comes with support for integrating Upgrade Analytics directly into ConfigMgr, allowing for syncing devices that are ready for upgrade or migration. Before we continue with the integration of Upgrade Analytics and ConfigMgr, if you’re unfamiliar with the solution I’d suggest that you read the following article describing how to get started with Upgrade Analytics:
https://technet.microsoft.com/itpro/windows/deploy/upgrade-analytics-get-started
When you’re evaluating Upgrade Analytics, before making the integration with ConfigMgr, I suggest that you take a look at my client deployment script for Upgrade Analytics. It includes some fixes to what Microsoft has released, in addition to installing the required hotfixes per operating system architecture and version. You can find the post about this script here:
www.scconfigmgr.com/2016/11/16/using-upgrade-analytics-deployment-script-with-configmgr
Another thing to keep in mind is telemetry in Windows 10. Upgrade Analytics relies on this and it will not work if you’ve disabled telemetry in your organization. For more information about telemetry in Windows 10, read the following documentation:
https://technet.microsoft.com/itpro/windows/manage/configure-windows-telemetry-in-your-organization
When you’re successfully set and have understood the underlying requirements and methods to get data into Upgrade Analytics, let’s continue with looking at the prerequisites for Upgrade Analytics and setting up the connection between both products.
Prerequisites for integration between ConfigMgr and Upgrade Analytics
As for the prerequisites that needs to be in place before we can setup the connection, both ConfigMgr and Azure AD configurations are required for this to work properly. In terms of ConfigMgr, you’re required to have a Service Connection Point that is operating in an Online state, which is not covered in this post (assuming that most environments have this). As for your Azure AD tenant, you’ll need to create an Application where you extract a Client ID and Secret from. This application will be used to assign proper permission for a Resource Group in Azure, which ConfigMgr will leverage in terms of communicating to Upgrade Analytics.
You’ll also need to have an OMS workspace setup prior to following this post. If that’s not the case and you’ve not started with Upgrade Analytics at all, I suggest that you have a look at the following (scroll to the bottom and choose Try for free):
https://www.microsoft.com/en-us/cloud-platform/operations-management-suite
In this post, we’ll go through the steps for creating an Application in Azure AD, that I recently mentioned and also show how to make the actual connection between ConfigMgr and Upgrade Analytics.
Create an Application in Azure AD
Creating an application in Azure AD is pretty straight forward, it could also be automated with PowerShell, but in this post I’ll walk you through the steps to give you an idea of what you’re really configuring. However, if you want to see how this part can be configured with PowerShell, have a look at the following post:
www.scconfigmgr.com/2016/11/24/create-azure-ad-application-with-powershell-for-configmgr-and-upgrade-analytics-connection
1. Log in to manage.windowsazure.com with a Global Admin account.
2. Go to Active Directory and click on your directory.
3. Select the Applications tab and then Add.
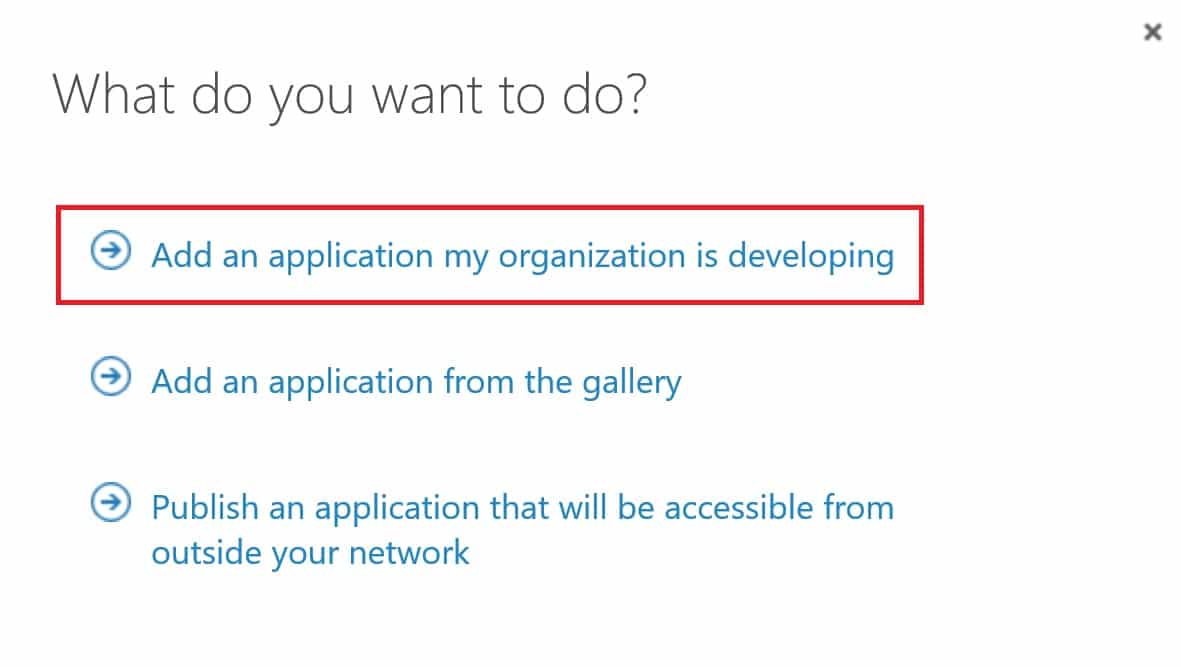
4. Select Add an application my organization is developing.
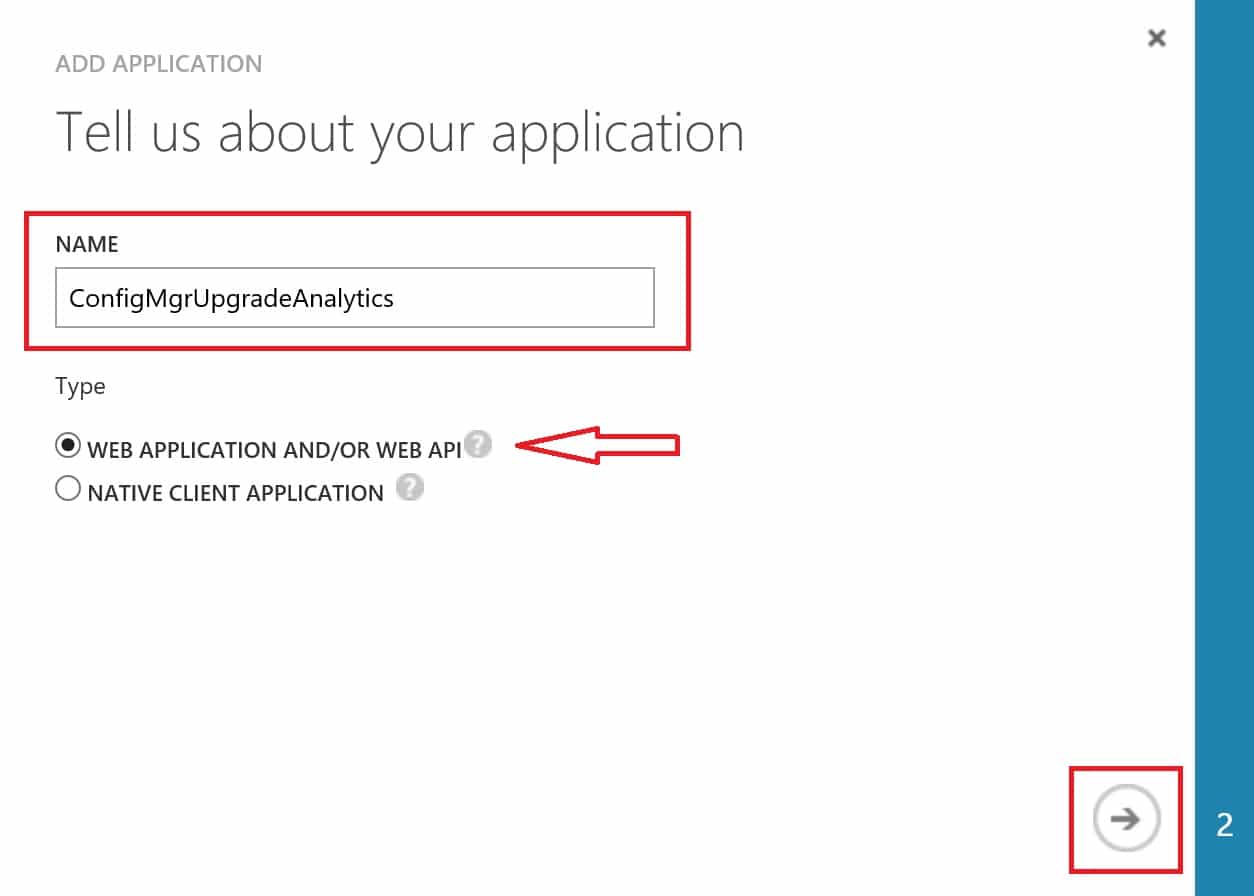
5. Give the application a name, e.g. ConfigMgrUpgradeAnalytics and make sure that you select Web Application and/or Web API. Click on the arrow to continue.
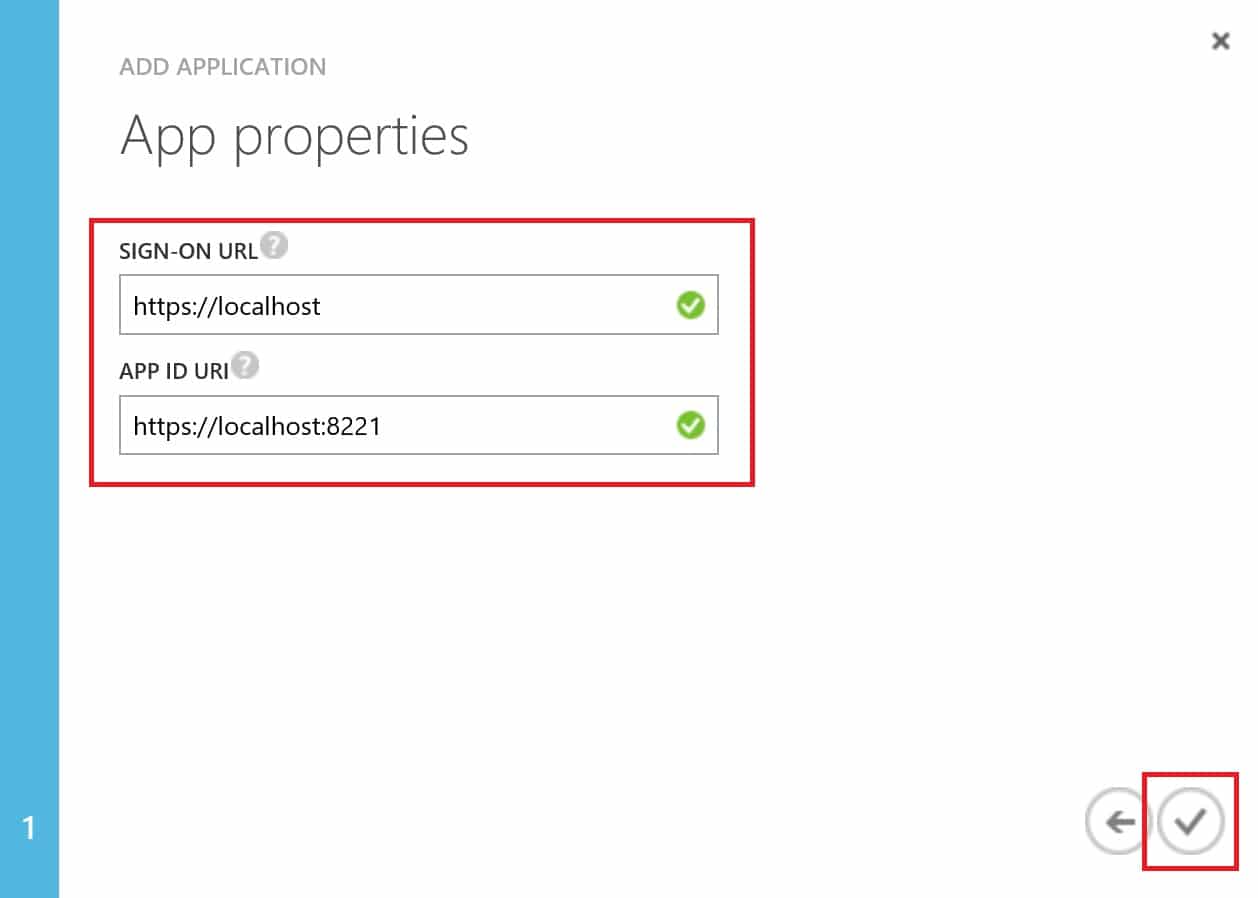
6. As for the App Properties, just enter any valid URL (as shown in the picture below), it’s important to know that these URL’s doesn’t have to be resolvable. Therefore I’ve just configured both URL’s to point at the localhost. Click the check mark button to create your application.
7. With the application successfully created, go to the Configure tab.

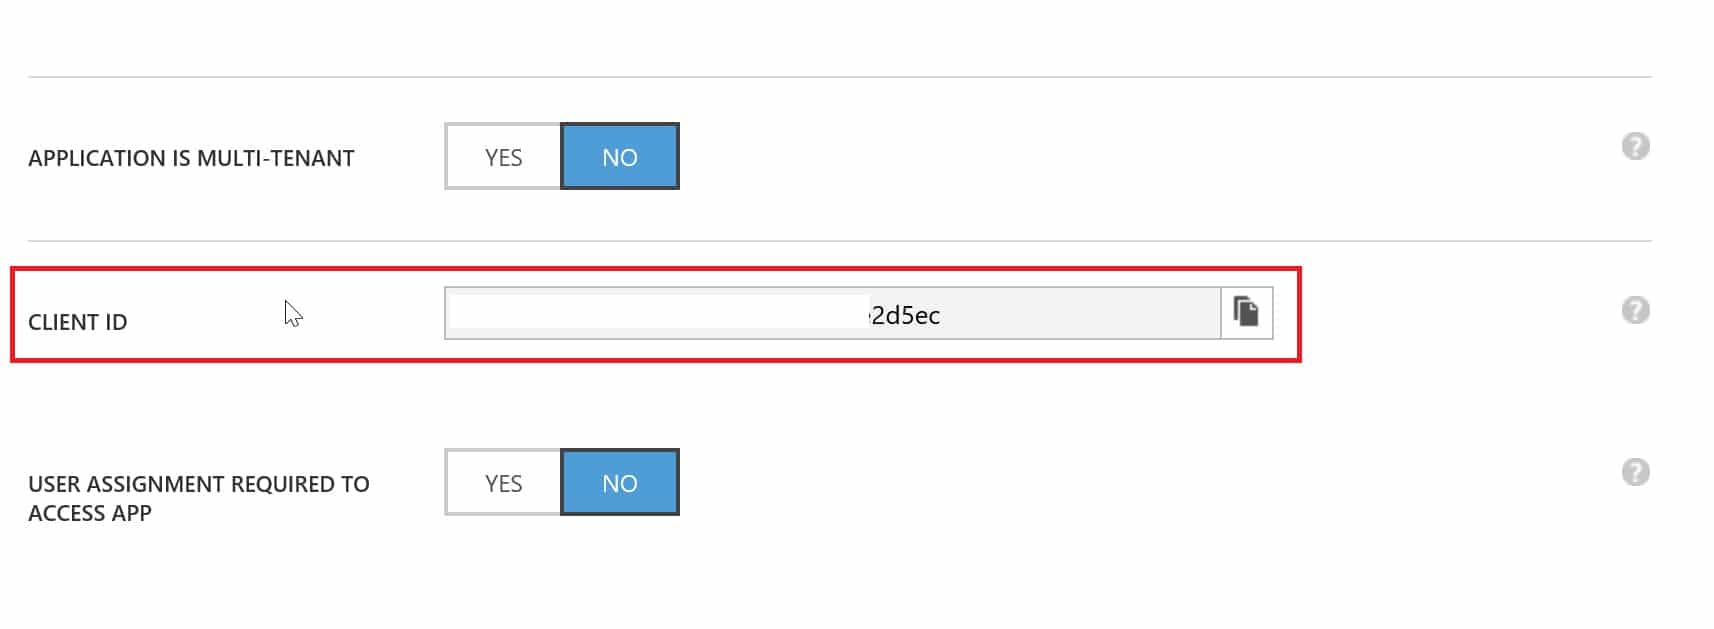
8. Scroll down and make a note of the Client ID. You’ll have to enter this string at a later stage when making the connection to Upgrade Analytics in ConfigMgr.
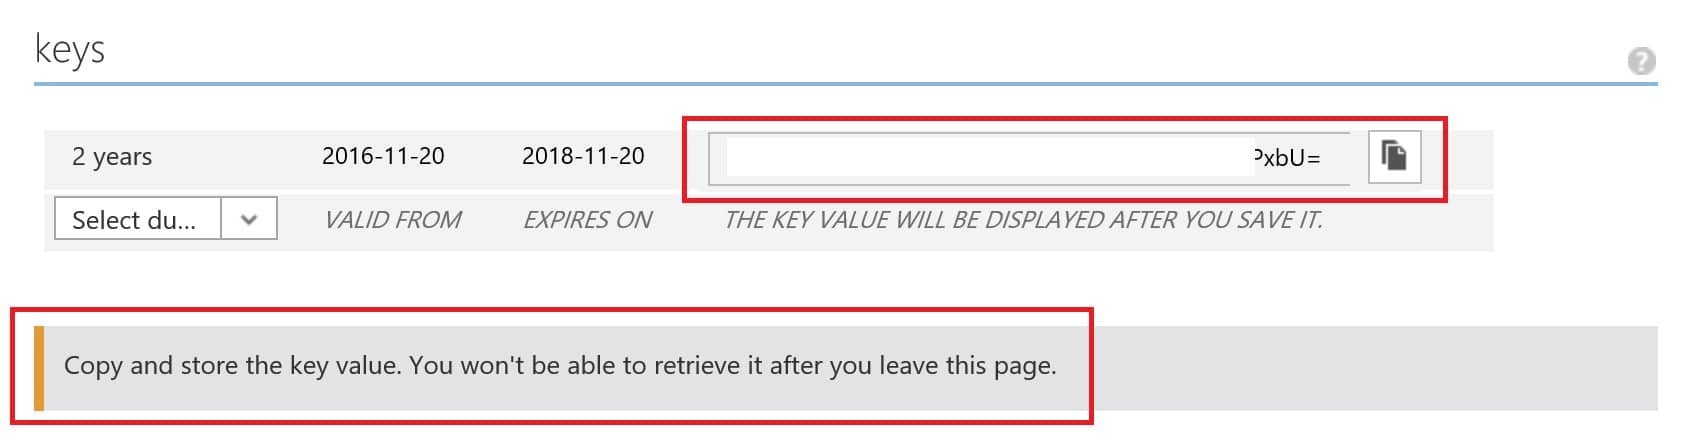
9. Go down to the Key section and select the drop-down menu to create a new key. Select either 1 or 2 years, depending on how often you wish to re-create it and enter it in the connection in ConfigMgr. Also, make a note of the key value, or also referred to as the secret key (in the ConfigMgr console which you’ll see later in this post) which will only be visible once you hit the Save button. However, it’s important that you at this point make a note of the key value, since you’ll not be able to retrieve it again once you leave the current page.
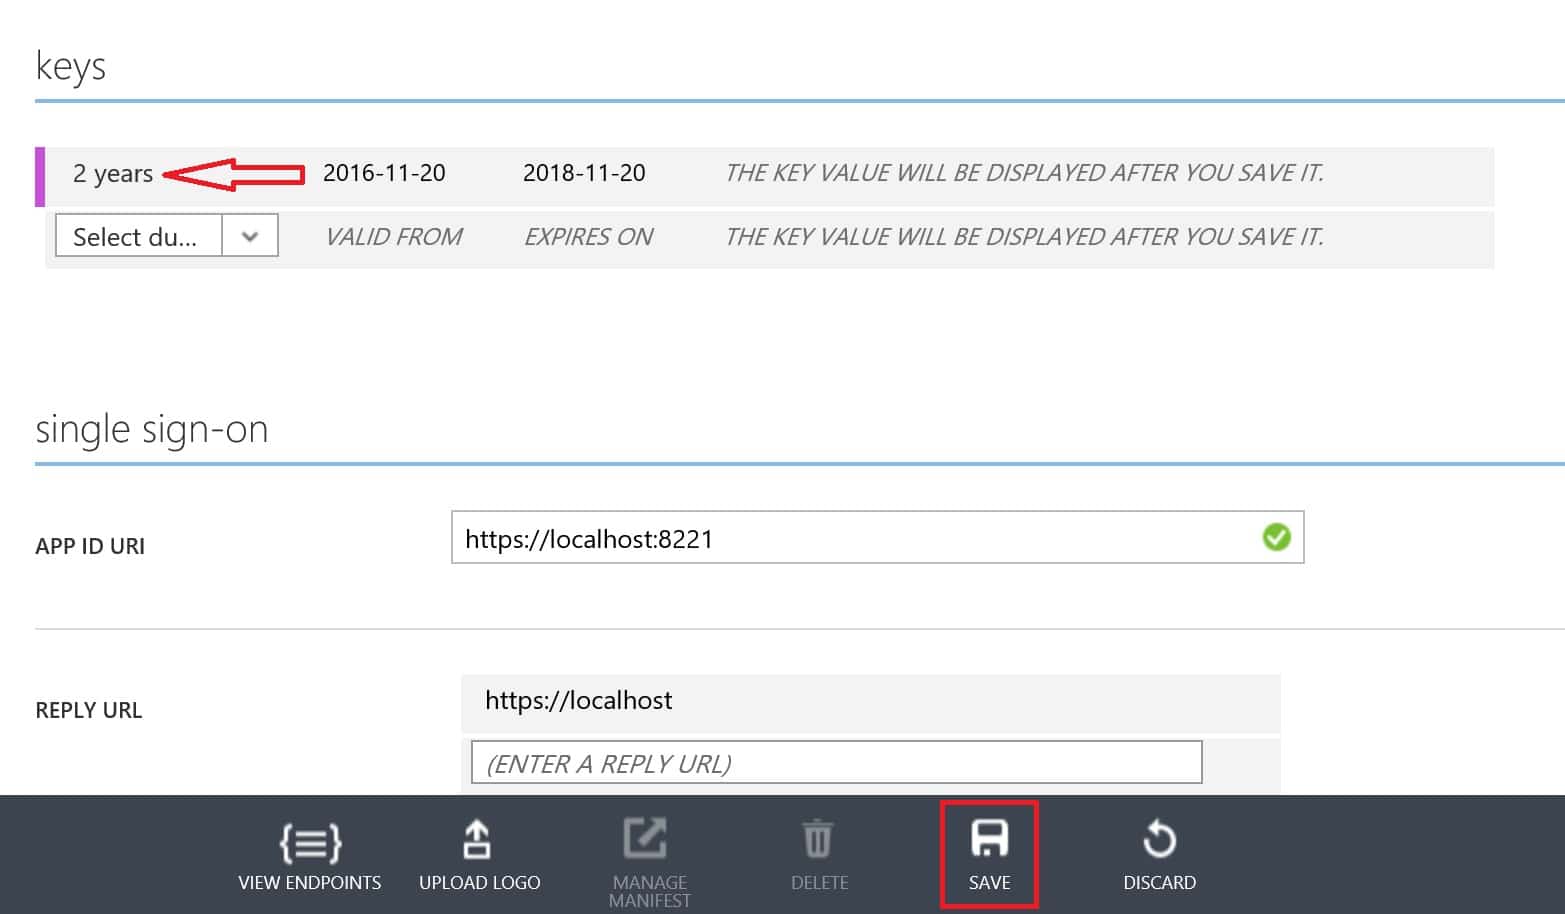
10. Like I said, make a note of the key value (secret key).
The application is not configured, and the required information that’s needed later when making the connection in ConfigMgr should now have been temporarily saved.
Assign permissions for application in Resource Group
Next you’ll have to assign the application that was just created, the proper permissions for your Resource Group. For this, we need to access the new Azure portal.
1. Log in to portal.azure.com with a Global Admin account.
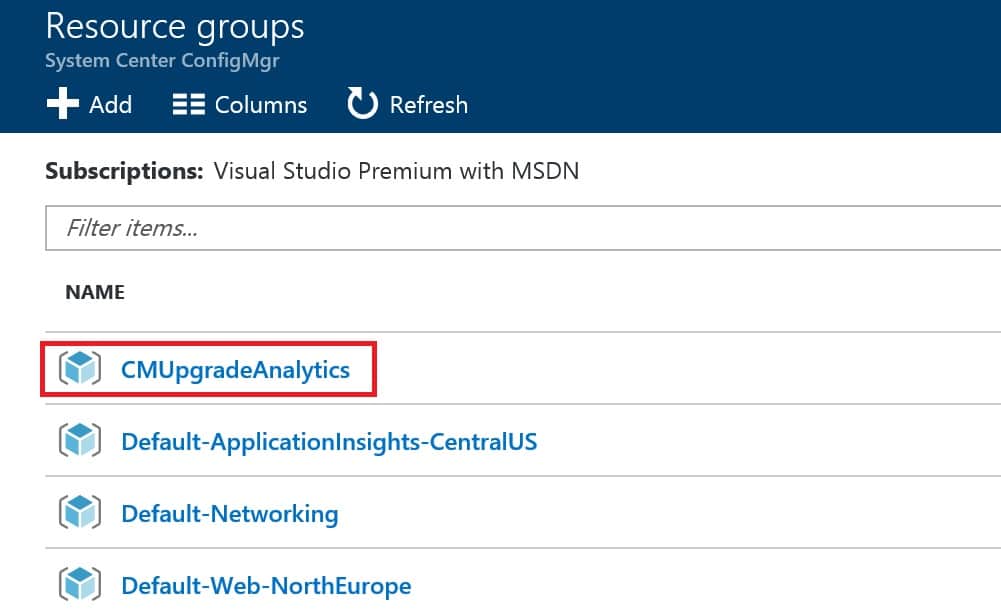
2. On the left, select More services and filter by typing Resource Groups.
3. Select the Resource Group that contains your OMS workspace.
4. In the Resource Group blade, select Access control (IAM) and click Add.
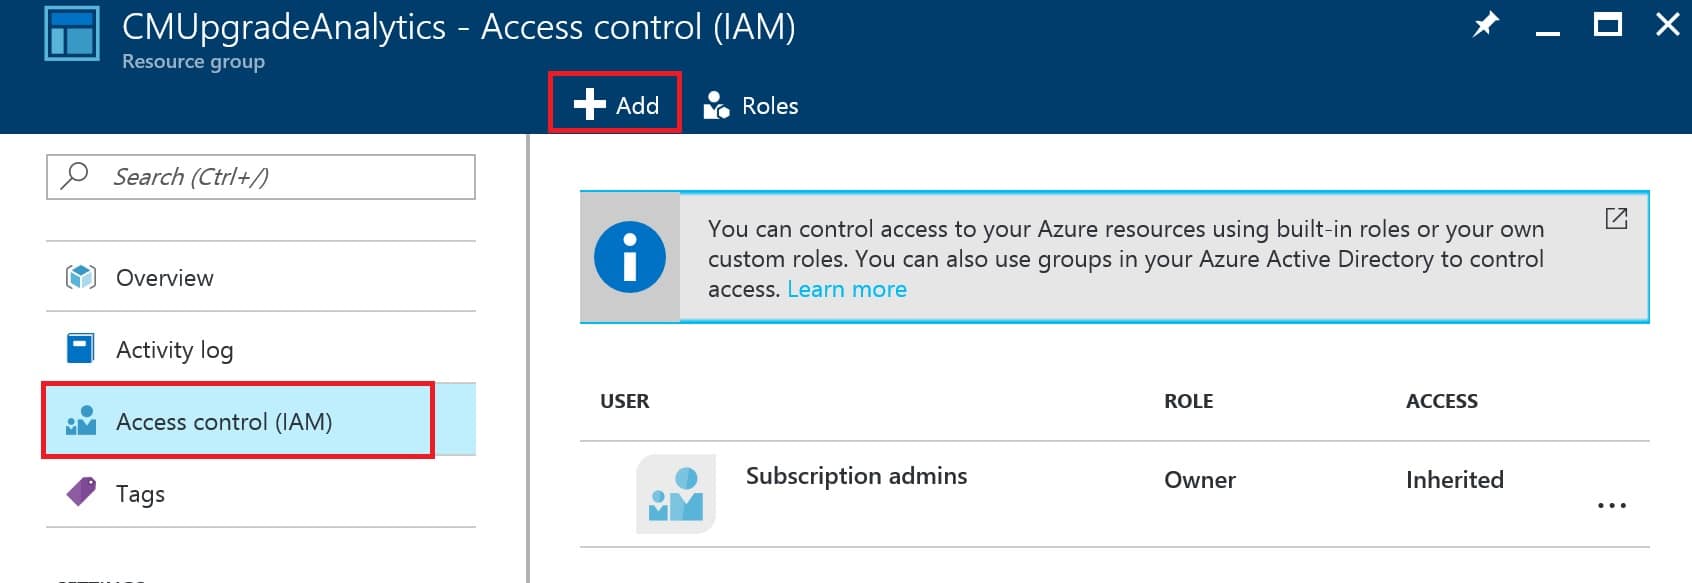
5. In the Add access blade, select Contributor as the role (this is important, do not select anything else).

6. As for Add users, search for the name that you gave your Azure AD application and select it.

7. Click OK in the Add access blade.

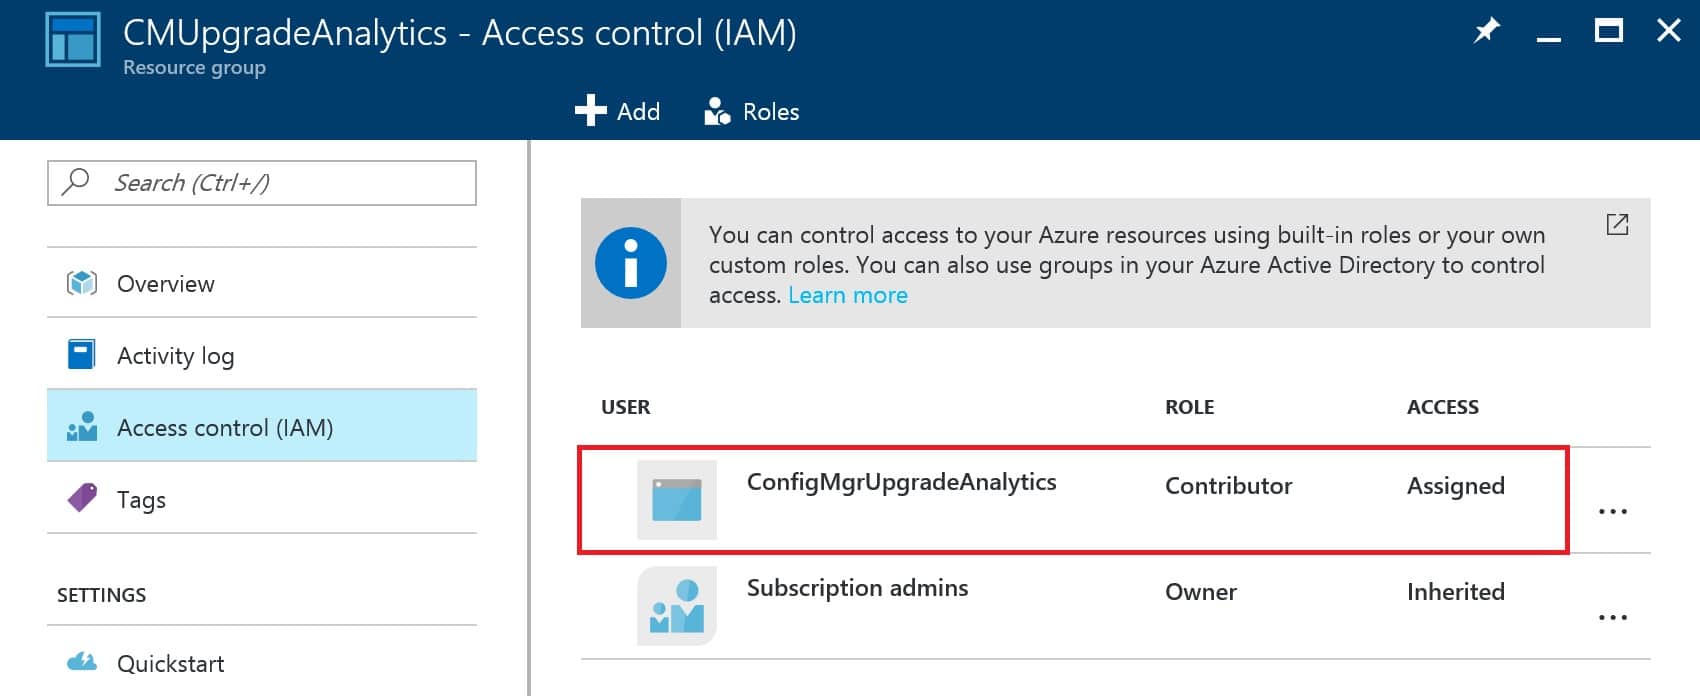
8. You should now be presented with a overview showing that the application has been assigned the role Contributor to this Resource Group.
And you’re done. All the prerequisites for making the connection between ConfigMgr and Upgrade Analytics are now completed.
Connect ConfigMgr with Upgrade Analytics
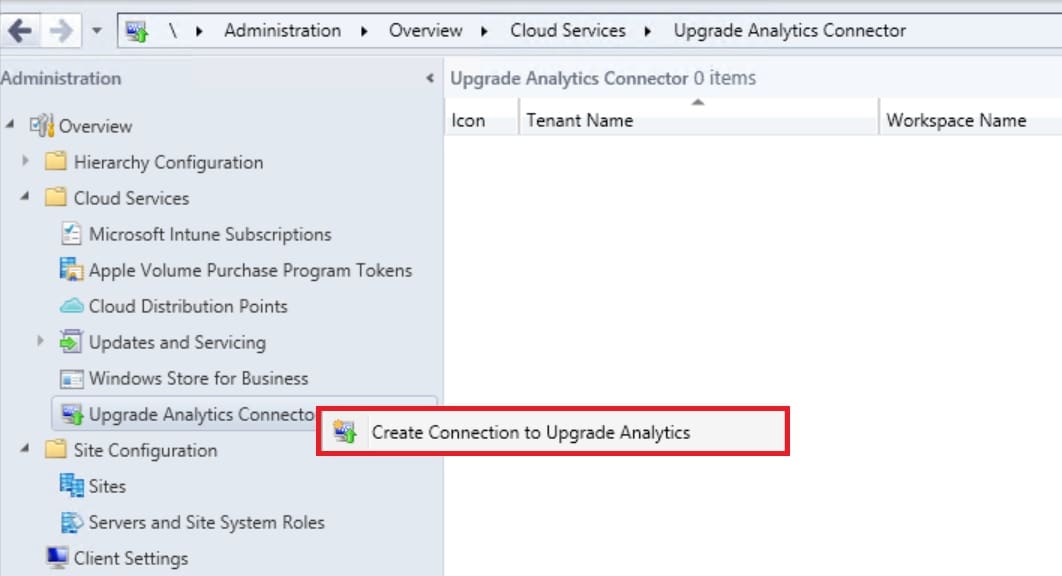
In the ConfigMgr console, under Cloud Services in the Administration workspace there’s a new node called Upgrade Analytics Connector, which is where we setup the connection.
1. Right click on the Upgrade Analytics Connector node and select Create connection to Upgrade Analytics.
2. On the General page, if you click the Learn mode link, don’t be confused that it’s not taking you to the correct documentation page. It’s a bug and it has been reported. Click Next.

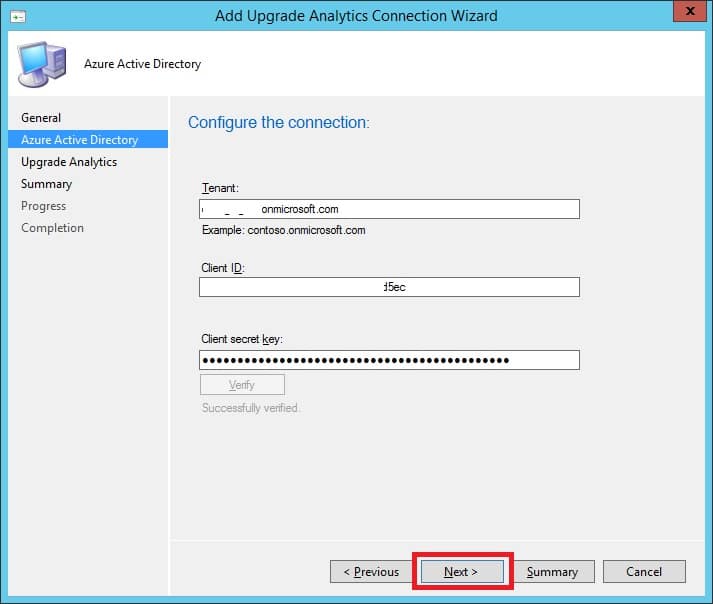
3. Enter your tenant name, e.g. mydomain.onmicrosoft.com, your Client ID and the Secret Key on the Azure Active Directory page. Click Next.
4. If you’ve setup all the prerequisites properly, the drop-down menu on the Upgrade Analytics page should automatically select the correct option. If not, there’s most likely a permission issue with your Azure AD application in your Resource Group. Make sure that you have actually given the application permissions for the Resource Group, and not the OMS workspace, they’re two wildly different things. Click Next.
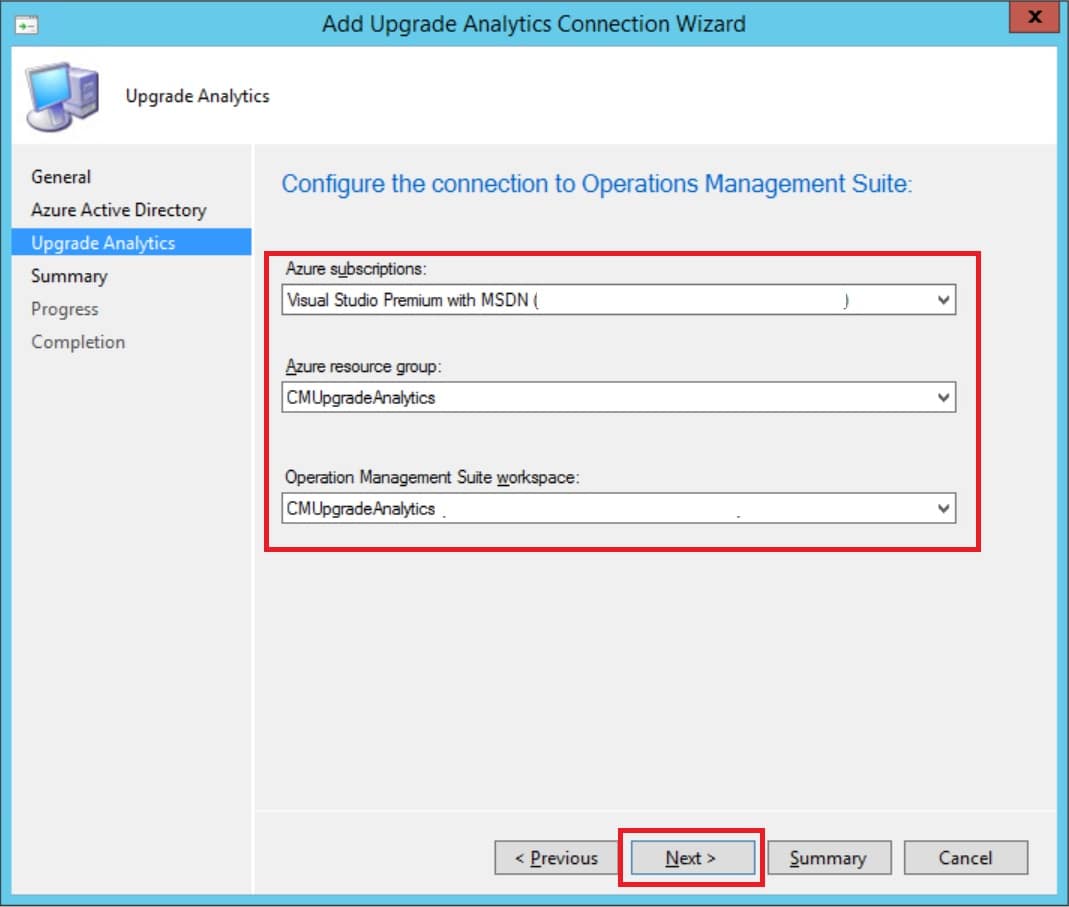
5. On the Summary page, click Next.

6. And finally on the Completion page, click Close.
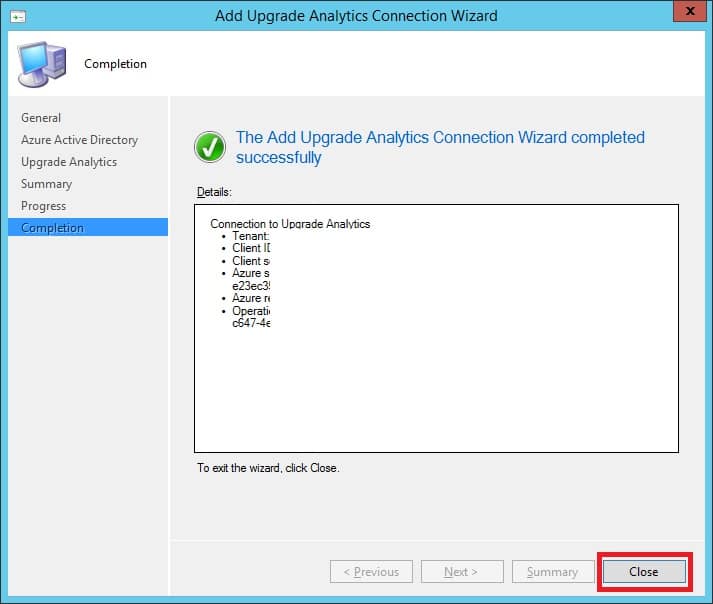
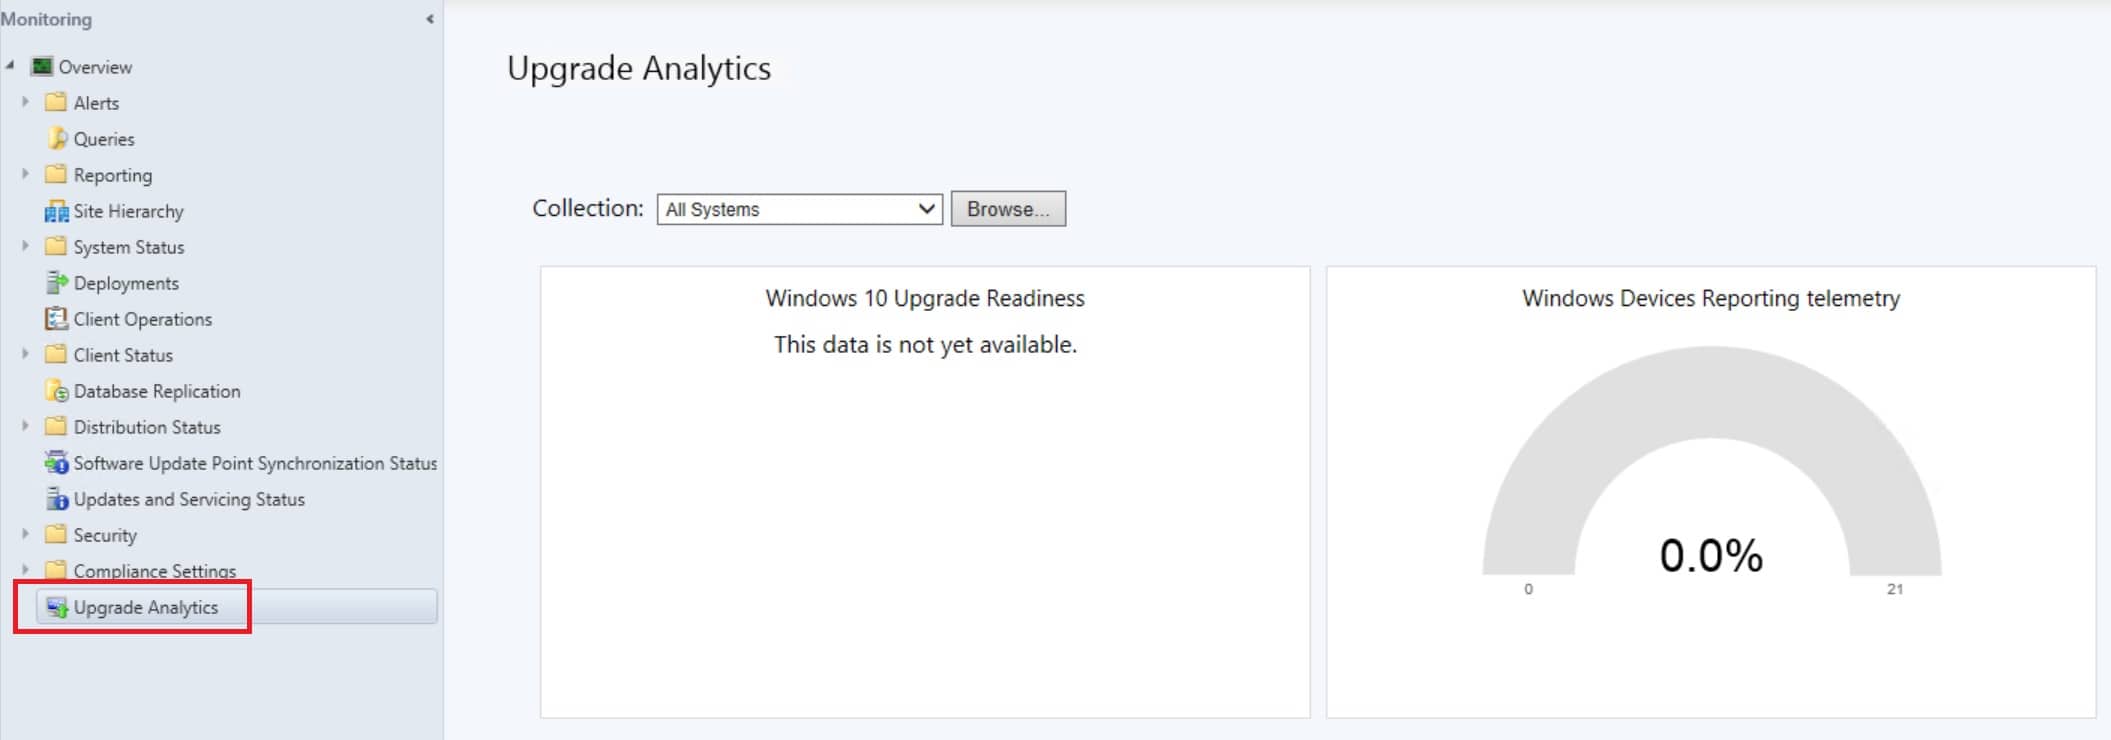
And with that, the connection between ConfigMgr and Upgrade Analytics is now configured. Under the monitoring workspace, there’s a new node called Upgrade Analytics, that provides a dashboard showing you some nice figures.
Summary
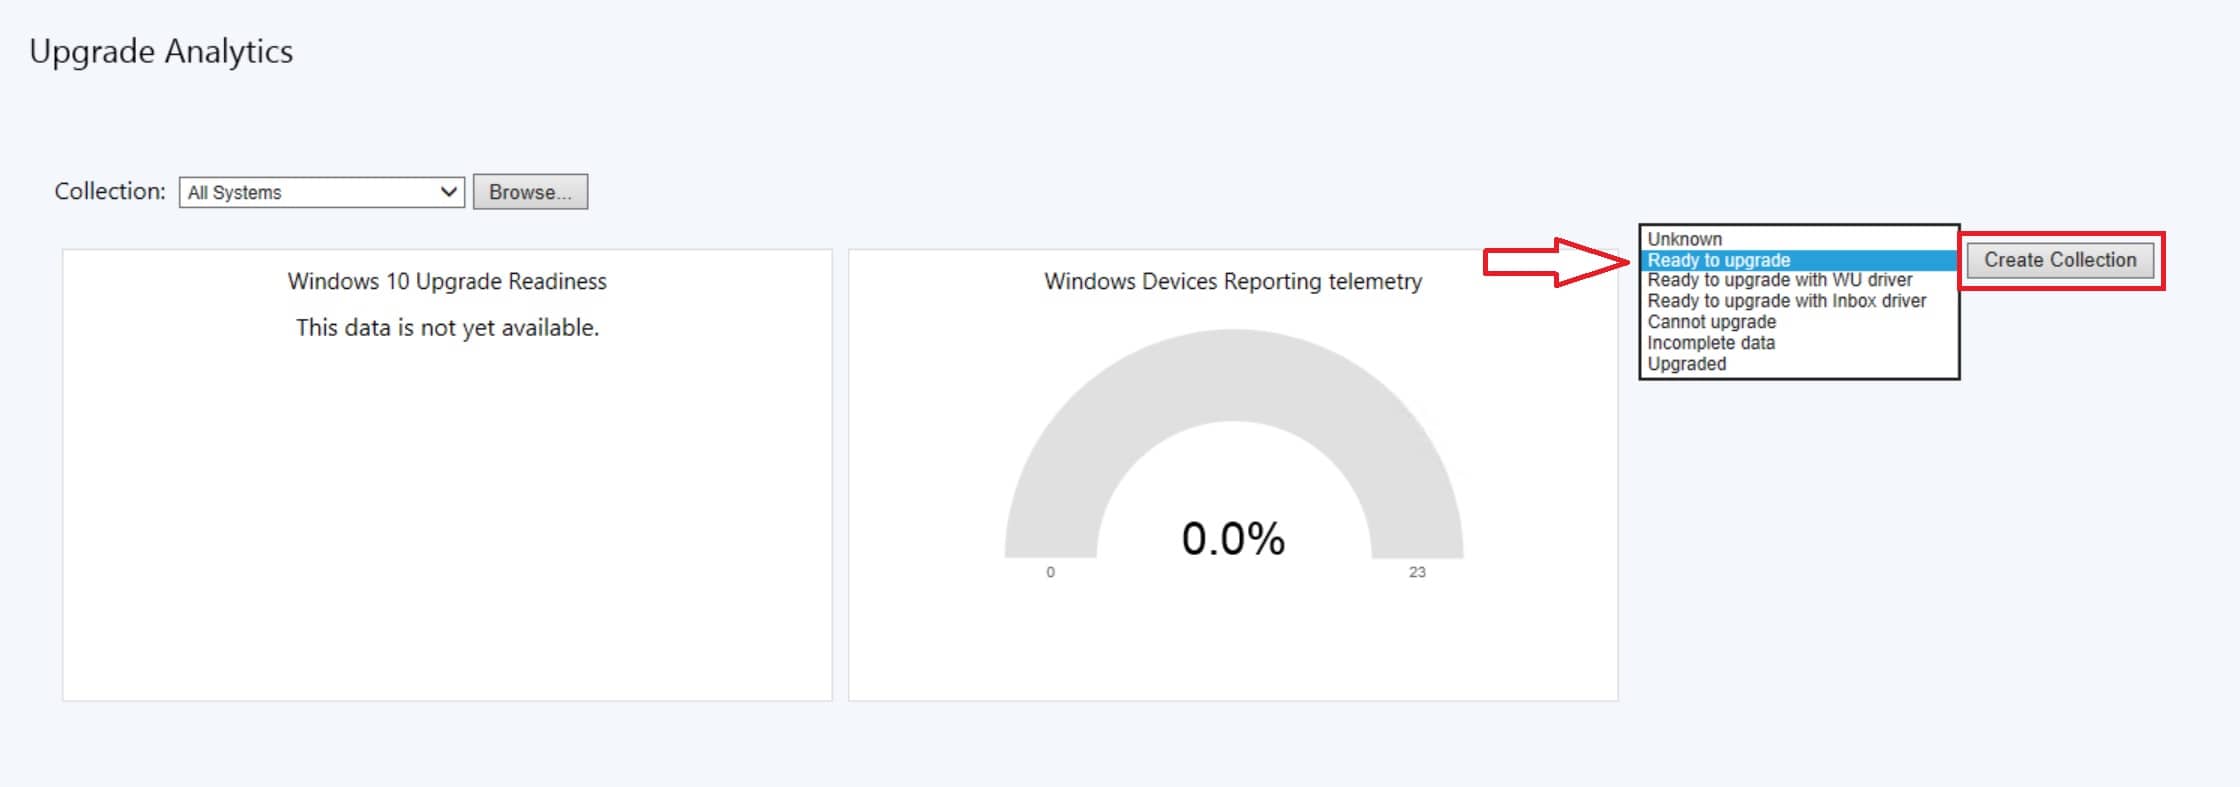
What you need to do now is to wait for the data to be analyzed by Upgrade Analytics, and finally show up in the ConfigMgr console. When the data is available, you’ll be able to create collections based upon this data, and target operating system deployments towards those collections.


Thanks, its a very useful post.
However, I’m facing “Authentication error” when i click “Verify”. In SCCM we enable our internet only for WSUS, does it needs to have open internet access on server?
Thank in advance.
Hi,
Great Post.
Just a little question regarding telemetry service .. Do you know what telemetry level should be used for Upgrade Analytics. Security (level 0) is enough or UA need more ?
Tks for your answer
Thanks for this post, helped me alot as im new to Azure (its not very intuitive!)
I have an issue after i have entered my tenant and client ID, it all validated ok – but on the next screen i can see my Azure Subscription, but there is an error next to the resource group and OMS workspace dropdowns :
“Unable to retrieve valid resource group names”
“Unable to retrieve valid workspace values”
Any ideas how to resolve or even troubleshoot – the errors are a bit rubbish….
I fixed the above issue, I had given the user / app I created a key for permissions to the application within OMS, not the OMS resource group itself – for me it was called mms-weu. This got me past the first page of the wizard in ConfigMgr. No data has started flowing yet, so thats the next thing to sort…