


For those of you that are familiar with the process of enrolling a Mac system, you’ve probably experienced the improvements made to the process with ConfigMgr 2012 R2. There are different ways of completing the task of successfully install the ConfigMgr 2012 R2 client on OS X, but you always have to perform an enrollment at the end either manually or some how automated. In this blog post, I’ll show you how to create a installation package for OS X where it will install the ConfigMgr 2012 R2 client and perform the enrollment, all bundled together in a mpkg file (advanced installation package).
Overview
Here’s a brief overview of what’s covered in this blog post:
- Requirements
- Enrollment scripts
- Package files
- Create the Installation Package
Requirements
I assume that you’ve all of the required components for enrolling Mac systems in ConfigMgr 2012 R2 setup and configured properly. This post will not cover how to configure the infrastructure, so if you haven’t completed that yet I suggest that you do that before you continue. There are several great posts out there that covers the infrastructure required with step-by-step guides. What we do need though is to setup an Active Directory service account for enrolling the Mac systems. This account needs the Read and Enroll permissions on the certificate template created for Mac Enrollment and it should be a regular user account. See the following documentation for creating the certificate template:
Creating and Issuing a Mac Client Certificate Template on the Certification Authority
The required software you’ll need in order to follow along with this blog post are the following:
Composer is not freeware unfortuantely, so you’d have to invest some bucks in that software which I highly recommend that you do. I’ll be using it to create a bunch of pkg files that we then will orchestrate together with Packages (which is freeware) to get our end result, a mpkg file that we can use for either installation or distribution for an automated installation of the ConfigMgr client. The ConfigMgr 2012 R2 Mac client is packaged into an MSI file that you’ll need to download the Microsoft Download Center (see ConfigMgr 2012 R2 Mac client link above, choose the ConfigMgrMacClient.msi file when asked for what file to download) and install on a Windows system. Once you’ve installed the MSI package, grab the macclient.dmg file from:
C:\Program Files (x86)\Microsoft\System Center 2012 R2 Configuration Manager For Mac Client
You’ll also need access to a Mac system running any version of OS X, preferably 10.6 or above. From here and on, all of the tasks we do will be performed in OS X.
Enrollment scripts
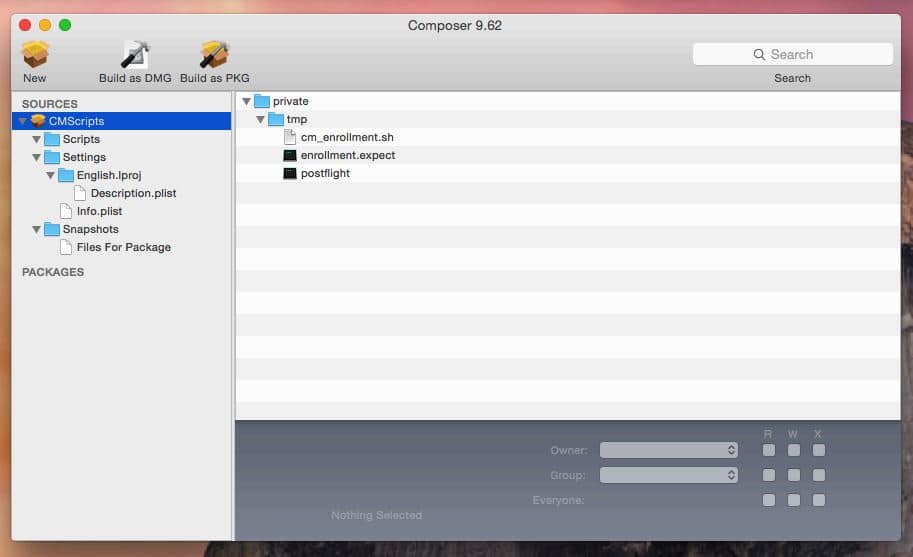
In order to get everything automated, we’ll be using a set of scripts that will handle different tasks. Below you’ll find three scripts that you need to save. In my lab (I’m running OSX Yosmite on a Mac Mini from 2011) I’ve created a folder on my Desktop that I’ve called Scripts. I suggest that you create the same folder. It’s recommended that you know the difference between a shell script and an expect script. Since my knowledge of the OS X platform is limited, I had to read up on these two scripting languages in order to understand them better and how to leverage their functionality properly. If you wish to modify these scripts further, it’s a good idea to understand how they work.In this post the expect script is where the magic happens, although I leverage the shell script as a wrapper if I’d want to extend it’s capabilities further.
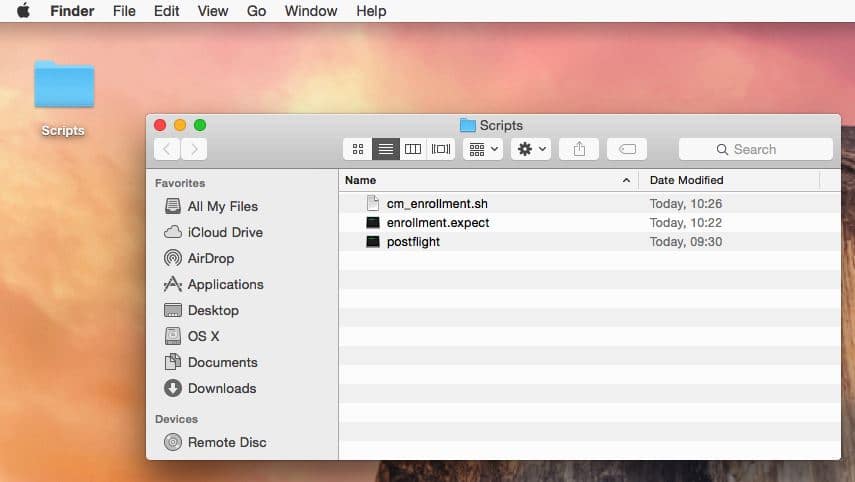
cm_enrollment.sh
This script is a shell script that will be used to launch the expect script. It’s basically a small wrapper for the expect script. Save the script below as cm_enrollment.sh in the Scripts folder on your Desktop.
#!/bin/bash
## Start expect script
/tmp/enrollment.expect
exit 0
enrollment.expect
This script is actually where the enrollment of the ConfigMgr client happens. Save the script below as enrollment.expect (it’s important that you get the extension correct) in the Scripts folder on your Desktop.
#!/usr/bin/expect
## Timeout
set timeout 20
## Enroll ConfigMgr Client
spawn /Library/Application\ Support/Microsoft/CCM/Tools/CMEnroll -s FQDN -ignorecertchainvalidation -u UPN
expect "Please enter your password."
send PWD
send \r
expect "Successfully enrolled."
interact
exit 0
In the script above, you need to replace a couple of strings with valid data for your environment, so replace the following parts:
- FQDN
- Replace with the FQDN of your Enrollment Proxy Point
- UPN
- Replace with the user name of the service account in the following format e.g. [email protected]
- PWD
- Replace with the password for the service account (don’t worry, the expect script will be stored in the /tmp folder and removed upon reboot)
postflight
This script will be used in the Packages application as a postflight script being in charge of installing all of the bundles pkg files that we’ll create and lastly execute the cm_enrollment.sh shell script (that then executes the enrollment.expect script). Save the script below as postflight in the Scripts folder on your Desktop.
#!/bin/sh
## Determine working directory
install_dir=`dirname $0`
## Install the packages
/usr/sbin/installer -dumplog -verbose -pkg $install_dir/"CMClient.pkg" -target "$3"
/usr/sbin/installer -dumplog -verbose -pkg $install_dir/"CMScripts.pkg" -target "$3"
/usr/sbin/installer -dumplog -verbose -pkg $install_dir/"CMTools.pkg" -target "$3"
## Execute wrapper script
/tmp/cm_enrollment.sh
exit 0
You should now have the following three scripts in the Scripts folder on your Desktop:
Package files
Now that we have the enrollment scripts ready, we need to create some packages. We need to create the following two packages:
- CMTools
- CMScripts
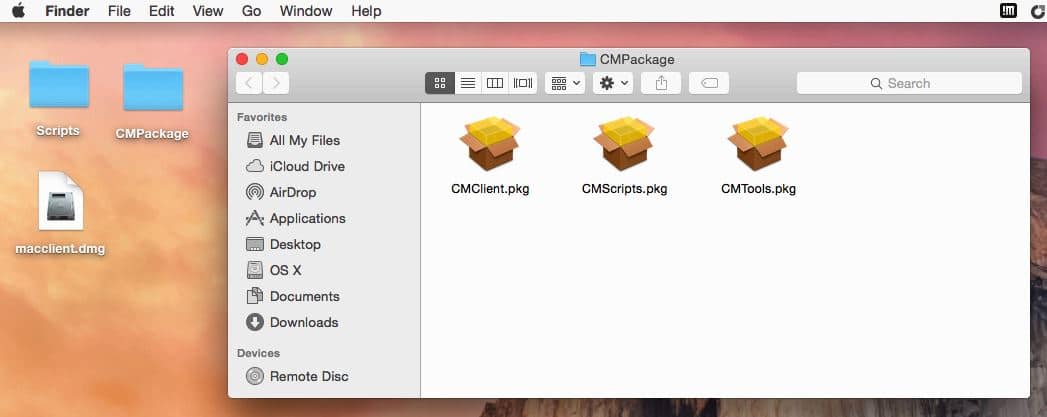
In addition to these two packages that we’re going to create, we’re gonna use a third package called CMClient.pkg. I’ll describe how we’re going to get our hands on this package later. Before we begin, copy over the macclient.dmg file that you’ve previously obtained from the ConfigMgrMacClient.msi file and put it on your Desktop.
CMTools
1. Create a folder on your Desktop called CMPackage.
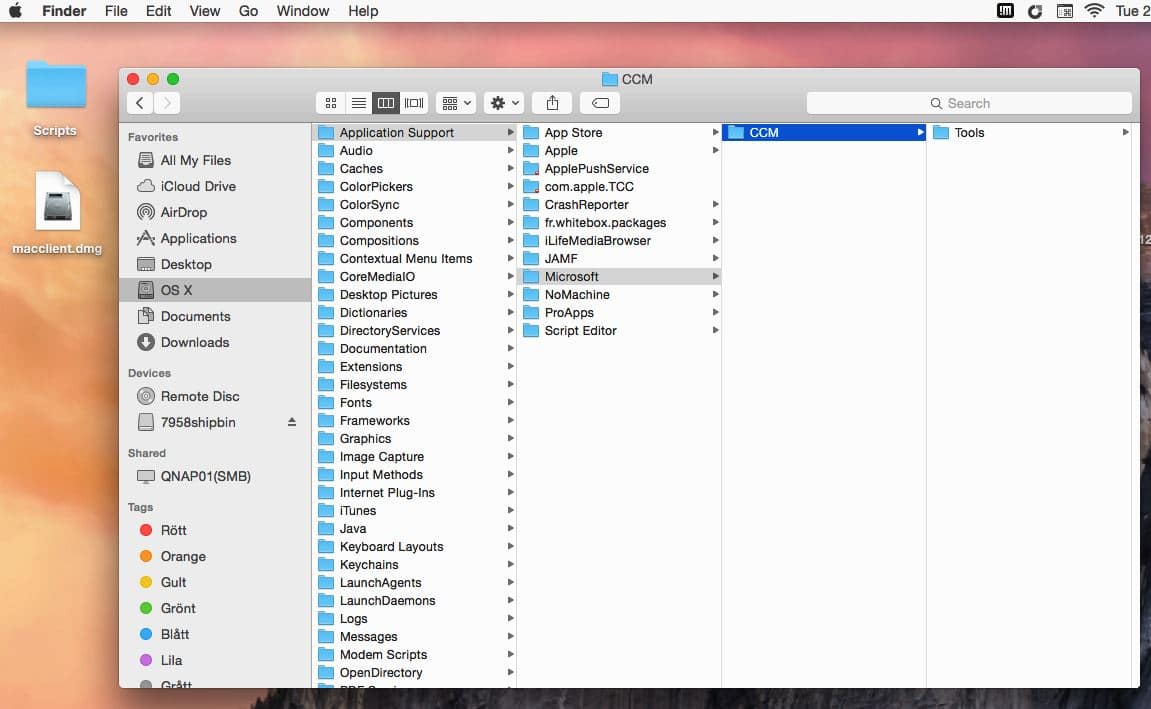
2. Open Finder, click on the Go tab and select Go to Folder and enter /Library in the window that pops up, click Go.
3. Create the following folder structure:
/Library/Application Support/Microsoft/CCM/Tools
4. Double click on the macclient.dmg file on your Desktop.
5. Copy the contents of the Tools folder to the recently created folder structure:
/Library/Application Support/Microsoft/CCM/Tools
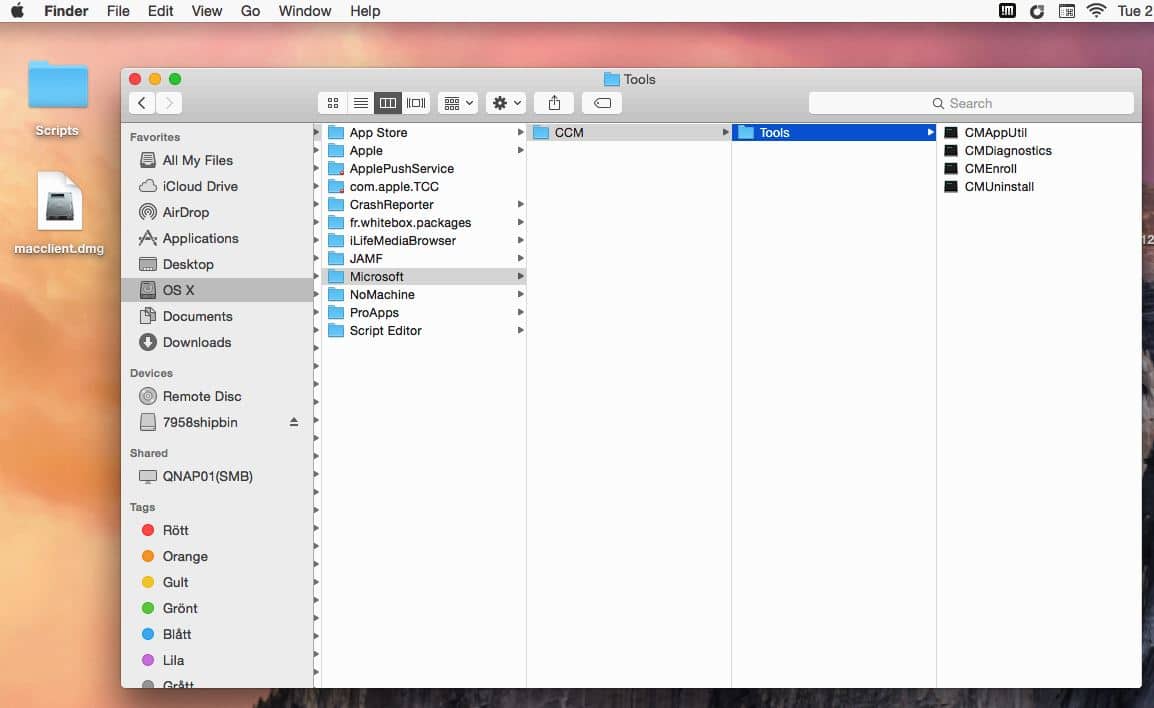
6. Open Composer and drag the contents in the Tools folder from the folder structure that we’ve created into Composer under Sources.
7. Right-click on CMApputil to the left and rename it to CMTools.

8. Click on Build as PKG and save it in the CMPackage folder on your Desktop.
CMScripts
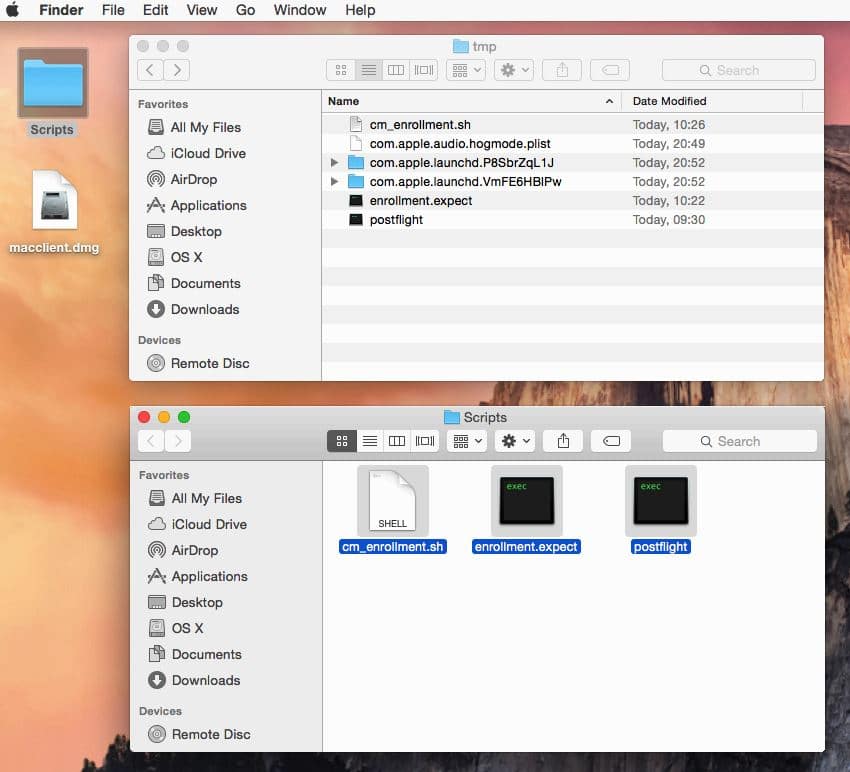
1. Open Finder, click on the Go tab and select Go to Folder and enter /private/tmp in the window that pops up, click Go.
2. Copy the three script files from the Scripts folder on your Desktop to the /private/tmp folder.
3. Open Composer (if you closed it previously).
4. Right-click CMTools and select Delete CMTools (if the package is present in Composer) and select Delete.
5. Drag the three scripts files into Composer under Sources.
6. Rename the package that is now called cm_enrollment.sh to CMScripts.
7. Click on Build as PKG and save it in the CMPackage folder on your Desktop.
CMClient
This is the easy part, since we don’t need to create this package. Simply just double-click on the macclient.dmg file on your desktop and copy the CMClient.pkg file to the CMPackage folder on your Desktop.
We should now have the following three packages in the CMPackage folder:
Create the Installation Package
Now it’s time to put all the pieces together into a single Installation Package. For this we’re gonna use an application called Packages.
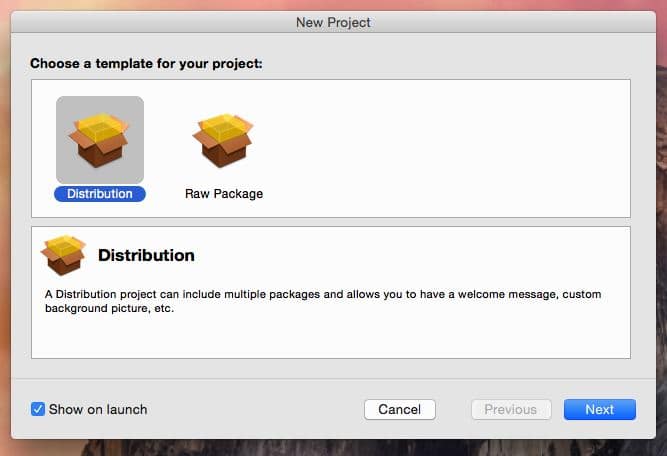
1. Open Packages. On the New Project page, select Distribution and click Next.
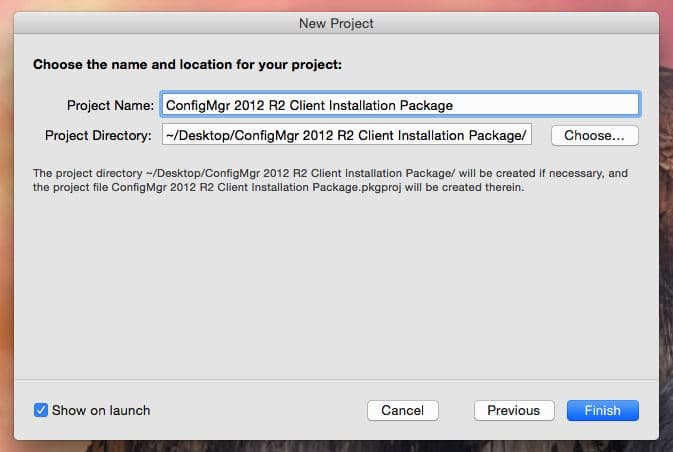
2. Give the project a suiteable name, e.g. ConfigMgr 2012 R2 Client Installation Package and amend the Project Directory so that it will be stored on the Desktop. Click Finish.
3. Go to the Requirements and Resources tab for the project and put a check mark next to the Install on start disk only.
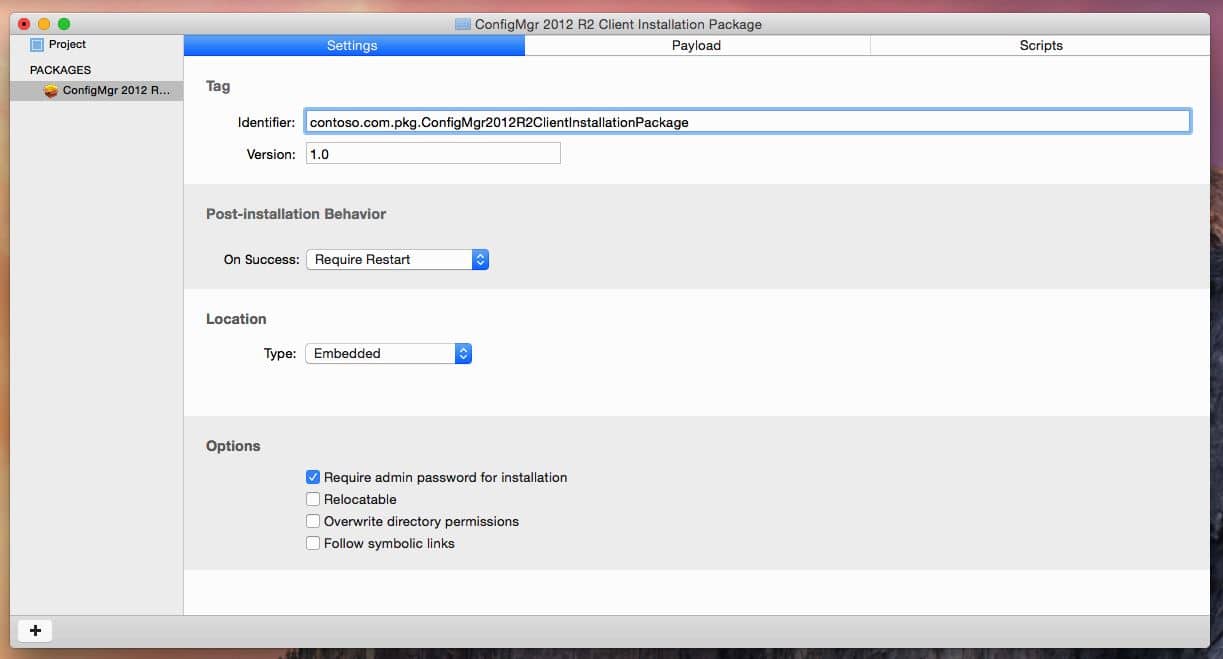
4. Select the ConfgMgr 2012 R2 Installation Package package on the left pane.
5. In the Identifier field, amend the text to reflect your company, in my case contoso.com for instance. Select Require Restart in the On Success drop down menu.
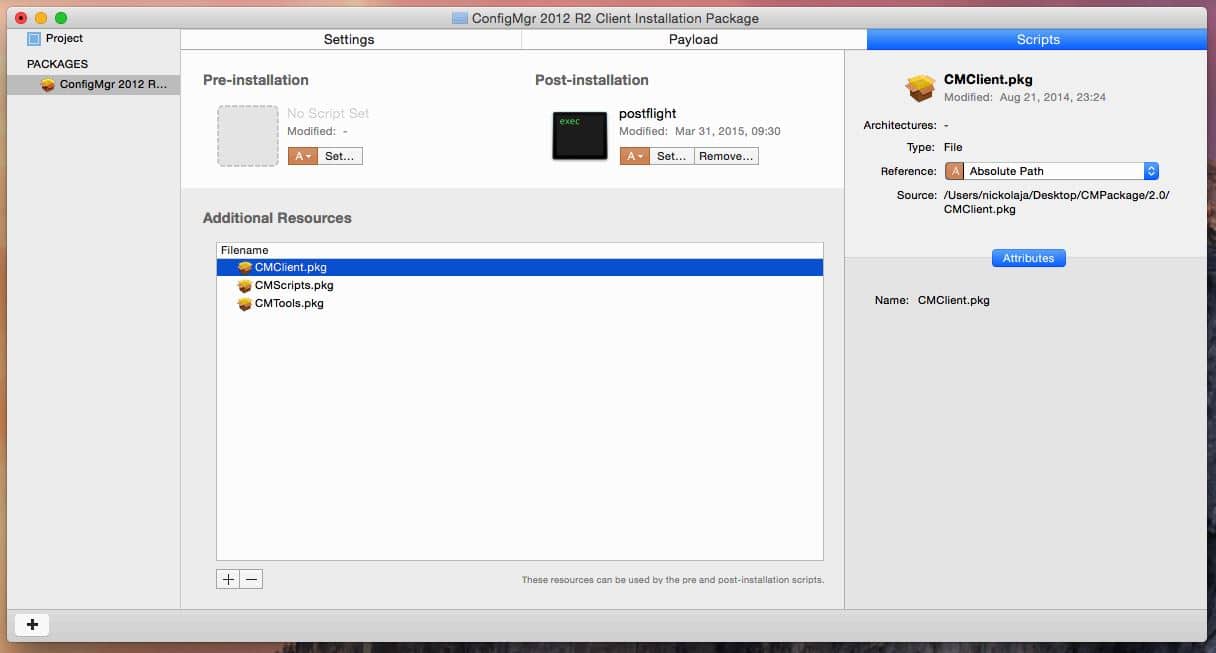
6. Click on the Scripts tab and click on the plus sign in the left corner. Add all of the packages in the CMPackage folder on your Desktop. When asked for Reference Style, choose Absolute Path and click Add. Click on Set right under Post Installation and point to the postflight script in the Scripts folder on your Desktop.
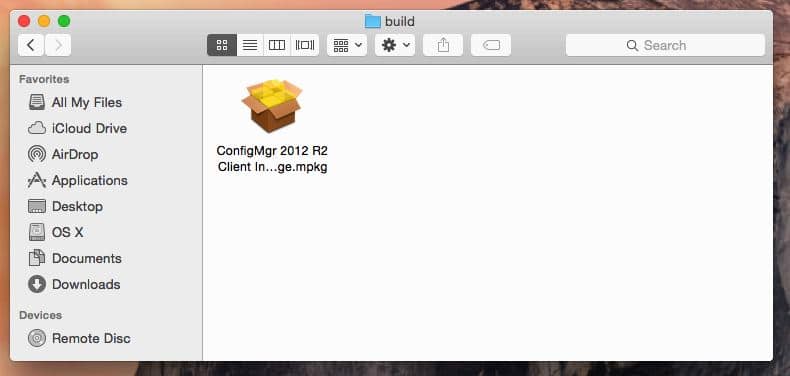
7. Click on the Build tab and select Build. Allow the program to save the project when asked.

If you open up the ConfigMgr 2012 R2 Client Installation Package folder on your desktop, you’ll have a ConfigMgr 2012 R2 Client Installation Package.mpkg in the build folder. This is the Installation Package that contains all the components required to perform an automated installation of the ConfigMgr client.
You can now go ahead and execute this package on your Mac systems to install the ConfigMgr client and have it enrolled automatically. That’s all, I hope this helps!


Nickolaj,
Thanks for the helpful guide on how to set this up. I did just as Kim mentioned in creating everything, but after reading her conversation with you looks like I’ll have to go back and change a couple of things because mine was not working either.
One of the problems could possibly be the manner in which I’m trying to execute the package which is through DeployStudio. After several test runs with another package build aside from coming across yours, I have the experience from the test of seeing the package install with no problem– but the fields never populate and enroll. Instead I have to manually fill in the fields that I really want to see populate and auto-enroll my test Mac. So, I’m thinking that DeployStudio is not the tool I should use.
What tool or method did you use to automate the enrollment of the Mac into SCCM? Did Kim mention the method/tool with which she got the automation to work?
Thanks.
Disregard. I got it to work. Thanks for this article! It helped a lot!
So here is my input for the expect script:
#!/usr/bin/expect
## Timeout
set timeout 20
## Enroll ConfigMgr Client
spawn /Library/Application\ Support/Microsoft/CCM/Tools/CMEnroll -s psccmsa4.mydomain.com -ignorecertchainvalidation -u [email protected]
expect “Please enter your password.”
send mypassword
send \r
expect “Successfully enrolled.”
interact
exit 0
I followed your instructions to the tee and for some reason it won’t register. I found that the SCCM Tools weren’t copying to the library\Application Data\Microsoft\CCM folder that I created. When I try to copy the tool files manually it still won’t register when I run the scripts. I can, however, register it manually via the configuration manager console, or via the cmenroll sudo command. I’m pretty much using your script and filled in the variables with my settings. Also, is there a reason why we have to copy the postflight installation file in /tmp directoy as well as have it run in the post installation in Packages?
Hi Kim,
That’s strange, I have it working here in my lab and just set it up at a customer. What output do you get when you run the enrollment.expect script?
No, there’s no reason for that, a slight mistake from my end 🙂
Regards,
Nickolaj
Thanks for the prompt reply. I get the error:
Need sudo priveleges to run.
send: spawn id exp7 not open
while executing
“send PWD”
Hi Kim,
Could you please re-run it with sudo priviliges?
Are you not prompted during the installation to elevate?
Regards,
Nickolaj
It registers fine when I try to run it with sudo privileges. And it does prompt for an admin password to elevate. I also tried adding an expect line for the local admin password.