


The purpose of this post is to describe a way of implementing the Replace scenario in ConfigMgr 2012. I’ll cover some bits more in detail and some others on a more high-level scale. So let’s go through the steps in order to setup the Replace scenario with ConfigMgr 2012.
Overview
- Scenario
- Site System Roles configuration
- Packages
- Task Sequences
- Computer associations
- How it all works together
Scenario
In my current work, we where faced with a global computer replacement program. Computers older than 3 years would have to be replaced by new hardware. In our case, installing a bare-metal system without migrating the users settings and documents was not an option. We had to migrate a specific user for a specific computer. So we decided to take advantage of ConfigMgr 2012 that we had in place and build a replace scenario for the new hardware. The ConfigMgr hierarchy consists of a stand-alone Primary Site server with several Secondary Sites for each region of the world.
Site System Roles configuration
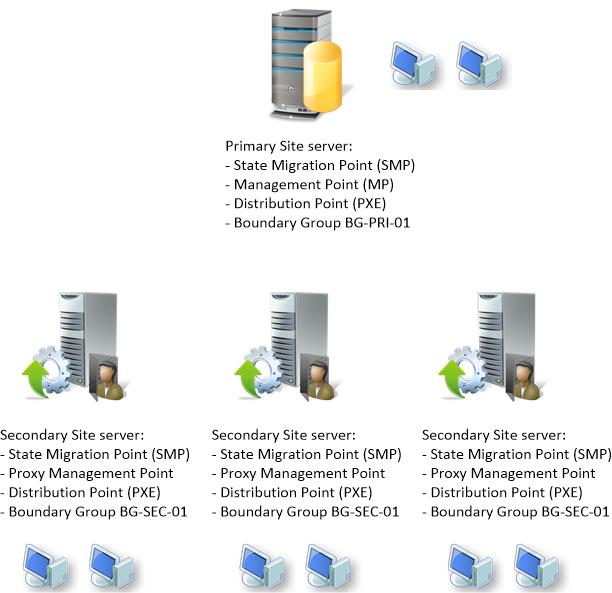
For our replace scenario to work with ConfigMgr you need to install the State Migration Point site system role in each Site where you have clients. In the scenario described above, we added the State Migration Point to our Primary Site server and to all Secondary Site servers. When a client is trying to locate the best State Migration Point site system role, the discovery works in the same way a client would locate content on a Distribution Point. It uses the Boundary Groups to find the State Migration Point. Let me give you an example. You have a stand-alone Primary Site server, a Secondary Site server and a client located in the same region as the Secondary Site. A Boundary Group called BG-SEC-01 is configured with a Boundary for the client subnet of 192.168.1.0 and content locations for the Distribution Point and State Migration Point on the Secondary Site server. When the client is instructed to use a State Migration Point, it will either retrieve or store the contet on the State Migration Point associated with the Boundary Group the client is currently located in.
In this case we added the State Migration Point directly on the Secondary Site servers and the Primary Site server. We didn’t install any additional Site System servers in the Secondary Sites or the Primary Site, and because the Boundary Groups was already configured correctly with the Site System servers where we added the State Migration Point, everything was already in place. But if you were to do so, you’d need to add a new Site System Server in ConfigMgr for the new server that will have the State Migration Point site system role installed. In addition to that you’d have to add the new Site System Server to the appropiate Boundary Group. You can do that if you open the Properties of the Boundary Group, goes to the References tab and clicks on Add under Content Location. Select the new Site System Server and you’re good to go.
To give you a better overview of how we’ve configured our Site servers, see the picture below:
Packages
In order to migrate the user data, you’d need to verify that you have a USMT package containing the USMT files from the Windows ADK. This is created by default and called User State Migration Tool for Windows <version>. If you don’t have that package, create a new package without anny programs and the content source pointing to:
C:\Program Files (x86)\Windows Kits\<version>\Assessment and Deployment Kit\User State Migration Tool
The above path assumes that you’ve installed Windows ADK in the default path.
Task Sequences
You’ll need to create two seperate Task Sequences so that you have the option to first backup the old computer, storing the users migration data (documents and settings) and then on the new computer restore the migration data during the installation phase. In this post we’re gonna reference to the two task sequences as:
- Windows 7 x64 – Backup System
This task sequence will make use of USMT and perform the back of the migration data to the State Migration Point. - Windows 7 x64 – Install Replace System
This task sequence will install the new computer and also restore the users migration data from the State Migration Point.
Let’s go through each task sequence and explain how it’s configured.
Windows 7 x64 – Backup System
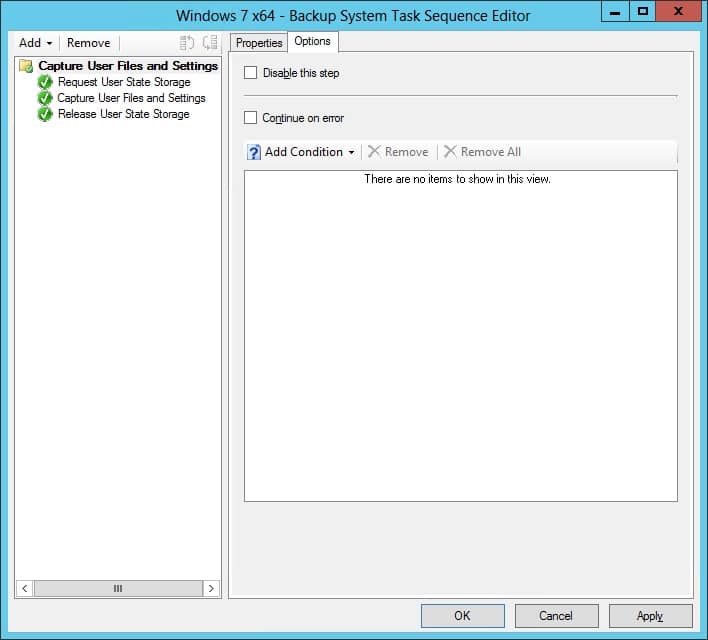
In this task sequence we have 3 different steps. Each step is configured as the following:
- Request User State Storage
Step: Request State Storage
Capture state from the computer
Number of retries: 3
Retry delay (in seconds): 60
If computer account fails to connect to state store, use the Network Access account: Enabled - Capture User Files and Settings
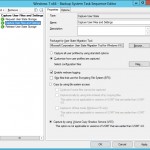
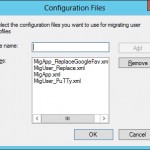
Step: Capture User State
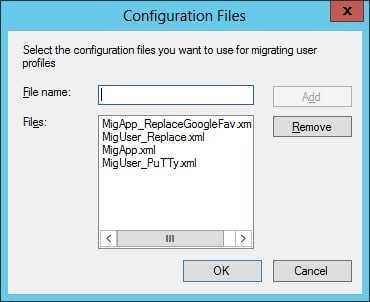
See pictures below how this step is configured. The specified custom configuration files are copied into the content source of the USMT package (in the amd64 folder, since our environment only has 64-bit versions of Windows 7). Remember to update the package on the DP’s. You’d need to atleast choose the default files here, which are MigApp.xml and MigUser.xml.
- Release User State Storage
Step: Release State Store
No configuration available on this step

Windows 7 x64 – Install Replace System

This task sequence is basically a copy of our main task sequence that we use to deploy operating systems to bare-metal systems. Except for 3 extra steps, which restores the users migration data onto the new computer. You should add the 3 steps after the Setup Windows and ConfigMgr step. See below how the steps are configured:
- Request State Store
Step: Request State Store
Request state storage location to: Restore state from another computer
Number of retries: 3
Retry delay (in seconds): 10
If computer account fails to connect to state store, use the Network Access account: Enabled - Restore User State
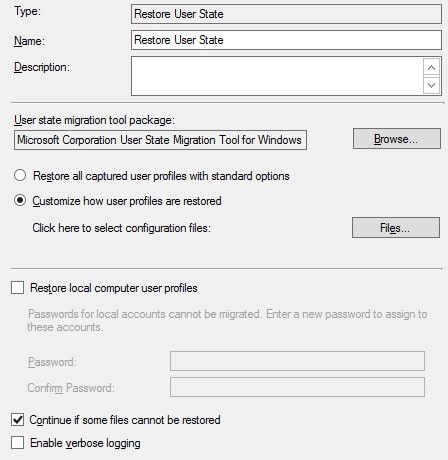
Step: Restore User State
See picture below how this step is configured. The same XML files choosen in the Windows 7 x64 – Backup System task sequence is also specified here.
- Release State Store
Step: Release State Store
No configuration available on this step

Now that we have both task sequences configured for the computer replacement, we need to deploy them. The Windows 7 x64 – Backup System is deployed to custom collection called Replace – Source Computers. This collection contains all the computers in our organization. The Windows 7 x64 – Install Replace System task sequence should be deployed to a custom collection called Replace – Destination Computers. This collection is an empty collection where we’ll import the new computers.
Computer associations
When the State Migration Point has been added to each necessary Site System Server, the task sequences have been created and updated, the USMT package is distributed to all necessary DP’s, we can then go ahead and create a computer association. This is the most crucial part, and where we need to get everything right. What we’re doing here is that we’re creating an association between the old computer that is about to be replaced and the new computer that we’ll install and migrate the user data to. You can do this in different ways. One of them is to use the ConfigMgr console. The process is described below:
1. Right-click on Devices in the Assets and Compliance view and choose Import Computer Information. Follow the wizard to import the new computer into the ConfigMgr database.
2. Right-click on User State Migration in the Assets and Compliance view and choose Create Computer Association.
3. On the Computer Association tab, specify the old computer as the Source computer and the new computer as the Destination computer.
4. On the User Accounts tab, select Capture and restore specified user accounts and add the user account to be migrated between the computers.
This is fairly simple, but it requires access to the ConfigMgr console and the necessary permissions to import a computer object and then create the association. Instead we choose another approach, Orchestrator, PowerShell and an End-User Portal. I’m not gonna go through all the steps to setup an End-User Portal for Orchestrator, but I encourage you to take a look at Eupsco. It’s a free End-User Portal that is easy to install and works well with Orchestrator. This is how we set it up described at a high level:
1. Installed Eupsco on our Orchestrator server.
2. Created a Runbook in Orchestrator and with the PowerShell script below.
3. Created a service in Eupsco pointing to the Runbook.
Now anyone with the proper access (an Active Directory group) could browse to the Eupsco Portal, execute the Runbook and the computer association will be created automatically. In the script below, some of the variables would have to specified hard in the script, and some from Published Data in the Runbook. Here’s how we did it:
$SiteServer = “<Primary_Site_Server>” (specied in the script)
$SiteCode = “<Site_Code>” (specified in the script)
$MigrationUserName = “<Domain>\” + “<UserName>” (domain should be specified in the script, while UserName should be a string from Published Data in the Runbook)
$DestinationComputerName = “<Destination_ComputerName” (Published Data from the Runbook)
$DestinationMACAddress = “<Destination_Computer_MACAddress>” (Published Data from the Runbook)
$SourceComputerName = “<Source_ComputerName>” (Published Data from the Runbook)
$CollectionName = “Replace – Destination Computers” (specified in the script)
# 0 - Dynamic variables
$SiteServer = "<Primary_Site_Server>"
$SiteCode = "<Site_Code>"
$MigrationUserName = "<Domain>\" + "<UserName>"
$DestinationComputerName = "<Destination_ComputerName"
$DestinationMACAddress = "<Destination_Computer_MACAddress>"
$SourceComputerName = "<Source_ComputerName>"
$CollectionName = "Replace - Destination Computers"
# 1 - Import Computer information to Replace - Destination Computers collection
# 1.1 - Create a new computer object
$CollectionQuery = Get-WmiObject -Namespace "Root\SMS\Site_$($SiteCode)" -Class SMS_Collection -ComputerName $SiteServer -Filter "Name='$CollectionName'"
$WMIConnection = ([WMIClass]"\\$($SiteServer)\root\SMS\Site_$($SiteCode):SMS_Site")
$NewEntry = $WMIConnection.psbase.GetMethodParameters("ImportMachineEntry")
$NewEntry.MACAddress = $DestinationMACAddress
$NewEntry.NetbiosName = $DestinationComputerName
$NewEntry.OverwriteExistingRecord = $True
$Resource = $WMIConnection.psbase.InvokeMethod("ImportMachineEntry",$NewEntry,$null)
# 1.2 - Create a direct rule
$NewRule = ([WMIClass]"\\$($SiteServer)\root\SMS\Site_$($SiteCode):SMS_CollectionRuleDirect").CreateInstance()
$NewRule.ResourceClassName = "SMS_R_SYSTEM"
$NewRule.ResourceID = $Resource.ResourceID
$NewRule.Rulename = $ResourceName
# 1.3 - Add the newly created machine to Replace - Destination Computers collection
$CollectionQuery.AddMemberShipRule($NewRule)
# 2 - Create Computer Association with User State Migration
# 2.1 - Get source and destination ResourceID's
$SourceResourceID = Get-WmiObject -Namespace "Root\SMS\Site_$($SiteCode)" -Class SMS_R_System -ComputerName $SiteServer -Filter "Name='$SourceComputerName'" | Select-Object -ExpandProperty ResourceID
$DestinationResourceID = Get-WmiObject -Namespace "Root\SMS\Site_$($SiteCode)" -Class SMS_R_System -ComputerName $SiteServer -Filter "Name='$DestinationComputerName'" | Select-Object -ExpandProperty ResourceID
# 2.2 - Create the association
$NewUserName = ([WMICLASS]"\\$($SiteServer)\root\SMS\Site_$($SiteCode):SMS_StateMigrationUserNames").CreateInstance()
$NewUserName.UserName = $MigrationUserName
$NewUserName.LocaleID = 0
$WMIConnection = [WMICLASS]"\\$($SiteServer)\root\SMS\Site_$($SiteCode):SMS_StateMigration"
$AddAssoc = $WMIConnection.psbase.GetMethodParameters("AddAssociationEx")
$AddAssoc.SourceClientResourceID = $SourceResourceID
$AddAssoc.RestoreClientResourceID = $DestinationResourceID
$AddAssoc.MigrationBehavior = 2
$AddAssoc.UserNames = $NewUserName
$WMIConnection.psbase.InvokeMethod("AddAssociationEx",$AddAssoc,$null)
# 3 - Refresh collection membership
try {
    if (Test-Connection -ComputerName $SiteServer -Count 15) {
        $CollectionQuery = Get-WmiObject -Namespace "Root\SMS\Site_$SiteCode" -Class SMS_Collection -ComputerName $SiteServer -ErrorAction STOP -Filter "Name='$CollectionName'"
        $CollectionQuery.RequestRefresh()
    }
}
catch {
    Write-Output "Error: $($_.Exception.Message)"
}
How it all works together
When everything is setup and configured for the Replace scenario, the process is quite simple.
1. The user runs the Windows 7 x64 – Backup System task sequence from the Software Center.
2. The task sequence starts to capture the specified user’s documents and settings and stores the data on the State Migration Point.
3. A ConfigMgr administrator creates the new computer object by importing it to the ConfigMgr database and at the same times creates an association between the old computer and the new. If instead the script is used from either a Runbook or by just running it directly, all the necessary components is created automatically.
4. An administrator/help desk personal initiates the Windows 7 x64 – Install Replace System task sequence either by PXE or by boot media.
5. The task sequence installs the new computer and restores the specified user’s documents and settings.
That’s all you have to do. Now go try it out in a lab environment! If you have any question about specific parts of this post, write a comment or drop me an email and I’ll answer them as soon as possible.


This is the line that throws the error: $WMIConnection.psbase.InvokeMethod(“AddAssociationEx”,$AddAssoc,$null)
This is the issue I’m having as well.
This is the same issue I’m running into.
This looks like exactly what we are trying to do but the script is broken for me, does anyone else get this message
Exception calling “InvokeMethod” with “3” argument(s): “Generic failure ”
At C:\Build Computer Assossiation WMI.ps1:56 char:1
I’m getting this same issue. “InvokeMethod” with “3” argument(s): “Generic failure”
I figured out why it was not PXE booting after some more research. Very simple problem.
https://www.itsupportguides.com/knowledge-base/configmgr-sccm/sccm-os-deployment-pxe-boot-aborted/
When I read the part that says the PC is not a member of any collection that has a task sequence deployed to it… it got me thinking.
When you import computer information using the computer name and mac address, it informs you that it will be added to the “All Systems” collection.
I checked my collection that I had the task sequence deployed to and the limiting collection was “All Workstations” therefore it had no members. When I changed the limiting collection to “All Systems” the computer account was added and I was able to PXE boot to the USMT restore task sequence.
Old thread, not sure if anyone is responding any more?… I have the same issue as Joel O posted above on 12.7.15.
I am able to do everything except PXE boot on the replacement PC because once I import the computer information, it is no longer an “Unknown Computer” in the way SCCM recognizes “Unknown Computers”.
Due to this, I cannot even get to the screen to choose a task sequence as the PXE boot fails because the computer is known. If I remove the imported PC information, then the computer association does not exist and will therefore not copy the data back to the new PC after Windows has been installed.
If they are bare metal machines how are they already in SCCM to create the association? This is the one thing I am not understanding about USMT. Do you image them first to get them into SCCM then re-image them?
I assume that I need to manually put in the Computername, MAC address and SMBIOS GUID. If this is true and I have to do it for 1,000 machines I would rather create a users account associated network drive and have the users backup their own files.
Your script looks awesome. I have one question related to it. I am under the gun and trying to work through what you have but have a question.
Is there a way to take a list of existing computers in column A and then have them associated with a list in column B and specify to capture for “all users” on the machine?
Any help would be appreciated. It looks I could tweak something but I would like to automate what I can for our support teams or give them a prompt to be able to run the script, enter the info and then it will go through.
Thanks a ton!
Hi Nickolaj, How are you?
I hope you still can reply my question on this post you made couple years ago.
Actually, it is simple question, not very technical.
I have Windows 7 HOME x86 running on the domain.
Am I able to run a ConfigMgr 2012 R2 SP1 CU2 Replace task sequence just to upgrade the Windows to Windows 7 Enterprise x64?
I will keep the hardware, I just want to change the OS and keep user profiles.
Thank you in advance.
Eden Oliveira
Nice post Nickolaj.
Can the destination computer be an existing computer within SCCM? or must the destination computer be a brand new system?
I saw ‘skullicious’ post above and noticed that “B) If existing machine – Add machine to USMT/ Windows 7 x64 – Replace System collection.” Therefore I made the attempt of adding an existing computer to the Replace-Destination Computers but as I attempt to PXE to the Task Sequence, I am denied assuming because computer already exists.
Would you be able to assist? Still new to SCCM in general but completely naïve on USMT altogether.
Thank you.
Nice post very usefull
Has anyone heard of a usmt process where the computer association is handled within the ts or where the backup is created and copied to the new computer as part of the process?
Thanks in advance,
Ha?
HA as in High-Availability? Or just a simple, ha! 🙂
/Nickolaj
Hi,
thanks for the post. Currently I am looking for a solution to buildup a desktop restore procedure using SCCM which will be able to restore the OS image along with system configurations and some specific applications in case change of hardware.
Can you please guide what exact task sequences and tasks I need to define.
//Shadid
Hi Shadid,
In that case it seems to me that you’re wanting to perform a “Refresh”. I don’t have any guide for that, but if you search for “SCCM OSD refresh”, you’ll most likely get tons of information. One of the search results that I found was:
https://blogs.technet.com/b/configmgrteam/archive/2013/09/12/how-to-migrate-user-data-from-win-xp-to-win-8-1-with-system-center-2012-r2-configmgr.aspx
Regards,
Nickolaj
This is superb. I’ve been looking for a way to do this, and this looks ideal. Can’t wait to try it when I get back to work on Monday!
Will these work in sccm 07?
Great post! Really got me on the right track.
Had a few issues with generic errors in the Task Sequence at state restore time (0x00004005 etc).
After checking the SMSTSLOG and finding a specific error (sorry I can’t remember but it was to do with the GUID(?) of the .mig) it turned out the workflow in how you migrated was important was important.
See below:
1. A) If bare metal – Create the new computer object by importing it into the database and USMT/ Windows 7 x64 – Replace System collection.
B) If existing machine – Add machine to USMT/ Windows 7 x64 – Replace System collection.
2. Create an association between the old computer and the new under User State Migration and configure required settings. (It is important that this is done BEFORE the backup is created if this is for a REPLACEMENT as a GUID is generated for either in-place or side-by-side/replace!)
3. Run the Windows 7 x64 – Backup System task sequence from the Software Centre.
4. Build machine using PXE boot and select Windows 7 x64 – Replace System Task Sequence.
Hi,
You’re totally correct about your notes. I’ve written about the workflow more in my ‘Migrate from Windows XP to Windows 8 Enterprise with ConfigMgr 2012 R2’ posts. If you’re interested in a script to automatically import the bare metal computer and add it to a collection, let me know. Thanks for sharing your findings here in the comments, it will hopefully help someone else that reads this!
Regards,
Nickolaj
HI, I’m not able to find the following
I’m have project to migrate XP to win7. I have to image new computer with win7 and copy data from old XP computers while imaging win7 computer,
in my company we are using SCCM 2012 R2,
I appreciate any help
Thank you
Gary
Hi Gary,
I’d recommend to look at my post about Migrating from Windows XP to Windows 8.1. The steps are basically the same, and you’ll find it here:
https://msendpointmgr.com/2014/02/21/migrate-from-windows-xp-to-windows-8-1-with-configmgr-2012-r2/
Regards,
Nickolaj
Can you help me set this same process up with SCCM & MDT 2012? How do I create the variables and populate them?
Hi Moose,
I’d suggest that since you already seems to have ConfigMgr 2012, to use that instead. I’d create a native ConfigMgr task sequence and if you’re using MDT for populating certain variables e.g. like DefaultGateway001 etc, just add a “Use toolkit Package” and “Gather” step to the ConfigMgr task sequence.
Regards,
Nickolaj
Awesome post, been trying to figure out the best way of doing this for ages. I’ll be giving it a try asap.
Hi Steve,
Cool, let me know what you find and if there’s any way this process can be improved!
Regards,
Nickolaj