


You’re probably familiar with Johan Arwidmarks awesome hydration kit for ConfigMgr 2012. He recently released an updated version that supports ConfigMgr 2012 R2. If you’ve tested it out, you’re probably aware of all the benefits with the hydration kit. For those of you who still havn’t tried it out (I seriously urge you to try it out), I’ll break it down for you. The Hydration Kit basically lets you install a stand-alone Primary Site server, everything running on 1 single virtual machine (except for the domain controller running seperately). Now that is really cool, but what if you’d like go beyond the stand-alone Primary Site server and start learning more on how a ConfigMgr hierarchy works? This is where this post comes in handy, because I’ve with permission from Johan modified his hydration kit so that it can now install a ConfigMgr 2012 R2 hierarchy. Are you excited? You should be, because this is really cool!
Overview
- Before we begin
- Install the necessary software for the Hydration Kit
- Download the software to be used in the Hydration Kit
- Install and prepare the Hydration Kit
- Deploy the hierarchy
Before we begin
This modified version of Johan’s Hydration Kit extends the functionality to deploy a fully operational ConfigMgr 2012 R2 hierarchy. The Hydration Kit will install a single Domain Controller in the contoso.com domain (sorry Johan and Micke for switching from ViaMonsta.com) called DC01, a Central Administration Site called CAS01, and two Primary Site servers called CM01 and CM02.
The password used for all of the accounts is: P@$$word
Install the necessary software for the Hydration Kit
1. In order to use the Hydration Kit, you’d need to download and install the following software on the machine that are running Hyper-V:
2. Begin to install the Windows Assessment and Deployment Kit 8.1 with the following features:
- Deployment Tools
- Windows Preinstallation Environment (Windows PE)
3. Install the Microsoft Deployment Toolkit with all of the default settings.
Download the software to be used in the Hydration Kit
Download the following software:
- Windows ADK 8.1
Run the following command to get the installation files:
adksetup.exe /layout “C:\Downloads\WindowsADK8.1” - BGInfo
Download from the web. - SQL Server 2012 SP1
Download from MSDN or TechNet - ConfigMgr 2012 R2
Download from MSDN or TechNet
- ConfigMgr 2012 R2 prerequisite files
Run “setupdl.exe” located in the SMSSETUP\BIN\X64 folder in the ConfigMgr 2012 R2 installation files. Specify the download location to C:\Downloads\CM2012R2Prereqs. - Windows Server 2012 R2
Download from MSDN or TechNet
Install and prepare the Hydration Kit
Once that you’ve installed the prerequisite software, download the bits for my modified Hydration Kit from this link. Extract the content of the zip file to C:\. Once you’ve extracted the contents, you should have a folder structure like C:\HydrationCM2012R2 containing a few folders and some PowerShell scripts.
1. Open an elevated PowerShell prompt and browse to C:\HydrationCM2012R2\Source.
2. Run the following command:
.\CreateHydrationDeploymentShare.ps1 -DriveLetter C:
Use the same drive letter in the command above as of where you’ve extracted the Hydration Kit.
3. The Deployment Share in MDT should now have been created if the script completed successfully. At this stage, we need to populate the Hydration Kit with the necessary software for it to work. Copy the following software to it’s destination:
– Windows ADK 8.1 (copy from C:\Downloads\WindowsADK8.1)
C:\HydrationCM2012R2\DS\Applications\Install – ADK\Source
– BGInfo
C:\HydrationCM2012R2\DS\Applications\Install – BGInfo\Source
– SQL Server 2012 SP1 (installation files, not the ISO)
C:\HydrationCM2012R2\DS\Applications\Install – SQL Server 2012 SP1\Source
– ConfigMgr 2012 R2 (installation files, not the ISO)
C:\HydrationCM2012R2\DS\Applications\Install – ConfigMgr 2012 R2 – CAS\Source
C:\HydrationCM2012R2\DS\Applications\Install – ConfigMgr 2012 R2 – Primary 1\Source
C:\HydrationCM2012R2\DS\Applications\Install – ConfigMgr 2012 R2 – Primary 2\Source
– ConfigMgr 2012 R2 prerequisite files (copy from C:\Downloads\CM2012R2Prereqs)
C:\HydrationCM2012R2\DS\Applications\Install – ConfigMgr 2012 R2 – CAS\PreReqs
C:\HydrationCM2012R2\DS\Applications\Install – ConfigMgr 2012 R2 – Primary 1\PreReqs
C:\HydrationCM2012R2\DS\Applications\Install – ConfigMgr 2012 R2 – Primary 2\PreReqs
– Windows Server 2012 R2 (installation files, not the ISO)
C:\HydrationCM2012R2\DS\Operating Systems\WS2012R2
– EXTADSCH.EXE (copy from ConfigMgr 2012 R2 installation files in SMSSETUP\BIN\X64)
C:\HydrationCM2012R2\DS\Applications\Configure – Extend AD for ConfigMgr 2012\Source
4. Now it’s time to create the boot media used for the hydration. Open the Deployment WorkBench, expand Deployment Shares -> Hydration CM2012 R2 -> Advanced Configuration and select Media.
5. Right-click on MEDIA001 and select Update Media Content. This operation will take some time.
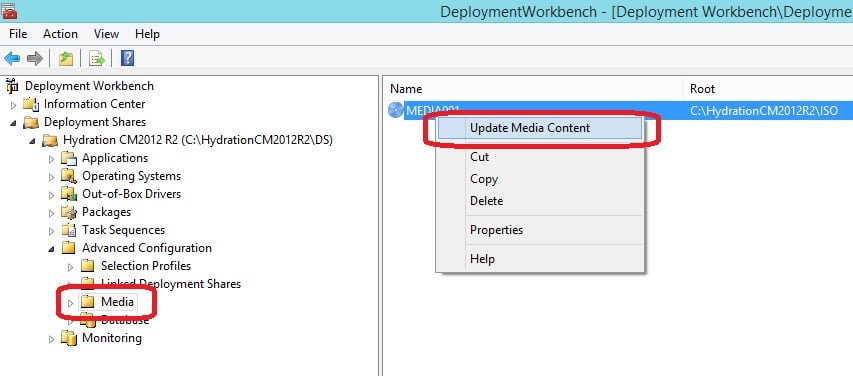
6. An ISO file called HydrationCM2012R2.iso has now have been created in C:\HydrationCM2012R2\ISO.
7. Open an elevated PowerShell prompt and browse to C:\HydrationCM2012R2\Source\Extra. We’ll now run a PowerShell script that will create the four virtual machines that will be hydrated into a ConfigMgr 2012 R2 hierarchy. What’s important to note about the script is that it accepts two parameters. The HydrationDriveLetter parameter should be the drive letter of where you’ve put the Hydration Kit (in this post C:). Regarding the VMDriveLetter, it specifies the drive where you’d like to store the virtual machines. In my lab environment, I’m running all my virtual machines on the E: drive.
8. Run the following command:
.\CreateVirtualMachines.ps1 -HydrationDriveLetter C: -VMDriveLetter E:
Deploy the hierarchy
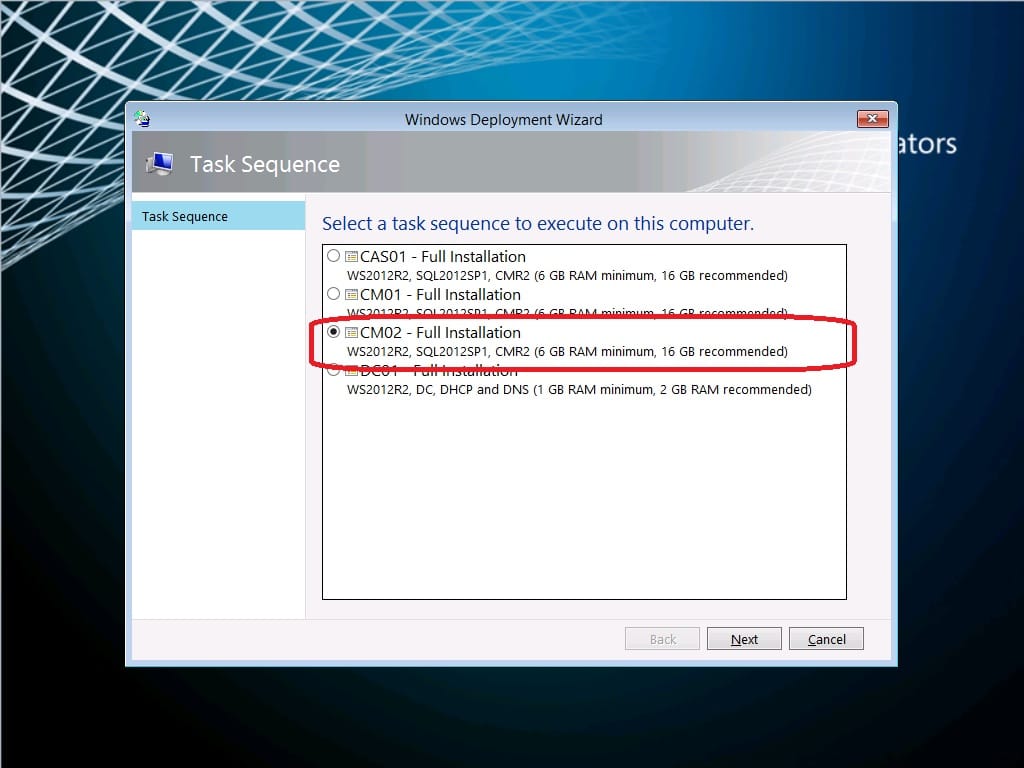
Now that the Hydration Kit is installed and prepared, we can now move on to installing the ConfigMgr 2012 R2 hierarchy. You should install the virtual machines in the following order:
- DC01
- CAS01
- CM01
- CM02
1. Start the DC01 virtual machine. Select the DC01 – Full Installation task sequence and click Next. Let the hydration finish before you continue.

2. Start the CAS01 virtual machine. Select the CAS01 – Full Installation task sequence and click Next. Let the hydration finish before you continue.

3. Start the CM01 virtual machine. Select the CM01 – Full Installation task sequence and click Next. Let the hydration finish before you continue.

4. Start the CM02 virtual machine. Select the CM02 – Full Installation task sequence and click Next. When the hydration has finished, the hierarchy is installed!


A couple of other things I found: The CAS install isn’t added to the media because the application is pointing to the wrong folder (it’s point to .\Applications\Install – ConfigMgr 2012 R2, but the folder name is actually .\Applications\Install – ConfigMgr 2012 R2 – CAS). I simply changed the folder name to match the path in the application. You will also need to modify the ini file to point to the correct location for the prereqs. Hope this saves others from the headscratching I went through! Excellent write-up nonetheless.
for those of you, like me, who had issues trying to find a version of SQL 2012 SP1 that worked, refer to https://sqlserver-qa.net/2013/01/04/sql-server-2012-full-slipstream-package/ (I used https://download.microsoft.com/download/3/B/D/3BD9DD65-D3E3-43C3-BB50-0ED850A82AD5/SQLServer2012SP1-FullSlipstream-ENU-x64.iso for my hydration)
I have tried to run the create virtual machine power shell script, as you stated, but it does not create the virtual machines, it creates the directory structure, but that is it. also the CAS and CM’s did not join the domain. what am I doing wrong here? I can post the error message I get when running the script if needed.
VERBOSE: Add-VMHardDiskDrive will add a hard disk drive to virtual machine “CM2012R2-CM02”.
VERBOSE: Set-VMDvdDrive will configure “DVD Drive on SCSI controller number 0 at location 1”.
Set-VMDvdDrive : ‘CM2012R2-CM02’ failed to modify device ‘Virtual CD/DVD Disk’. (Virtual machine ID
4681341F-212B-4E15-AF10-2510D9E9522C)
‘CM2012R2-CM02’: Attachment ‘C:\HydrationCM2012R2\ISO\HydrationCM2012R2.iso’ not found. Error: ‘The system cannot find
the file specified.’ (0x80070002). (Virtual machine ID 4681341F-212B-4E15-AF10-2510D9E9522C)
At C:\HydrationCM2012R2\Source\Extra\CreateVirtualMachines.ps1:49 char:1
+ Set-VMDvdDrive -VMName $VMName -Path $VMISO -Verbose
+ ~~~~~~~~~~~~~~~~~~~~~~~~~~~~~~~~~~~~~~~~~~~~~~~~~~~~
+ CategoryInfo : NotSpecified: (Microsoft.HyperV.PowerShell.VMTask:VMTask) [Set-VMDvdDrive], Virtualizati
onOperationFailedException
+ FullyQualifiedErrorId : Unspecified,Microsoft.HyperV.PowerShell.Commands.SetVMDvdDriveCommand
Great job guys , thanks
Thanks!
/Nickolaj
I was able to get everything to work perfectly. Great Post. I have one question though. Where do you to change the domain from Contoso.com to something like DomainABC.com in the script?
Thank you in advance.
Never Mind, found it. It’s in HydrationCm2012R2\ISO\content\Deploy\Control\*.ini file. Hope that helps other trying to change the Domain Name and IP Addresses.
Hi,
Great that you found it. There are a few places where you have to change it, but they are pretty obvious. You’d also need to change some of the scripts in Applications.
Regards,
Nickolaj
Did it work for You? Deploying of the DC failed at AD configuration and then of course DHCP Authorization.
Hi Mariusz,
Yeah it’s working for me and a colleague. Did you check the logs why it failed?
Regards,
Nickolaj