


Now that Microsoft has released Windows 8.1 and ConfigMgr 2012 R2, lets look at how we can deploy Windows 8.1. In this post we’ll not be integrating with MDT, instead it will be a native ConfigMgr OSD scenario. Keep in mind though that integrating MDT with ConfigMgr gives you lots of great functionality, so I highly recommend it if you havn’t done so already. In this post we’ll more specifically concentrate on Windows 8.1 Enterprise x64.
Overview
- Prerequisite
- Create a Reference image
- Import the Reference image
- Create a Task Sequence
- Deploy Windows 8.1
Prerequisite
In order to deploy Windows 8.1 with ConfigMgr you need to have upgraded your hierarchy (or stand alone Primary Site) to ConfigMgr 2012 R2. If you havn’t upgraded your ConfigMgr hierarchy to R2 yet, take a look at this upgrade guide. If you’re not able for some reason to upgrade just yet, install the Cumulative Update 3 for ConfigMgr 2012 SP1. You can then deploy Windows 8.1 but that’s about it. You’ll also need to import a WinPE 5.0 boot image. Take a look at MVP Niall Brady’s excellent blog post about creating a WinPE 5.0 boot image for ConfigMgr 2012 SP1 CU3.
Create a Reference image
I’ve previously create a post on how you can use MDT 2013 to create a Windows 8.1 Reference image. The process of creating the Reference image can be found here:
Import the Reference image
When you have created the Reference image, we need to import into ConfigMgr 2012 R2. First off we need to copy the WIM file to our Content Library. I’ve created the following folder structure in my Content Library for storing Reference images: \\CM01\ContentLibrary$\OSD\ReferenceImages
1. Copy the Reference image to your Content Library.

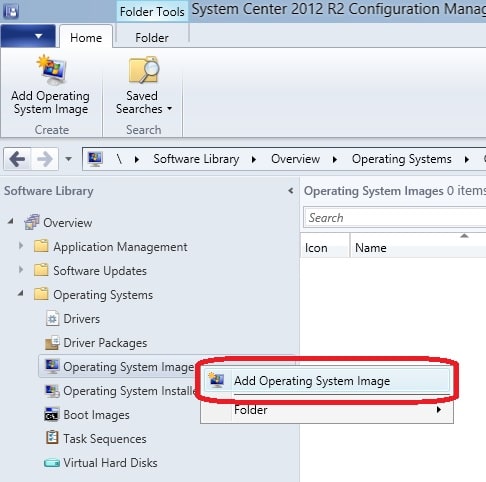
2. Open the ConfigMgr console and go to Software Library -> Operating Systems.
3. Right click on Operating System Images and choose Add Operating System Image.
4. Enter the path to the WIM file you copied to the Content Library. Click Next.

5. Enter the following in the specified fields and click Next afterwards:
- Name: Windows 8.1 Enterprise x64
- Version: 1.0
- Comment: Windows 8.1 Enterprise x64 reference image created with MDT 2013
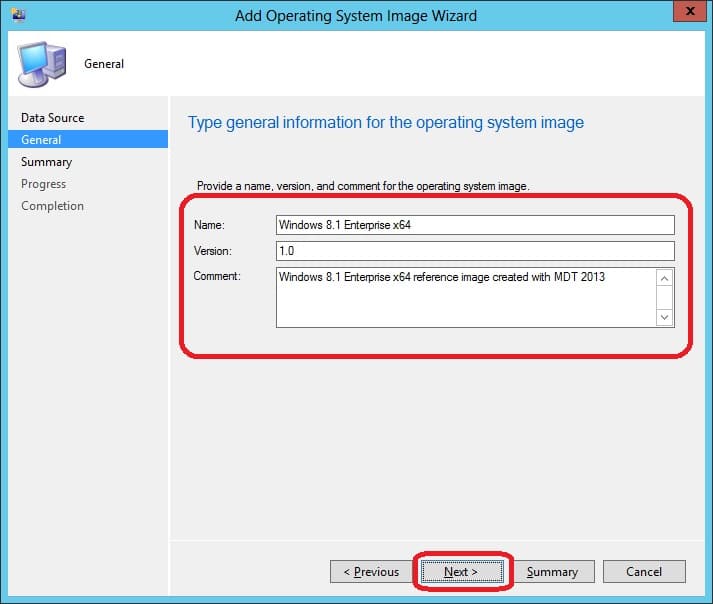
6. On the Summary page, click Next.
7. On the Completion page, click Close.
8. Right click on the newly imported image and select Distribute Content.
9. Complete the Distribution Content wizard.
Create a Task Sequence
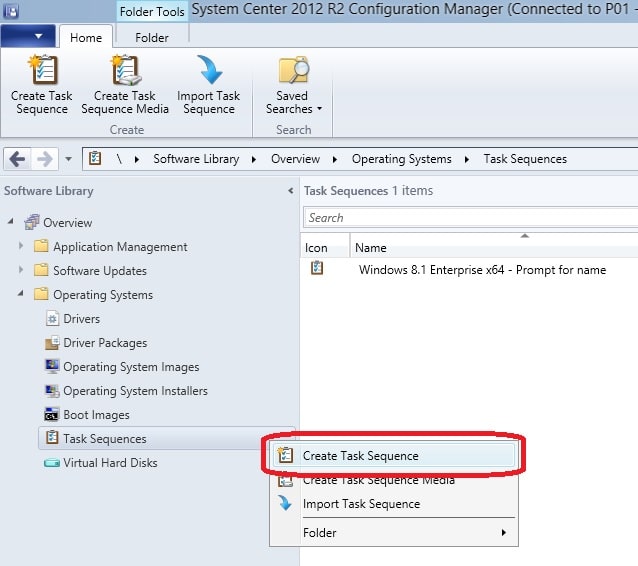
1. In the ConfigMgr console, go to Software Library -> Operating Systems.
2. Right click on Task Sequences and select Create Task Sequence.
3. Select Install an existing image package and click Next.

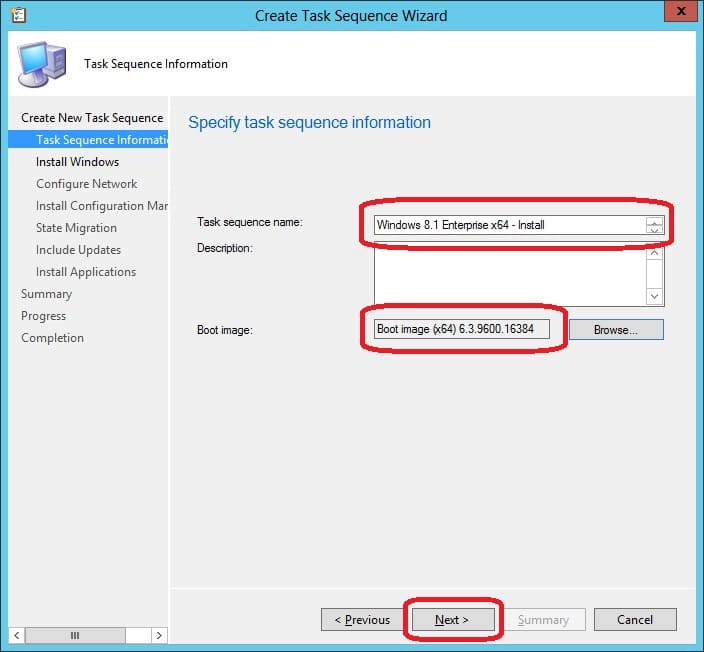
4. In the Task sequence name field, enter Windows 8.1 Enterprise x64 – Install. Click on the Browse button and select the boot image called Boot image (x64) 6.3.9600.16384 (that’s the default name when running ConfigMgr 2012 R2). At this point if you havn’t upgraded to R2 yet, select your custom WinPE 5.0 boot image created by following the guide mentioned above in the prerequisite step. If you’re deploying Windows 8.1 Enterprise x64 to an UEFI enabled system, remember that the boot image you select needs to be of the same architecture as the Reference image and the CPU. Basically you can only use the x64 boot image to deploy Windows 8.1 Enterprise x64 to a x64 UEFI enabled system. Click Next when you’ve selected the appropriate boot image.
5. Click Browse next to the Image package field, and select the Windows 8.1 Enterprise x64 1.0 en-US image package. Determine if you’d like to configure the task sequence for use with BitLocker. It’s recommended that you do. Do not specify any Product key and let ConfigMgr Randomly generate the local administrator password. Click Next.

6. On the Configure Network page, select Join a domain and specify the domain settings. Click on Browse next to the Domain field to specify your domain. Click on the Browse button for specifying the Domain OU (this is where the computer object in Active Directory will be created, once the system that is being deployed with Windows 8.1 is joined to the domain). Specify an account for joining the system to the domain. It’s recommended to use a service account for this action. The service account should only have permissions to Read and Create Computer Objects in the OU you specified earlier. In this post I’ll be using the CONTOSO\administrator just for demoing purposes. Click Next.

7. On the Install Configuration Manager page, make sure that the Package field is propagated with Configuration Manager Client Package. In the Installation properties field, you can configure the ConfigMgr client installation properties. You can find all the properties available here (scroll down to Client.msi Properties). I’d recommend to change the SMSCACHESIZE from its default of 5120 MB to 10240 MB. Enter SMSCACHESIZE=10240 in the Installation properties field and click Next.

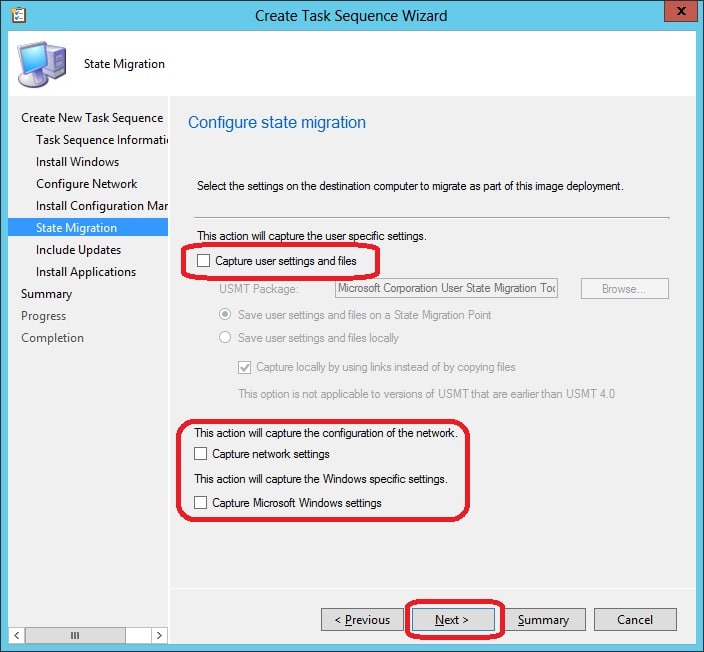
8. On the State Migration page, remove the check mark from Capture user settings and files, Capture network settings and Capture Microsoft Windows settings. Click Next.
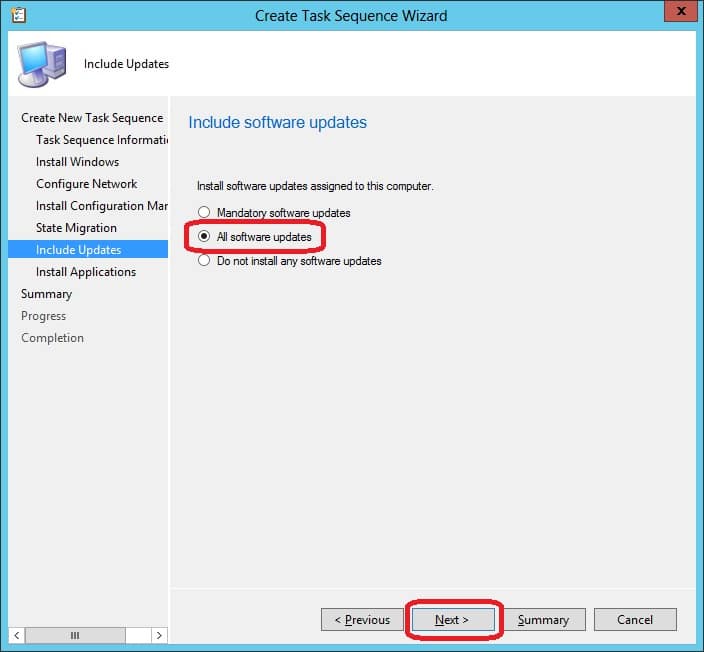
9. On the Include Updates page, select All software updates and click Next.
10. On the Install Applications page, select the applications you wish to add to your deployment of Windows 8.1 Enterprise. In this post I’ll not be adding any applications. Click Next when you’ve added the applications.
11. Click Next on the Summary page.
12. Click Close on the Completion page.
If you now edit the task sequence, it should look like this:
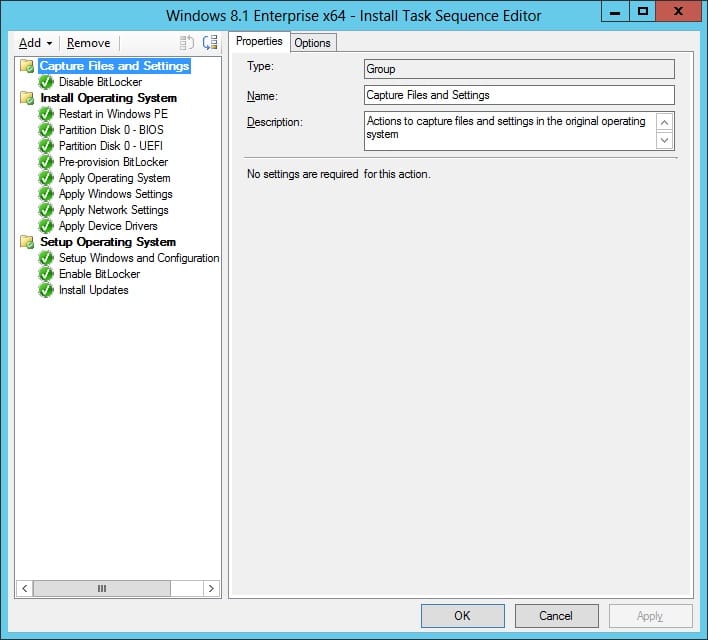
Since we choose to enable BitLocker, it’s necessary to configure the Enable BitLocker step in the task sequence. Right click on the newly created Windows 8.1 Enterprise x64 – Install task sequence and choose Edit. Select the Enable BitLocker step and configure it for your environment. If you wish to store the BitLocker recovery keys in Active Directory, it’s necessary to configure ADDS prior to that. See this article on how to accomplish that.
Deploy Windows 8.1
In this part of the post, we’ll deploy the Windows 8.1 task sequence so that you can execute it when booting a system from PXE. This requires that your Distribution Point(s) has been configured for PXE.
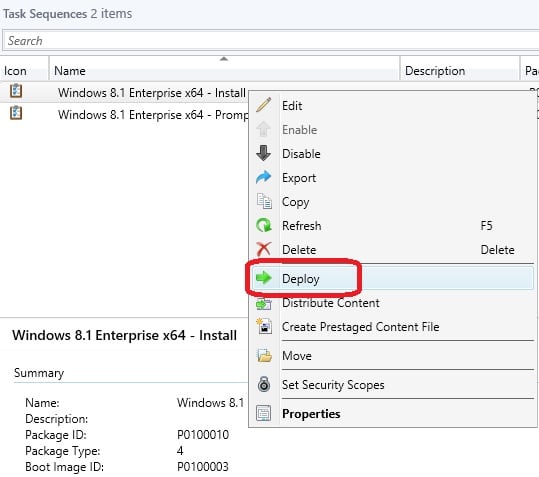
1. Right click on the Windows 8.1 Enterprise x64 – Install task sequence and choose Deploy.
2. In the Collection field, browse for the All Unknown Computers selection and click Next.
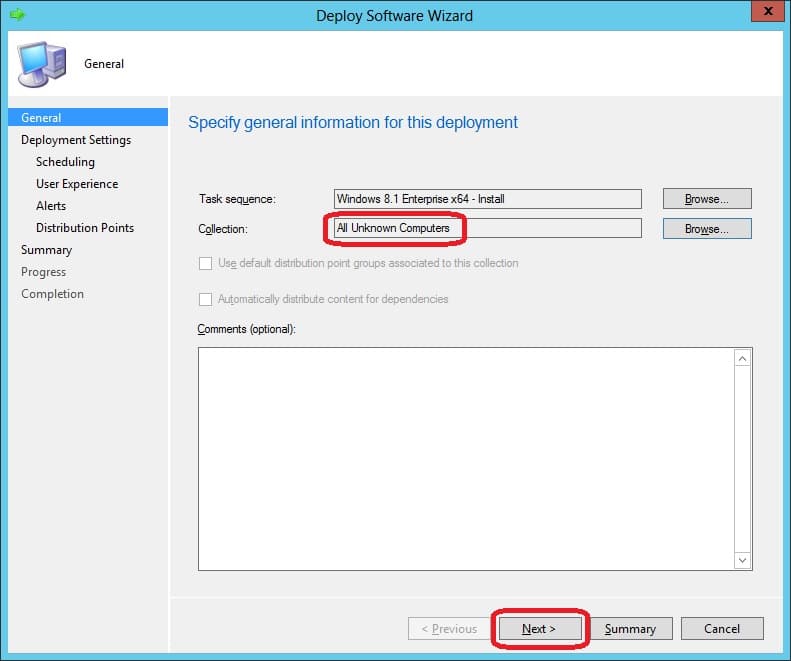
3. Make sure that the Purpose selection is Available and that the Make available to the following selection is Only media and PXE. Click Next.

4. Leave the defaults on the Scheduling page and click Next.
5. Leave the defaults on the User Experience page and click Next.
6. Click Next on the Alerts page.
7. Click Next on the Distribution Points page.
8. Click Next on the Summary page.
9. Click Close on the Completion page.
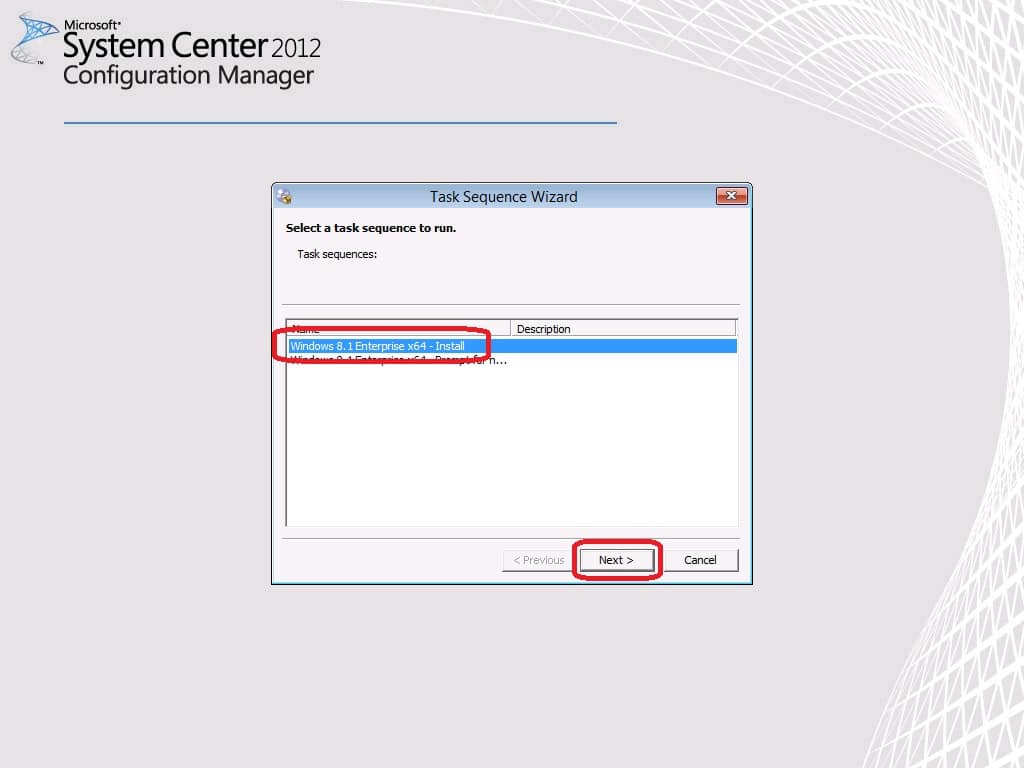
We’re now ready to start a up a system and boot from PXE. When WinPE has loaded and the Task Sequence Wizard has opened, click Next. Select the Windows 8.1 Enterprise x64 – Install task sequence and click Next.
The task sequence will now start to deploy Windows 8.1 Enterprise x64 to your system.

Once the deployment is complete, users can now log on to the system. And you’re done!

Optional related articles
Prompt for Computer Name during OSD – This post describes how you can leverage the PowerShell feature of Windows PE 4.0 to prompt for Computer Name during OSD.
Automate Computer Name during OSD – If you’re looking for automating the Computer Name during OSD, check out this post.
Modify the Windows 8.1 Start screen during OSD – This post covers the steps needed in order to modify the Start screen and apply it to the default user profile.


Hi Nickolaj. Thank’s for the great post!
I’m getting the error “Windows PE initialization failed with error code 0x80220014” while trying to install and capture a Windows 10 image.
I searched the Internet for similar threads but only found articles related with ADK 1511, which shouldn’t apply to my case because I have the latest version installed. Properties on the adksetup.exe file indicates version 10.1.15063.0.
Any ideas? I have some screenshots of the Task Sequence that I can send you if you need.
Thanks in advance!
Cheers!
pedro
If it helps, I also found the following error messages in the smsts.log:
Getting namespace “Microsoft-Windows-Deployment” for architecture “amd64”
pengine -> getnamespace ( spsettingsIdentity, readwriteaccess, NULL, &spnamespace), hresult=80220014 (e:\nts_sccm_release\sms\framework\osdcore\smiinterface.cpp,234
Failed to get namespace “Microsoft-Windows-Deployment” 0x80220014
Configure(), hresult=80220014 (e:\nts_sccm_release\sms\client\osdeployment\applyos\installimage.cpp,2072)
could not find CCM install folder. Don’t use ccmerrors.dll
installation of image 1 in package PT10004A failed to complete..
unknown error (error: 80220014, source:unknown)
I am currently attempting to deploy Windows 81. Ent. x64 using a custom task sequence. It install the image, configures Windows settings, joins the domain and then installs Configuration Manager. After that it just boots into the OS when it should be moving on to the next task sequence. I have tried a restart into existing task sequence to no avail. Any advice you could give me would be most appreciated.
Question, I have created a Windows 8.1 Pro x64 task sequence and it installs the OS, joins the domain, configures windows settings and install ConfigMgr. After that is just boots into the OS without continuing on to the next series of task sequences.
This image is being launched in Hyper-V using bootable media.
Hi David,
It would seem that it fails at the point of specializing Windows. Have you examined the smsts.log to see what the error was?
Regards,
Nickolaj