


Since Configuration Manager 1806 there is a simpler method for implementing a Cloud Management Gateway without any need for PKI or certificates on-premises instead you can use Azure AD for client authentication. If you are using PKI client authentication certificates, this post is not for you, and you should read the postings from Sandy here : https://msendpointmgr.com/category/co-management/
In this post I will take you trough the whole process in 10 steps. There are a few prerequisites:
- You need a public certificate for your domain name. I recommend getting a wildcard certificate (*.company.com)
- You need an Azure Subscription, not CSP Subscription, and you need to have co-owner rights on the subscription to follow this guide.
- You also need Global Admin rights in Azure AD
- You need to have Windows 10 Hybrid Join setup
- This is for your on-premises clients, Azure AD join via cloud will also work of course.
Your users need to have a license for EMS (Intune) assigned*see Note- If this is a newer subscription you will probably need to enable classic compute on your subscription before you start on this. Read more here
*Note: You no longer need to purchase and assign individual Intune or EMS licenses to your users. For more information, see the Product and licensing FAQ. Azure AD Premium is still required for Windows 10 Automatic Enrollment
Overview
- Onboard Azure Tenant
- Approve permisssions in Azure AD
- Review Azure Discovery Agent Log Files
- Enable Enhanced HTTP and Enable CMG Traffic on Management Point
- Validate Name Availability in Azure Portal
- Create a Cloud Managment Gateway
- Create a CMG Connection Point
- Create Client and User Settings to allow use of Cloud Services
- Enable Co-management
- Deploy ConfigMgr Client trough Intune for your Azure AD Devices
- Verify on your Azure AD Device
Onboard your Azure Tenant
- Open your Configuration Manager Console.
- Click Administration Workspace > Cloud Services
- Right click on Azure Services and Select Configure Azure Services.
- Name: <Type in a Name>
- Description: <Type in a description>
- Leave Cloud Management selected and click next
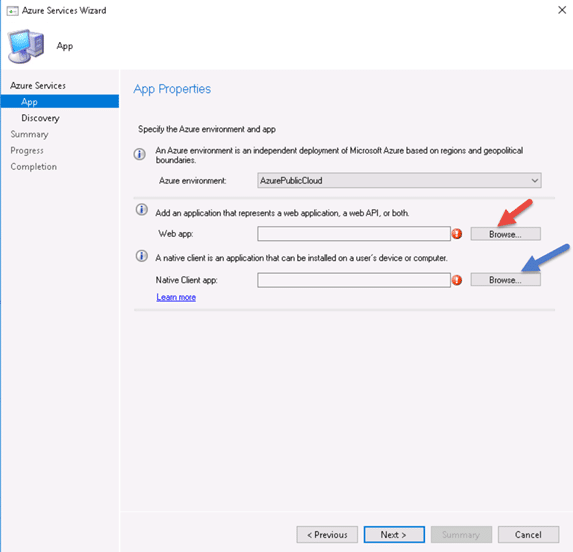
- On App Properties Click browse next to web app to create the Server Application
- On the Server Application Click Create
- Name: ConfigMgrServerApp
- Homepage: <Leave Default> (Does not need to be a valid URL, but must be unique in YOUR tenant.)
- APP ID URL: <Leave Default> (Does not need to be a valid URL, but must be unique in YOUR tenant.)
- Select Secret Key Validity Period
- Then sign in with your Azure AD Admin account
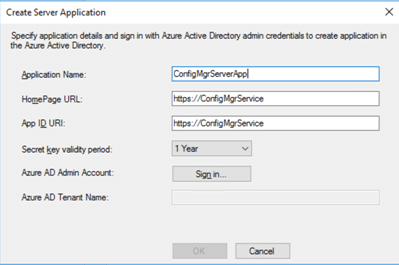
- Select the application and click ok.
- Back on the App Properties Page click browse on the Native Client App
- On the client app click
- On the Create Application.
- Application Name: ConfigMgrClientApp
- Reply URL: <Keep Default> (Does not need to be a valid URL, but must be unique in YOUR tenant.)
- Click Sign in and use your Azure AD Admin account
- Select the new created application and click ok
- After this step both applications should be created and you should click Next
- On the Configure Discovery Settings, leave as default and click Next twice then close.
Approve Admin Permissions in Azure AD
- Open a browser and go to https://aad.portal.azure.com and logon with your Azure AD Admin account
- Go to Azure Active Directory > App Registration and Select All Apps

- Select the Server Application > Settings > Required permissions > Grant permissions
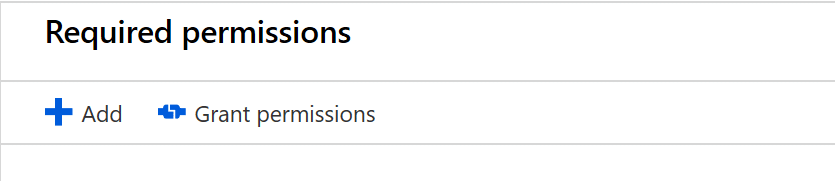
- Select the Server Application > Settings > Required permissions > Grant permissions
Note: Once you grant permissions there is a wait period before the permissions are fully applied, wait around 5 minutes before proceeding with the next step.
- Go back to the Configuration Manager Console
- Go to Administration Workspace > Cloud Services > Azure Services
- On the ribbon click on Run Full Discovery Now > then click yes.

Review Azure Discovery Agent Log Files
- On CM01 Open Windows Explorer
- Go to %Program Files%\Microsoft Configuration Manager\Logs
- Open SMS_AZUREAD_DISCOVERY_AGENT.log
- The log should show that the Sync is OK and that next Delta is Scheduled:
Next DELTA sync for cloud service 16777217 will start at 12/12/2018 01:04:39.
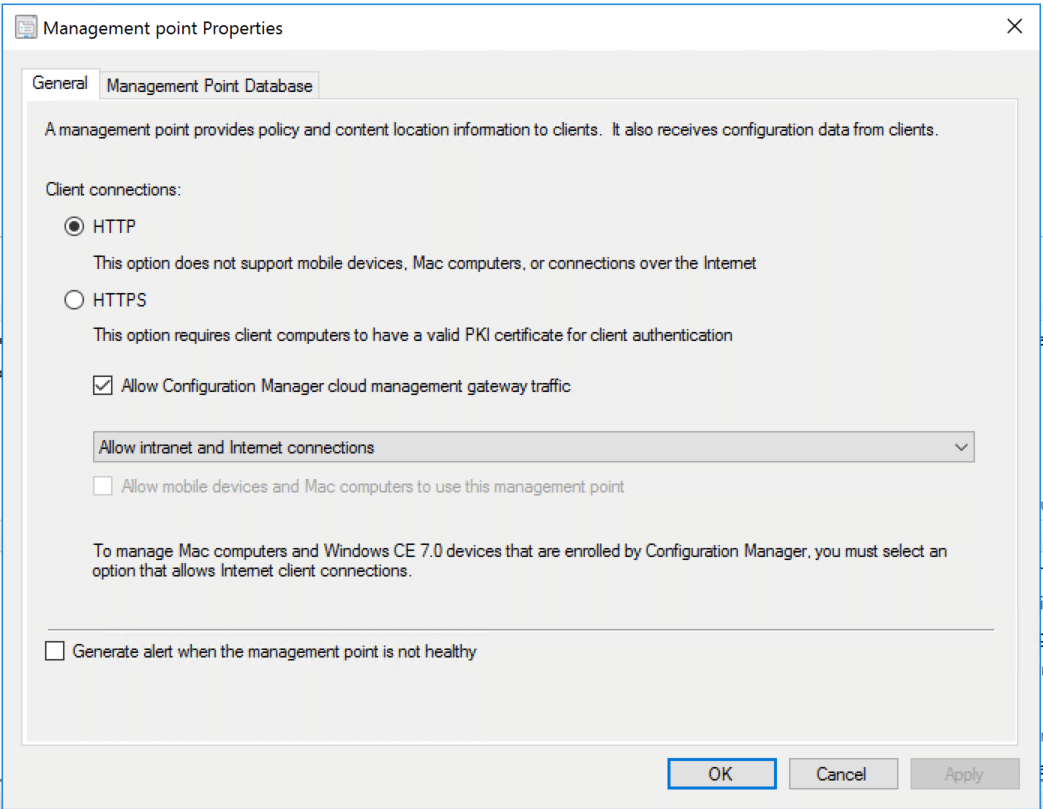
Enable Enhanced HTTP and Enable CMG Traffic on your Management point
- Open the Configuration Manager Console
- Go to Administration -> Site Configuration -> Sites
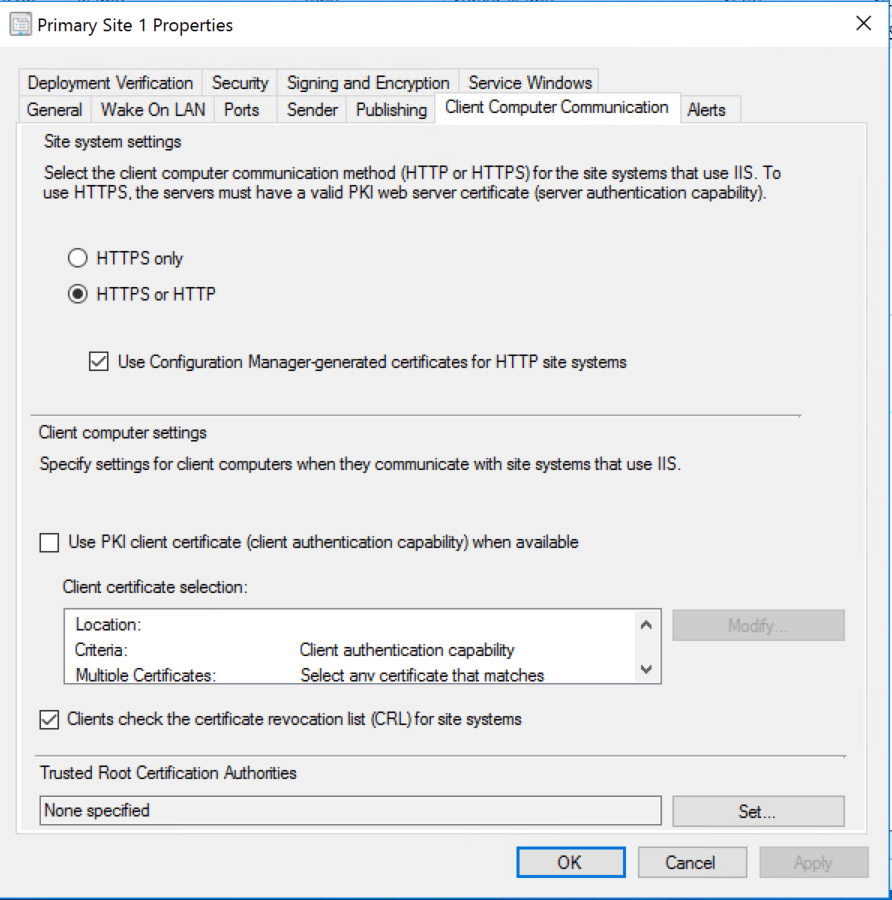
- Select your Primary Site and Click Properties on the Ribbon
- Under Client Computer Communication – Select “Use Configuration Manager-generated certificates for HTTP Site System.”
- Click OK
- Go to Administration -> Site Configuration -> Servers and Site Systems
- Mark your Primary Site and Right Click Management Point – Select Properties
- On General – Leave HTTP and Select Allow Configuration Manager cloud management traffic.
- Click OK
Validate Name Availability Azure
The Cloud Service we are creating needs to have a unique name in all of Azure. This is because it uses the *.cloudapp.net domain to host the service.
- Go to https://portal.azure.com
- Go to All Services – Cloud Services (Classic)
- Click on +ADD
- Under Cloud service (classic) type a name you like) in the DNS Name field
- If the Green Tick appears the name is available. If you have the red exclamation mark, try another name of your own choice and repeat.

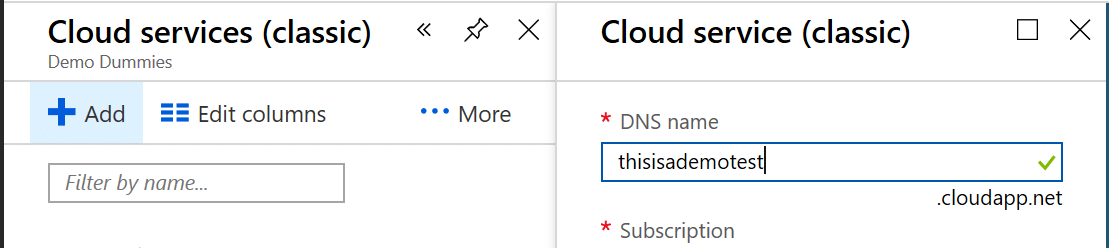
- Note down your Cloud Service name.
- CLOSE THE BLADE AND DO NOT CREATE THE SERVICE
- Create a CNAME Record in both Internal and External DNS pointing from your domain to cloudapp.net
- Example: CNAME thisisademotest.scconfigmgr.com -> thisisademotest.cloudapp.net
NOTE: This is why we recommend you use a wildcard public certificate so we avoid to order a certificate just to realize that name is already used.
Create a Cloud Management Gateway
Have your wildcard certifate ready in PFX format for this.
- Open the Configuration Manager Console
- Go to Administration workspace > Cloud Services
- Right Click on Cloud Management Gateway and Click Create Cloud Management Gateway.
- Select Azure Resource Manager deployment
- On Subscription admin account click Sign In and enter your Azure AD Admin Account
- The App Information will be populated and click Next

- On the Settings page of the wizard, first click Browse and select the wildcard certificate-file for the wildcard certificate. Ignore the warning about the wildcard certificate that pops up.
- Under Service Name – Type your public domain name
- Example: thisisademotest.scconfigmgr.com
- Select your region
- Click Create new – and leave auto populated value for Resource Group Name.
- Leave VM Instance to 1
(here you can choose to deploy several for performance in large environments) - Leave the default settings on the rest of the page and click Next
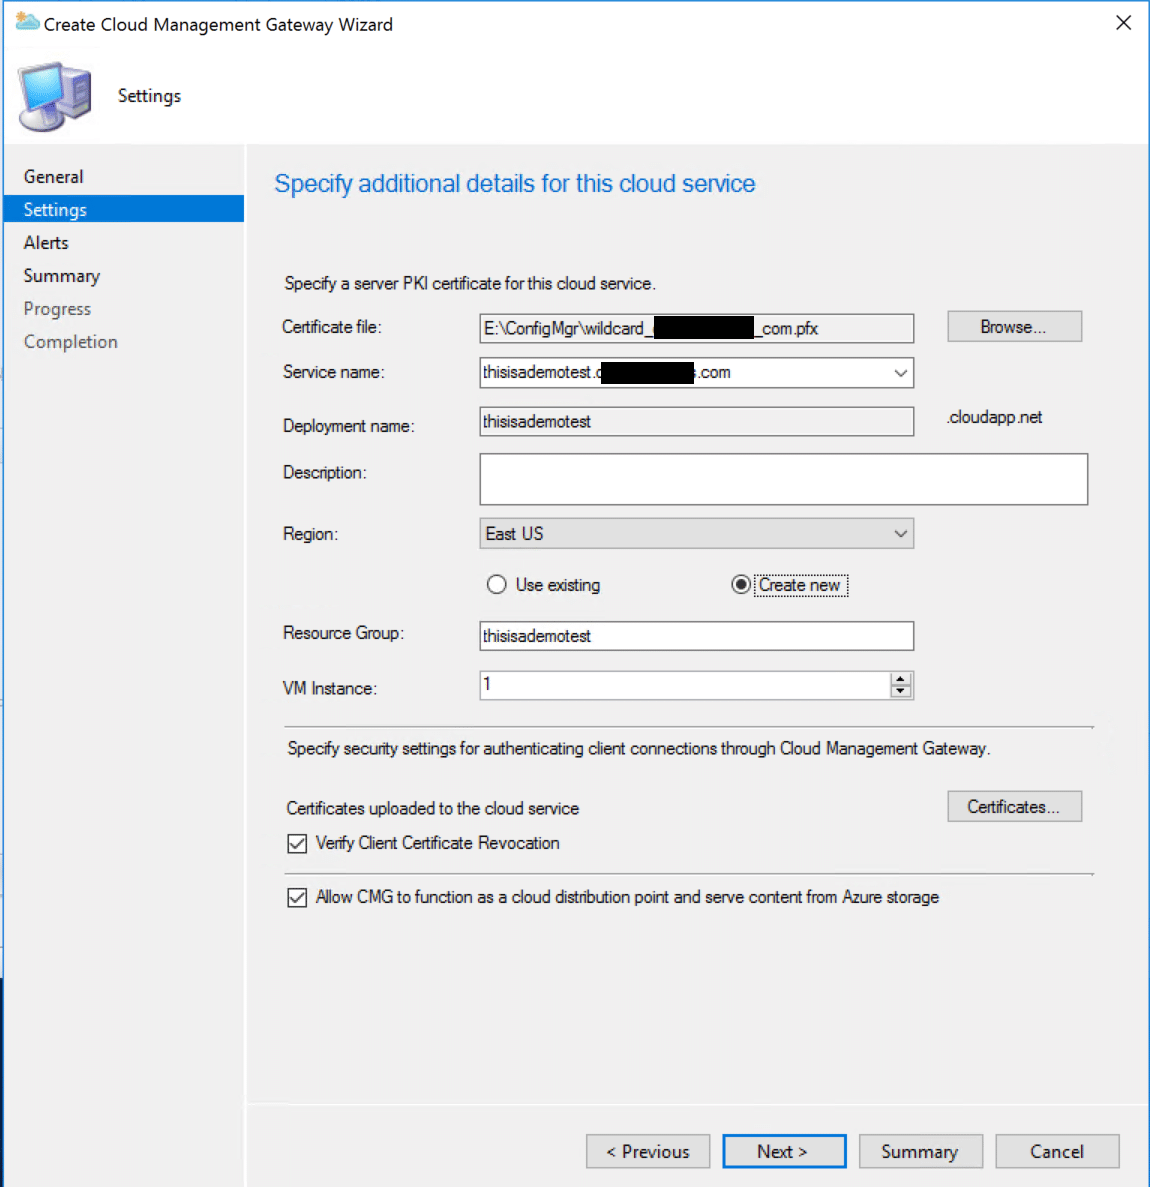
- On the Alerts page Click Next
- On the Summary Page Click Next – Wait and click Close
- This can take up to 20-30 minutes. You can follow the status under Cloud Management Gateway, or open the log: %Program Files%\Microsoft Configuration Manager\Logs\CloudMgr.log
- You can also follow the deployment in Azure Portal – Monitor – Activity Logs
- Then deployment is ready the Console will show Status Ready

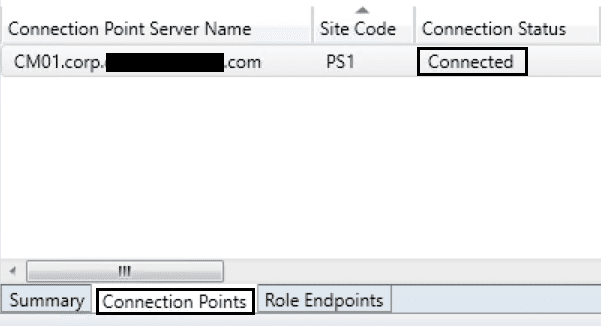
Create a CMG Connection Point
- Go to Administration -> Site Configuration -> Sites
- Select Primary Site and Click Add Site System Roles on the Ribbon
- On General -> Click Next
- On Proxy -> Click Next
- On System Role Selection – Select Cloud Management gateway connection point – Click Next
- On Cloud Management Gateway – Verify your service is listed and Click Next
- Click Next and then Close
- Wait for about 5 minutes
- Go to Administration – Cloud Services – Cloud Management Gateway
- On the bottom of the console – Click on Connection Points -> Status should be connected
Create Client and User Settings to allow Clients to use Cloud Services
- Go to Administration -> Client Settings
- Select or Create a Custom Client Settings –> Properties (Do not edit default client settings)
- Under Cloud Services change/verify:
- Allow access to cloud distribution points : YES
- Automatically register new Windows 10 Devices DJ Devices to AAD: YES
- Enable clients to use a cloud management gateway: YES
- Click OK (Deploy to appropriate collection)
- On the Ribbon – Click Create Custom Client User Settings
- General – Name: Custom User Settings
- Enable Cloud Services
- Now: On Cloud Services – Allow access to cloud distribution point: YES
- Click OK
Enable Co-management
- Go to Administration -> Cloud Services -> Co-management
- On the Ribbon click on Configure co-management
- Sign In with your Azure AD Admin user – Click Next
- On Enablement – Select Automatic Enrollment in Intune – ALL or PILOT based on your preference
- Click on COPY and paste into a Notepad Windows – Keep this information for later usage.
- Click Next
- Now you can for instance test with moving the slider to Intune on:
- Compliance Policies
- Click Next
- On Staging – Click Next – On Summary Click Next (If you are doing PILOT – select your PILOT Collection here)
- Click Close
Congratulations – You have now completed the setup. We have enabled co-management and our on-premises clients will now be enrolled into Intune. This might take some time
Verify on client
- On one of your domain joined and configmgr managed machines log on with a users that is licensed correctly in Azure AD
- Go to C:\Windows\CCM\Logs
- Open ADALOperationProvider.log
- You should see Getting AAD (User) token and Getting AAD (device) token
- Close
- Open CoManagementHandler.log
- See if the last line is Queuing enrollment timer to fire at ….
- This means the client is queued for enrollment. Sadly this would probably not be today.
- Close
Starting in version 1806, automatic enrollment isn’t immediate for all clients. This behavior helps enrollment scale better for large environments. Configuration Manager randomizes enrollment based on the number of clients. For example, if your environment has 100,000 clients, when you enable this setting, enrollment occurs over several days.
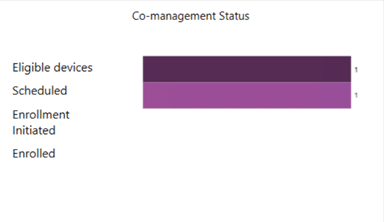
- Open Configuration Manager Console
- Go to Monitoring -> Co-management
If your are on CM 1810 – it should look like this, that shows that we have at least one device scheduled for enrollment:
Deploy ConfigMgr Client through Intune
- On your ConfigMgr server locate %Program Files%\Microsoft Configuration Manager\bin\i386\ccmsetup.msi and copy to another location
- Open a Browser and go to https://devicemanagement.portal.azure.com and logon with your Azure AD Admin Account (only need Intune Admin rights for this)
- Go to Client Apps -> Apps and click on Add
- Select Line-of-Business app
- Click on Select file -> and the blue Folder icon – Find your saved CCMSetup.msi – Click OK
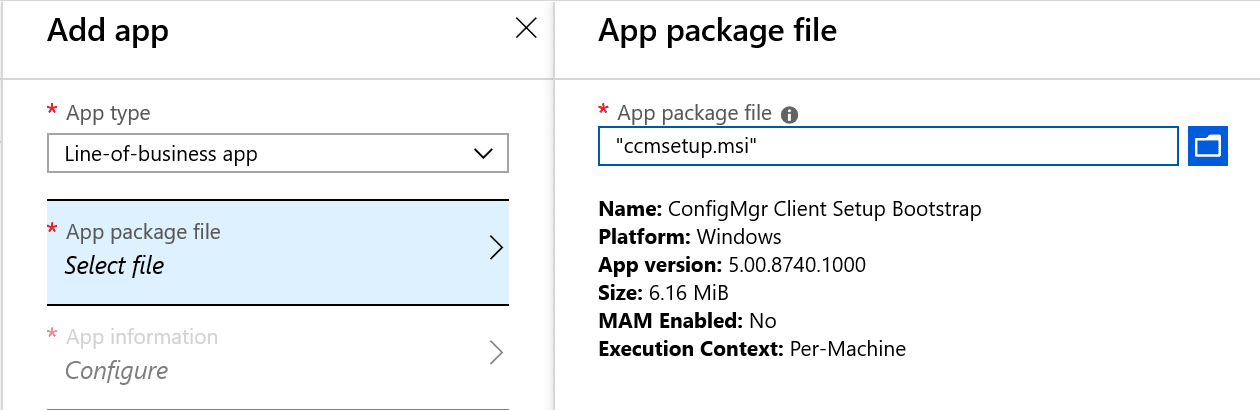
- Click on Configure
- Publisher: Microsoft
- Description: Just type something,,
- Ignore App Version: Yes
- Under Command-line arguments – Copy in the content you saved in Notepad from “Enable co-management”
- Click OK then Add
- Now we wait until the app is ready (uploading the MSI to Intune Service

- You should now have the app ConfigMgr Client Setup Boostrap – Click on it when it is finished uploading.
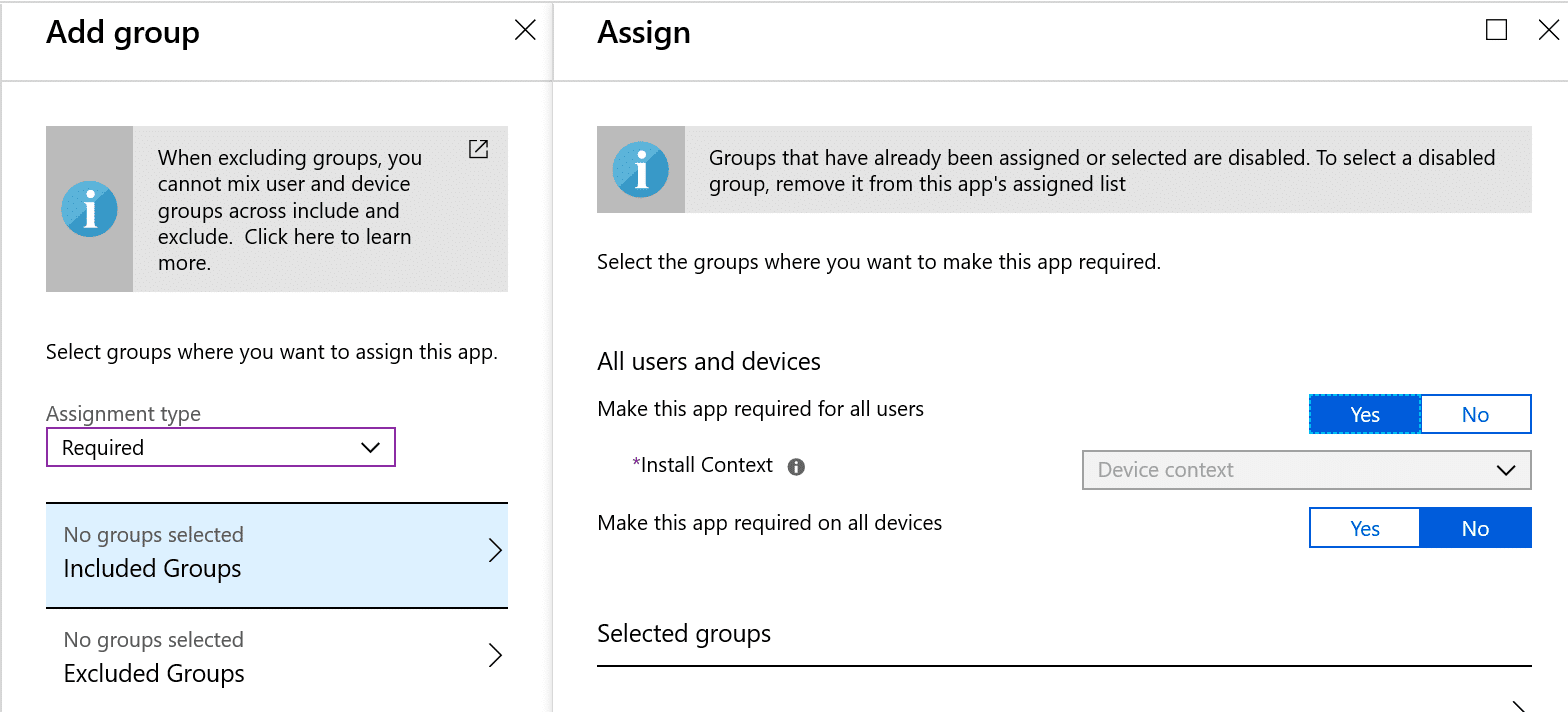
- Go to Assignments
- Click on Add group
- Assignment type: Required
- Click on Included Groups
- Make this app required for all users = YES
- Click OK
- Click OK and then Save
Verify Deployment of ConfigMgr Client to our Intune Managed Device
- Make sure you have a Windows 10 Device that is Azure AD Joined and managed by Intune
- Log on to this device
- Go to Setting – > Accounts -> Access work or School – Click on Info on our Azure AD Connection
- Click on Sync
- Wait ..
- Wait some more
- After a while you should first see C:\Windows\ccmsetup folder appear
- Then we should see C:\Windows\CCM
- Go to C:\Windows\CCM and start CMTrace.exe – Say YES to Default log reader
- Go to C:\Windows\CCM\Logs
- Open ADALOperationProvider.log with CMTrace.exe
- You should see Getting AAD (User) token and Getting AAD (device) token
- Close
- Open CoManagementHandler.log with CMTrace.exe
- Should say device is already enrolled with MDM and Device Provisioned
- Close
- Now we should also see Software Center in our Start Menu
- Go to Control Panel – Open Configuration Manager
 |  |
Verify your settings and see that you are connected to your CMG – If you go back to your ConfigMgr Console you should see your AzureAD Joined Device in here.
Congratulations – Your devices are now co-managed.


“Your users need to have a license for EMS (Intune) assigned” – are you sure?
No.. Intune license is no longer required, but at the time the post was written it was a hard requirement. Azure AD Premium P1 is still required for Windows 10 automatic enrollment though.
Great guide, very helpful…
but i have one question if under “create cloud management gateway wizard” the region is empty and i cannot choose something and cannot proceed , what do i do?
thank you in advance
Verify you have a classic subscription with Classic.Compute resource enabled and that you have the correct permissions on the Azure Subscription your are using.
Great write up, helped me get started. One sticking point I’m hitting – I don’t have a wildcard cert so I need to get one. where do I generate the CSR from?
I always use the DigiCert Certificate Utility for Windows to generate CSRs
https://www.digicert.com/util/
Nice guide. For the pre-req is “co-owner” same as “owner” i did not see CO as a role.
https://docs.microsoft.com/en-us/azure/role-based-access-control/built-in-roles
I get the confusion, this is based on Azure Classic RBAC roles where you needed to have at least co-administrator. For ARM I believe Owner is the correct one.
This is the link for classic RBAC https://docs.microsoft.com/en-us/azure/role-based-access-control/rbac-and-directory-admin-roles
THANK YOU!
Great write-up! Thanks for sharing the information. The pre-requisite section for “enhanced HTTP” also mentions the following:
For Scenario 3 only: A client running Windows 10 version 1803 or later and joined to Azure AD.
Does this mean that Azure AD Hybrid Joined devices below W10 version 1803 can’t use “enhanced HTTP”?
Reference: https://docs.microsoft.com/en-us/sccm/core/plan-design/hierarchy/enhanced-http#prerequisites
What this means is that for computer scenarios (scenario 3), where the computer itself, by using its Azure AD Device token, can securely communicate with his site without a user signed in requires you to be at Win 10 1803.
Awesome write-up, thanks for this gem post! Finally some certs less in the deployment.