


In my busy and boring summer holidays I decided to do something more fun and learn how to create ConfigMgr custom Task Sequence action. I started by reading the MS documentation site https://docs.microsoft.com/en-us/sccm/develop/osd/about-configuration-manager-custom-actions, most of steps are same but not all.
So below I have outlined the steps which are needed:
Create the control
- Install Visual Studio. (I am using Visual Studio 2015)
- Install ConfigMgr SDK https://www.microsoft.com/en-us/download/details.aspx?id=29559
- Open Visual Studio, create new project, choose template Windows Forms Control Library, name it example: ConfigMgrTSAction
- In Solution Explorer, right-click UserControl1.cs, click Rename, and then change the name to RunPowerShellControl.cs
- In Solution Explorer, right-click References, and then click Add Reference
- In the Add Reference dialog box, click the Browse tab, navigate to %ProgramFiles%\Microsoft Configuration Manager\AdminUI\bin, and then select the following assemblies:
- AdminUI.Common.dll AdminUI.Controls.dll
- AdminUI.DialogFoundation.dll
- Adminui.Osdcommon.dll
- Adminui.TaskSequenceEditor.dll
- Adminui.WqlQueryEngine.dll
- Microsoft.ConfigurationManagement.exe
- Microsoft.ConfigurationManagement.DialogFramwork.dll
- Microsoft.ConfigurationManagement.ManagementProvider.dll
- In Solution Explorer, right-click RunPowerShellControl.cs, and then click View Code.
- Add the following code to include the required namespaces:
using Microsoft.ConfigurationManagement.AdminConsole;
using Microsoft.ConfigurationManagement.ManagementProvider;
using Microsoft.ConfigurationManagement.AdminConsole.TaskSequenceEditor;
- Change the class RunPowerShellControl : UserControl to RunPowerShellControl : SmsOsdEditorPageControl
namespace ConfigMgrTSAction { public partial class RunPowerShellControl: SmsOsdEditorPageControl { public RunPowerShellControl() { InitializeComponent(); } } } - In Solution Explorer, right-click RunPowerShellControl.cs, and then click View Designer.
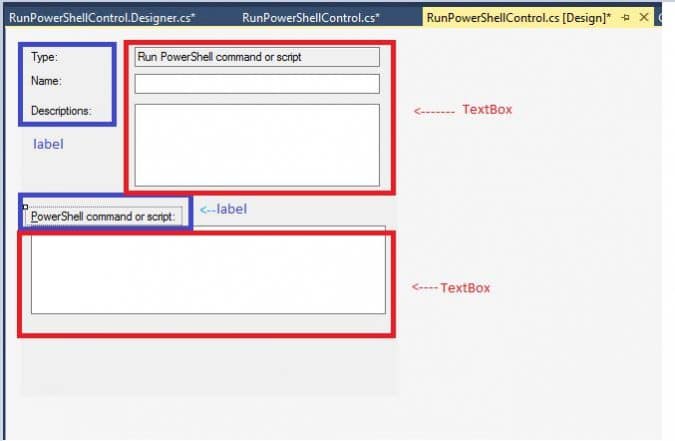
- Use ToolBox add label and TextBox, make it looks like this.
- In RunPowerShellControl.cs, add the following new constructor to the RunPowerShellControl class:
public RunPowerShellControl (SmsPageData pageData) : base(pageData) { this.Initialized = false; InitializeComponent(); if (this.PropertyManager["RunPowerShell"].ObjectValue == null) { this.PropertyManager["RunPowerShell"].StringValue = string.Empty; } this.textBoxPowerShell.Text = this.PropertyManager["RunPowerShell"].StringValue; this.Initialized = true; } - Add the following method to initialize the control:
public override void InitializePageControl() { base.InitializePageControl(); } - In the class RunPowerShellControl.cs, add the following method to write the text box value to the Name, Description and RunPowerShell property. This is called when the OK or Apply button is clicked.
protected override bool ApplyChanges(out Control errorControl, out bool showError) { // You can check the error here and return false. if (this.HasError(out errorControl) == true) { this.ShowMessageBox(this.GetErrorString(),"Error",MessageBoxButtons.OK,MessageBoxIcon.Warning); errorControl = null; showError = true; return false; } this.PropertyManager["Name"].StringValue = textBoxName.Text; this.PropertyManager["Description"].StringValue = textBoxDescription.Text; this.PropertyManager["RunPowerShell"].StringValue = textBoxPowerShell.Text; return base.ApplyChanges(out errorControl, out showError); } - In the design view for the control, double-click the control to create the method ConfigMgrTSActionControl_Load
- Add the following code to the method. This code loads the text box with an existing custom properties values, and it set button Apply active when there changes in TS step, or set button Apply deactivate after changes is applied.
private void ConfigMgrTSActionControl_Load(object sender, EventArgs e) { textBoxName.Text = this.PropertyManager["Name"].StringValue; textBoxDescription.Text = this.PropertyManager["Description"].StringValue; textBoxPowerShell.Text = this.PropertyManager["RunPowerShell"].StringValue; if (this.Initialized == false) { return; } if (string.Equals(this.PropertyManager["Name"].StringValue, this.textBoxName.Text, StringComparison.OrdinalIgnoreCase) == false || string.Equals(this.PropertyManager["Description"].StringValue, this.textBoxDescription.Text, StringComparison.OrdinalIgnoreCase) == false || string.Equals(this.PropertyManager["RunPowerShell"].StringValue, this.textBoxPowerShell.Text, StringComparison.OrdinalIgnoreCase) == false) { base.SetDirty(true); } base.SetDirty(false); } - In the design view for the control, double-click the “Name”, “Description” and “PowerShell command” TextBox control to create the method textBoxName_TextChanged, textBoxDescription_TextChanged, textBoxPowerShell_TextChanged
- Add the following code to the method, it set button Apply active when there changes in those custom properties.
private void textBoxName_TextChanged(object sender, EventArgs e)
{
    this.SetDirty(true);
}

private void textBoxDescription_TextChanged(object sender, EventArgs e)
{
    this.SetDirty(true);
}

private void textBoxPowerShell_TextChanged(object sender, EventArgs e)
{
    this.SetDirty(true);
}
Create the Option control
- In the Solution Explorer, right-click your project ConfigMgrTSAction, click Add, click User Control, create a User Control named ActionOption.cs
- Right-click on ActionOption.cs, and then click View Code
- Add the below code, it will create Option page for you, don’t need to worry about warring of ActionOptionPageTitle doesn’t exit, read below Resource Strings step 11 and 12.
using System;

using Microsoft.ConfigurationManagement.AdminConsole;
using Microsoft.ConfigurationManagement.AdminConsole.TaskSequenceEditor;


namespace ConfigMgrTSAction
{
    public partial class ActionOption : TaskSequenceOptionControl
    {
        public ActionOption() : base()
        {
            InitializeComponent();
        }
        public ActionOption(SmsPageData pageData) : base(pageData)
        {
            this.Title = Properties.Resources.ActionOptionPageTitle;
        }
    }
}
Resource Strings
- In Solution Explorer, right-click your project ConfigMgrTSAction, click Properties.
- Click the Resources tab. If the resources file does not exist, create it by selecting the message that is displayed on the Resources tab.
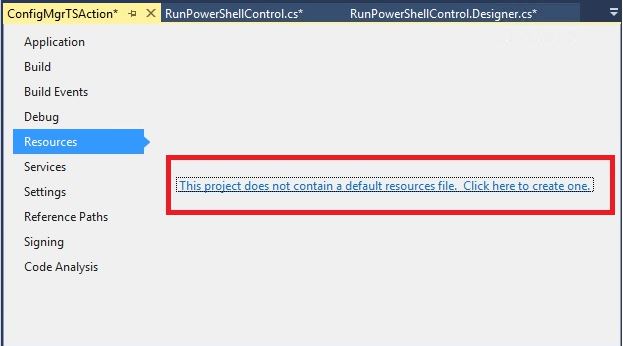
- On the Resource Designer toolbar, point to the resource view drop-down, click the arrow, and make sure it is set to Strings (which is the default). A settings grid appears, displaying the strings that are maintained by that instance of the Resource Designer.
- Click the Name column of the last row in the grid, which is marked with an asterisk (*).
- In the Name column, enter DefaultDisplay_RunPowerShellControl as the string name
- In the Value column, enter the string Run PowerShell command or script. This is the string displayed when you click add action in Task sequence.

- Click the Name column of the last row in the grid, which is marked with an asterisk (*).
- In the Name column, enter RunPowerShellControl as the string name.
- In the Value column, enter the string “Run PowerShell command or script”. This is the string that is displayed in TS steps after you added the step.
- Click the Name column of the last row in the grid, which is marked with an asterisk (*).
- In the Name column, enter “ActionOptionPageTitle” as the string name.
- In the Value column, enter the string Option. This is the string that is displayed in TS steps after you added the step.

Deploy the Assembly
- Close the AdminUI
- In Solution Explorer, right-click your project ConfigMgrTSAction, click Build.
- Open ..\ConfigMgrTSAction\bin\Debug folder, copy ConfigMgrTSAction.dll to %ProgramFiles%\Microsoft Configuration Manager\AdminUI\bin
To create a MOF file for a custom action
Microsoft Documentation:
https://docs.microsoft.com/en-us/sccm/develop/osd/how-to-create-a-mof-file-for-a-configuration-manager-custom-action
- In Notepad, create a new file.
- Add the following MOF code to the file, change XXX to your own site code in line 22 and 29.
//****************************************************************************** //----------------------------------------------------------------------- // // Sample Task Sequence Action MOF // // Where XXX is your three letter site code // This mof requires the site namespace when compiled, ie: // Mofcomp CustomAction.mof // Where XXX is your three letter site code // //****************************************************************************** #pragma autorecover #pragma namespace("\\\\.\\root") // SMS Root Storage instance of __Namespace { Name = "SMS"; }; #pragma namespace("\\\\.\\root\\SMS") // Configuration Manager database name for this computer. instance of __Namespace { Name = "site_XXX"; }; #pragma namespace("\\\\.\\root\\SMS\\site_XXX") #pragma classflags("forceupdate") [ CommandLine("smsswd.exe /run: powershell.exe -executionpolicy bypass -Command \"& {%1}\""), ActionCategory("My Custom Action Category,1,7"), ActionName{"ConfigMgrTSAction.dll", "ConfigMgrTSAction.Properties.Resources", "RunPowerShellControl"}, ActionUI{"ConfigMgrTSAction.dll", "ConfigMgrTSAction","RunPowerShellControl","ActionOption"} ] class CustomTSAction_RunPowerShellControl : SMS_TaskSequence_Action { [Not_Null, CommandLineArg(1)] string RunPowerShell; [SuccessCodes, Not_Null] string SuccessCodes = "0 3010"; }; - Choose a folder, and save the file as type All Files with the name CustomAction.mof.
- Close AdminUI
- Open a Command Prompt window, navigate to the folder that you saved CustomAction.mof in, and enter the following:
Mofcomp CustomAction.mof
Finished!
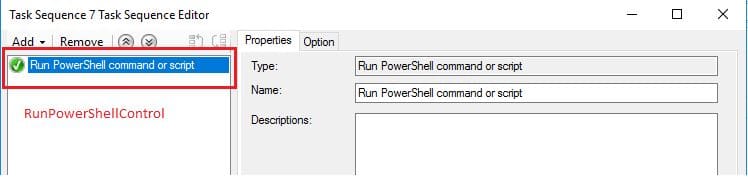
Open AdminUI again, create a new Task Sequence, you should see a new Action Category My Custom Action Category is listed, and there is an action Run PowerShell command or script.
Here is the source code in GitHub.
If you need to remove your custom task sequence action, follow these steps:
- Remove your custom action steps from your task sequence.
- Close AdminUI
- delete your DLL file
- Remove old WMI class what was in your old MOF file.
$SiteCode = Read-Host "Type your SCCM Site Code"
$class = Get-WmiObject -Namespace root\sms\site_$SiteCode -List -Class "Your Custom TS Action Class"
$class.Delete()


I like the article, but I must be doing something wrong as I have copied all the steps that you have set out (Really easy to follow), I have copied my compiled DLL into the bin folder, but nothing shows up in the task sequence editor, Is there any other step that I need to do? I have read through the Microsoft article as well but still nothing.
Did you do the “To create a MOF file for a custom action” steps? The MOF file is use for calling the dll file that you created, and you need to compile the MOF file. Close Admin Console before run Mofcomp command.