


I guess most of you that are reading this post have been in a situation where you were dealing with some sort of ConfigMgr migration project. After objects have been migrated, you’re often faced with the dilemma of manually updating the content source locations for e.g. Applications and Packages. Today I’m proud to announce the release of my next tool aimed to speeding up any migration process by being able to match and replace portions or a simple server name in the content source location of any object type.
Download the tool
I’ve made the tool available in our GitHub repository.
Documentation
This tool is written in PowerShell and the minimum required version is 3. For updating the content source location of any Deployment Types for Applications, access to certain DLL’s is required. These files are available when the ConfigMgr console is installed on the system the tool is being executed on. For all other object types like e.g. Packages or Boot Images, there’re no requirements. You’re able to resize this tool to get a better view of the data grid view, simply just drag in any of the corners as you’d normally do.
When you first launch the tool, you’ll see that there are two text boxes called Match and Replace. The idea is to enter a match pattern in the Match text box that will be used by the tool for matching against the existing content source location of the select object type. As for the Replace text box, enter here what you want the Match pattern to be replaced with. If the pattern entered in the Match text box does not yield any results, the data grid view will not contain any information, meaning you’re not able to update any content. The tool is also capable of checking if there’s any associated content with the objects of the select object type. When for instance a match is found for an object, and the object has content associated, it will be added to the data grid view called Content Source information. You’re also able to select to copy the content source files from the existing location to the updated location for each object that the tool is instructed to process. If there’s any matched object in the data grid view that you do not wish to update, simply just remove the check mark for that object.
When running this tool, execute it elevated (with Administrative rights) on the Primary Site server where you want the objects content source location to be updated. It’s not been tested to run this tool remotely, although it should most likely run without any errors given that your system for fills the requirements.
Example of usage
Let’s pretend that you’ve migrated a couple of Packages from either a ConfigMgr 2012 or ConfigMgr 2007 source hierarchy called CM01 and only want to update a single package, for testing purposes. Your new Primary Site server is called CM02. Your existing content library on CM01 has been shared as:
\\CM01\Source$
All of the content for your Packages are stored in:
\\CM01\Source$\Pkgs
In this scenario, the Packages have been migrated to CM02 and you’d like to update the content source location to reflect the new server name. We’re assuming that you’ve copied all of the content source files with the same structure over to the CM02 server, sharing it with the same name like Source$.
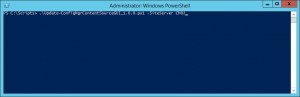
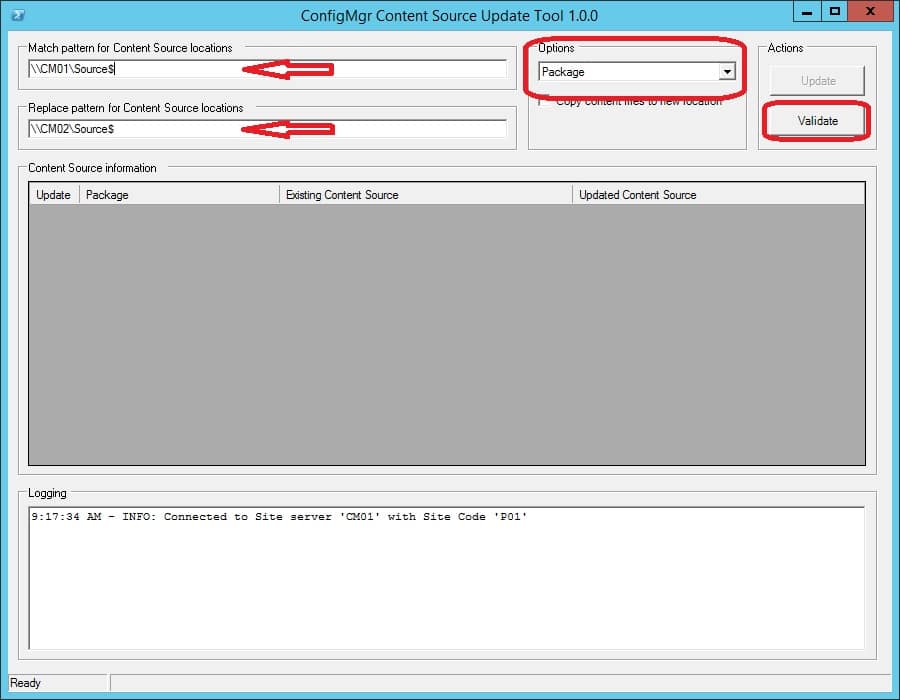
- Execute the tool on your new Primary Site server called CM02 with elevated rights and by specifying the Primary Site server name for the SiteServer parameter.
- In the Match text box, enter \\CM01\Source$. For the Replace text box, enter \\CM02\Source$.
- In the Options section, select Package as the desired object type.
- Click on Validate to start the validation process where the tool check if there’s any objects matching the pattern and that are eligible for a content source location update.
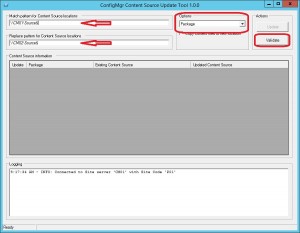
- Once you’ve clicked on the Validate button, the tool connects to the SMS Provider and yields the eligible objects in the Content Source Information data grid view.
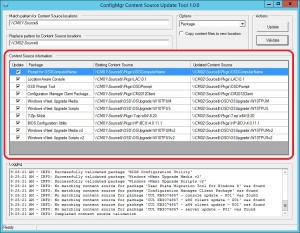
- Deselect the objects that you don’t want to update and click on the Update button.
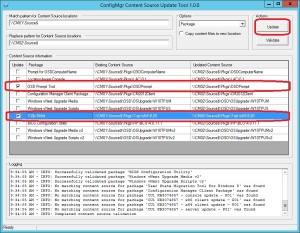
- The tool will not start updating the two objects that have been selected. It will output in the Log Information text field if it was either successful or an error occurred.
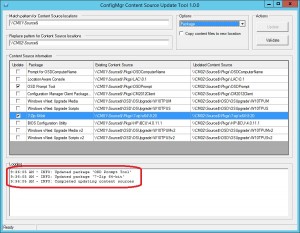


Now the two selected objects are updating and can be verified in the ConfigMgr console. I showed you this example as a way of verifying that it works in your environment. Once you’ve tested it, you should be good to go for running it on a broader scale.


Since Microsoft removed the TechNet site in December 2020, would it be possible to upload this tool on the MSEndpointMgr GitHub page?
Hi Johnny, the link has now been updated. Sorry for this 🙂
Regards,
Nickolaj
Thank you Nickolaj, your tool worked perfectly!
A few details:
– Operating System Upgrade Package -> Validate does nothing.
– maybe you could add logging to file by default so I don’t have to think about copying text from ‘Logging’ window to have some changelog of moving data.
– column with ‘Last Date Modified’ in validation output would be helpful to identify old apps/packages/… at glance.
Thank you once again.
Very good tool. Works fine in SCCM 1806. Thank you!
Hi Nickolaj, everything seems to work fine except the Drivers. When I do a validation on source and destination with Drivers selected, nothing shows up. It’ll allow me to do the Driver Packages though. Any idea on it? Thanks, much appreciated, Stephen
Hi Stephen,
Does the matching values actually exist on any of the drivers? It’s been some time since I used this tool for drivers, I usually nowadays remove everything and start from scratch.
Regards,
Nickolaj
Hi Nickolaj,
thank you! Great script!
We’ve used it after the migration from SCCM 2007 to SCCM current branch. Works like a charm.
Regards,
Ali
Thanks, I’m glad you’ve found it useful!
Regards,
Nickolaj
Hello, I had high hopes for this as we built a new server and needed to relocate the package source files. When I run the script it tells me WARNING: Unable to determine Site Code. I cannot figure out a way around this. It is running on SCCM 1710 on a 2016 server. I would love for this to work as I don’t want to manually update every package/application.
Sorry, the issue was me, I was putting in the site code on the actual server name.
Hi Anthony,
You’re not the first 😉
Glad you figured it out.
Regards,
Nickolaj
Hi Nickolaj,
Great tool, thank you for this. After running this on a few test Applications on SCCM 2012, I am noticing that the preferences are reverting to defaults after updating the content location. This includes the “Deployment options:” being set back to “Do not download content”, and reenabling “Allow clients to share content with other clients on the same subnet” being rechecked. Any advice on resolving this?
Hi Karsten,
Yes, that’s in fact a foolish mistake on my end back in the day when I first wrote that code (which was reused for this tool). The reason for this is that the current settings are not read in before creating the new ‘ContentImporter’, shown from the code below:
$ContentImporter = [Microsoft.ConfigurationManagement.ApplicationManagement.ContentImporter]::CreateContentFromFolder($UpdatedContentLocation)
$DeploymentType.Installer.Contents[0].ID = $ContentImporter.ID
$DeploymentType.Installer.Contents[0] = $ContentImporter
Right now there’s nothing that I can do except for updating the script, which I’ll put on my todo list.
Regards,
Nickolaj
Good morning Nickolaj –
Thanks for a wonderful script. I am testing it in our lab currently and will then be moving to prod as part of replacing 2 of our DPs which also, currently, house a great deal of our source content.
Could you tell me, have you by chance, updated the script to maintain the settings/preferences for the packages as indicated in your response above to Karsten?
Thank you kindly,
Steve
It looks like the destination path may not be working as intended. What I am seeing, in the GUI, is that if my source path is “\\Server1\D$\Folder1” and I want my new path to be “\\Server2\E$\Folder1”, the tool is setting the destination path to “\\Server2\E$\Folder1\E$\Folder1” which is not desirable. It seems to just be appending the current path to whatever I put in the replace pattern and making that the new updated source content path.
Am I doing something wrong here with the paths?
Disregard my 2nd item please. Sorry, I was not specifying a complete source path. I was trying to use just “\\Server1”. As long as I specify a more complete path, it looks like the destination path created is fine.
Thank you!
Hi Steve,
Thank you! Not yet unfortunately. I’ll put it on my todo list 🙂
Regards,
Nickolaj
many thanks, just have changed ~500 packages with a single click 🙂
But the “/” at the end of each path causes a problem when the are spaces in destination so got rid of them all
Line 206
$ExistingContentLocation = $DeploymentType.Installer.Contents[0].Location.trimend(“\”)
Line 208
$UpdatedContentLocation = $DeploymentType.Installer.Contents[0].Location.trimend(“\”) -replace [regex]::Escape($TextBoxMatch.Text), $TextBoxReplace.Text
Perhaps just include my first comment 🙂 It is brilliant.
It’s brilliant. Thank you.
I had copied, half-copied and un-copied source files on new server. Robocopy seems a nicer option than Copy-Item and you can limit network usage if necessary.
Line 216 ..
if (Test-Path -Path $ExistingContentLocation) {
START-PROCESS ROBOCOPY -ArgumentList “$ExistingContentLocation $AmendUpdatedContentLocation /MIR” -wait
}
else {
Write-OutputBox -OutputBoxMessage “Unable to access $($ExistingContentLocation)” -Type WARNING
}
}
else {
if (-not(Test-Path -Path $UpdatedContentLocation)) {
New-Item -Path $UpdatedContentLocation -ItemType Directory | Out-Null
}
if (Test-Path -Path $ExistingContentLocation) {
START-PROCESS ROBOCOPY -ArgumentList “$ExistingContentLocation $UpdatedContentLocation /MIR” -wait
}
Can we use it for resolving issue related validation failed error while distributing to DP.
This is great! Is there a way do de-select the checkbox on each application? I have over 400 applications and would rather do a few at a time and unchecking all will take forever. If not where would i reverse the check mark in the script?
Thank you very much Nickolaj – you’ve literally saved us a days worth of work!
Very very useful tool, thank you kindly for contributing.
Nice work, so helpful…so much time saved.
[…] Nickolaj Andersen’s ConfigMgr Content Source Update Tool https://msendpointmgr.com/2015/08/26/configmgr-content-source-update-tool-1-0-0 […]
[…] Nickolaj Andersen’s ConfigMgr Content Source Update Tool https://msendpointmgr.com/2015/08/26/configmgr-content-source-update-tool-1-0-0 […]
This is awesome. Thank you.
If I am allowed to comment, a “Delete original source after copy” would be sweet.
[…] Content Source Update Tool […]
Hi
yes, Thx.. think I was just in caffeine-withdrawal.. as I wrote it wasn’t like it was the first time I tried using the tool 😐
Hi
I’ve used this tool to update almost everything.. but it crashed at some point.. when restarting the GUI/script I get:
“unable to determine sitecode”
When running ” Get-WmiObject -Namespace “root\SMS” -Class SMS_ProviderLocation -ComputerName “ps2″”
just to test connectivity I am seeing
“Get-WmiObject : The RPC server is unavailable. (Exception from HRESULT: 0x800706BA)”
even after reboot this happens..
I’ve done nothing on the server….
thoughts?
delete above comment.. I was an idiot! siteservername not bloody sitecode!
Hi Martin,
Hehe the parameter SiteServer should (hopefully) be clear enough not to specify the Site Code 😉
Regards,
Nickolaj
Hi Nickolaj,
Been trawling looking for something like this tool to assist with a migration. This looks exactly what I require but it only returns content if the DeploymentTypeName matches the title of the application. For some reason we decided that VBScript would be a suitable title for all but five of our DeploymentTypes.
Will see if I can work around this to return all Applications irrespective of DeploymentTypeName.
Thank you for your efforts with this tool.
Decided due to time constraints that we would just run without the GUI and use your original script.
Notes:
Our environment was strange and we had to convert the location to lower case prior to updating.
# Convert all to lower case
$CurrentContentPath = $CurrentContentPath.ToLower()
$UpdatedContentPath = $UpdatedContentPath.ToLower()
Also added the option to comment out returning only one application via WMI for those not brave enough to Update all together.
To be used when applying to only one application
$applicationName = “Enter Application Name Here”
# To be used when applying to only one application
$Applications = Get-WmiObject -ComputerName $SiteServer -Namespace root\SMS\site_$SiteCode -class SMS_Application | Where-Object { $_.LocalizedDisplayName -eq $applicationName -and $_.isLatest -eq $True }
# Selects all applications, ignores application name value
# $Applications = Get-WmiObject -ComputerName $SiteServer -Namespace root\SMS\site_$SiteCode -class SMS_Application | Where-Object { $_.isLatest -eq $True }
We also changed the hardcoding of the Fast/Slow PeerCache and PinOnClient to write back the same settings that were already there as we have applications over a certain size limited to download only on Fast networks.
if ($SetEnumAnswer -like “Update”) {
Write-Output “”
$Applications | ForEach-Object {
$Application = [wmi]$_.__PATH
$ApplicationXML = [Microsoft.ConfigurationManagement.ApplicationManagement.Serialization.SccmSerializer]::DeserializeFromString($Application.SDMPackageXML,$True)
foreach ($DeploymentType in $ApplicationXML.DeploymentTypes) {
$Installer = $DeploymentType.Installer
$Contents = $Installer.Contents[0]
#Convert to lowercase
$Contents.Location = ($Contents.Location).ToLower()
$UpdatePath = ($Contents.Location).Replace($CurrentContentPath,$UpdatedContentPath)
if ($UpdatePath -ne $Contents.Location) {
$UpdateContent = [Microsoft.ConfigurationManagement.ApplicationManagement.ContentImporter]::CreateContentFromFolder($UpdatePath)
$UpdateContent.FallbackToUnprotectedDP = $Contents.FallbackToUnprotectedDP
$UpdateContent.OnFastNetwork = [Microsoft.ConfigurationManagement.ApplicationManagement.ContentHandlingMode]::$($Contents.OnFastNetwork)
$UpdateContent.OnSlowNetwork = [Microsoft.ConfigurationManagement.ApplicationManagement.ContentHandlingMode]::$($Contents.OnSlowNetwork)
$UpdateContent.PeerCache = $Contents.PeerCache
$UpdateContent.PinOnClient = $Contents.PinOnClient
$Installer.Contents[0].ID = $UpdateContent.ID
$Installer.Contents[0] = $UpdateContent
}
}
$UpdatedXML = [Microsoft.ConfigurationManagement.ApplicationManagement.Serialization.SccmSerializer]::SerializeToString($ApplicationXML, $True)
$Application.SDMPackageXML = $UpdatedXML
$Application.Put() | Out-Null
Write-Output “INFO: Updated content path for $($_.LocalizedDisplayName)”
}
}
Hi Nickolaj,
i tried this tool connected to an SCCM 2012 R2 SP1 CU3 Site.
With Applications there are no Problems.
But at Packages, OS Images, Drivers and Driver packages i get this Errors even after sucessfull Validation:
Exception calling “Put” with “0” argument(s): “Generic failure ”
At S:\_TEMP\Update-ConfigMgrContentSourceGUI_1.0.0.ps1:350 char:37
+ $Package.Put() | Out-Null
+ ~~~~~~~~~~~~~~~~~~~~~~~~~
+ CategoryInfo : NotSpecified: (:) [], MethodInvocationException
+ FullyQualifiedErrorId : DotNetMethodException
Exception calling “Put” with “0” argument(s): “Generic failure ”
At S:\_TEMP\Update-ConfigMgrContentSourceGUI_1.0.0.ps1:796 char:41
+ $OperatingSystemImage.Put() | Out-Null
+ ~~~~~~~~~~~~~~~~~~~~~~~~~~~~~~~~~~~~~~
+ CategoryInfo : NotSpecified: (:) [], MethodInvocationException
+ FullyQualifiedErrorId : DotNetMethodException
Can you help me here?
Thanks
Michael
Hi Nickolaj,
Problem solved my myself.
I was connected to a child Primary site in a Hierarchy.
After i connected to the CAS Site and run the tool again it works as expected 😉
Michael
As always great job!
Thanks Rich! Much appreciated.
Regards,
Nickolaj