During TechEd Europe 2014 this week, a lot of new information regarding Windows 10 deployment and the supported ways of deploying it has been made available. Since I was not able to be on-site myself, I’ve followed the event as close as possible to try and get as much of information as possible. From what I’ve gathered, the most interesting key points is that enterprises now can upgrade directly from Windows 7 SP1 to Windows 10. Previously the upgrade scenario has only been available to consumers, and none of the enterprise products used to deploy Windows have supported that method. You could of course just deploy the setup.exe for Windows 8.1 to a Windows 8 machine, and simply just let it update. But this would more or less be a uncontrollable upgrade, with more or less no reporting on the progress. In addition the ConfigMgr client would have to be remediated to work on the new upgraded system. In a presentation tagged EM-B326, Microsoft representatives working with OS deployment, gave us a solution to the problem with upgrading Windows in the enterprise. A new blog post regarding the solution that they presented in the session can be found in the following link:
How to upgrade to Windows 10 using the task sequence in System Center 2012 R2 Configuration Manager
From the above link, Microsoft has published a task sequence that they’ve used internally to upgrade some of their existing Windows 7 SP1 devices to Windows 10 Technical Preview. This task sequence will natively be incorporated into the vNext version of ConfigMgr. But since Microsoft is aiming to provide support for deploying Windows 10 with ConfigMgr 2012 SP1 and ConfigMgr 2012 R2, they’ve released it for us to play around with.
In this post I’ll outline all of the steps necessary to successfully upgrade a Windows 7 SP1 device to Windows 10 Technical Preview.
Overview
- Prerequisites
- Importing the Task Sequence
- Prepare the Upgrade packages
- Deploy the Task Sequence
- Upgrade to Windows 10 Technical Preview
Prerequisites
Before we go ahead with upgrading, we need to make sure that we have the prerequisites taken care of:
- You’ll need a fully functional ConfigMgr 2012 R2 primary site server
- A Windows 7 SP1 device with a functioning ConfigMgr 2012 R2 client
- Download the Windows Technical Preview bits from either MSDN or the Insider program
- Get the Windows Upgrade task sequence (updated 2015-06-16)
It’s also important to know that you’re only able to perform an upgrade if these conditions apply:
- Operating System architecture needs to be the same, e.g. you can’t upgrade from a 32-bit to a 64-bit operating system
- The Operating System language also needs to identical
- Last but not least, you can only upgrade from an Windows 7 SP1 Enterprise version, to Windows 10 Technical Preview Enterprise SKU
Assuming you have all this in place you’re ready to go. Next we’ll import the task sequence that Microsoft has created for us into ConfigMgr.
Importing the Task Sequence
When you’ve downloaded the Windows10TPUpgradeExport.zip file that Microsoft has provided, go ahead and extract it to a folder of your choice. In my lab environment I’ve extracted it to C:\Temp\W10TPUpgrade on my CAS. I’m running a CAS with two Primary Sites in my lab environment, if you’re not just go ahead and extract to a place of your choice on your Primary Site server. Once you’ve extracted the contents, you should have a zip file and a folder like in the picture below:
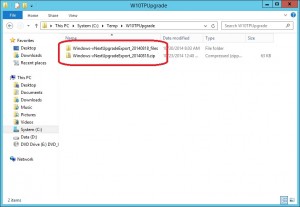
The file called Windows-vNextUpgradeExport_20140818.zip is the one that we want to use to import the task sequence.
1. Launch the ConfigMgr console and go to the Software Library node.
2. Expand Operating Systems and then expand Task Sequences.
3. Right-click on Task Sequences and select Import Task Sequence.
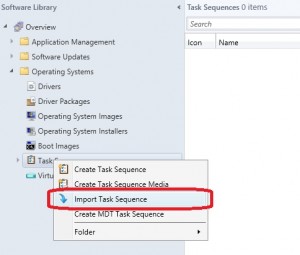
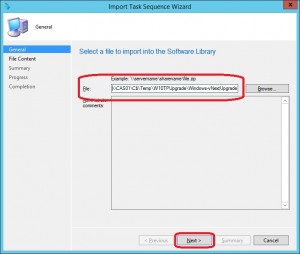
4. In the Import Task Sequence wizard that appears, enter the UNC path to location of zip file containing the task sequence data. In my case that would be:
\\CAS01\C$\Temp\W10TPUpgrade\Windows-vNextUpgradeExport_20140818.zip
Click Next when ready.
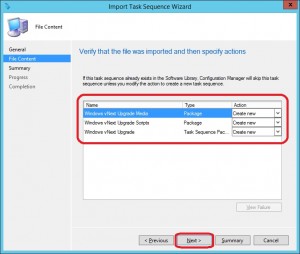
5. On the File Content page, make sure that the wizard will take the action Create new for all three instances. Click Next.
6. On the Summary page, click Next.
7. On the Completion page, click Close.
You should now have a new task sequence called Windows vNext Upgrade in the Task Sequence node:
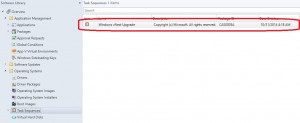
Prepare the Upgrade packages
Since we allowed the task sequence import wizard earlier to create two new Packages for us, we can be quite sure that we’d want to amend them slightly so that the content source location is pointing to our Content Library (where we already store all the content for Packages, Applications etc). But before we do that, let’s take a look in the Packages node under Application Management. If everything went well with the import, we should have two new packages called:
- Windows vNext Upgrade Media
- Windows vNext Upgrade Scripts
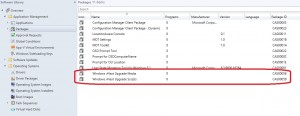
Content source
We now need to take care of the content source location for both of these packages. Before we make any changes to the packages themselves, we need to create some folders and copy some content into our Content Library.
1. Create two folders called:
- W10TPUM
- W10TPUS
in the following location:
\\CAS01\Source$\OSD\OSUpgrade
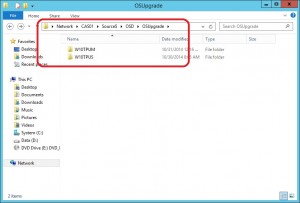
2. Copy the entire content from the Windows 10 Technical Preview ISO that you’ve downloaded earlier, to the W10TPUM folder.
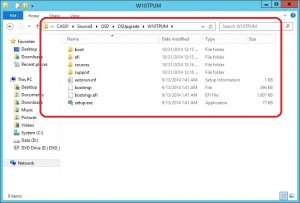
3. Browse to the C:\Temp\W10TPUpgrade folder where we extracted the task sequence files earlier. In the Windows-vNextUpgradeExport-20140818_files folder, open the Windows vNext Upgrade Scripts folder. Copy the contents of this folder to W10TPUS folder created in the Content Library.
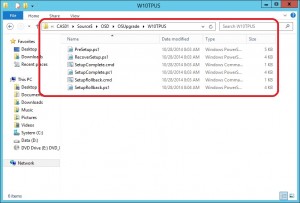
We now have the content necessary for the two packages in place, lets continue to amend the packages to reflect the changes we’ve made.
Amend Packages
1. Right-click on the Windows vNext Upgrade Media package and select Properties.
2. Go to the Data Source tab and click on Set.
3. Specify an UNC path to where the W10TPUM folder is located:
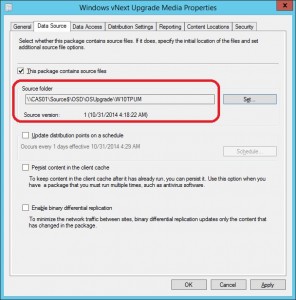
4. Click OK.
Perform the same steps for the Windows vNext Upgrade Scripts package, but point it to the W10TPUS folder instead. When you’ve successfully amended the two packages, remember to distribute them to your Distribution Points.
Deploy the Task Sequence
We’re almost ready to make the task sequence available to the Windows 7 SP1 devices. But we need to validate that everything we’ve done so far regarding importing and amending of the packages where successful.
Validate the task sequence
1. Go to the Software Library node
2. In the Task Sequences node, right-click on the Windows vNext Upgrade task sequence and select Edit.
3. If there’s no steps marked with a red icon, everything is working as expected and we can continue.

Deploy the task sequence to a collection
In order to deploy this to a collection targeting devices eligible for upgrade to Windows 10 Technical Preview, we first need to create a collection. In my lab environment I’ve created a collection called:
OSD – Windows 10 Technical Preview – Upgrade
In addition I’ve added a direct membership of my single Windows 7 SP1 device called CL05 that I want to upgrade to Windows 10 Technical Preview.
1. Right-click on the Windows vNext Upgrade task sequence and select Deploy.
2. On the General page, select the OSD – Windows 10 Technical Preview – Upgrade collection where you want to deploy this task sequence to. Click Next.
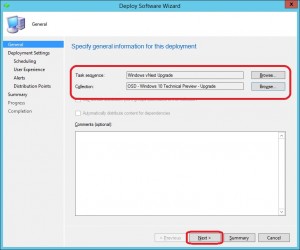
3. For this testing purpose, I’m gonna make this task sequence available to my device. Click Next.
4. On the Scheduling page, Click Next.
5. On the User Experience page, click Next.
6. On the Alerts page, click Next.
7. On the Distribution Points page, click Next.
8. On the Summary page, click Next.
9. On the Completion page, click Close.
Now that we’ve deployed our task sequence, we should be able to see it in Software Center on our CL05 device, once it has refreshed its machine policy.
Upgrade to Windows 10 Technical Preview
From this point on, all we have to do is to initiate the Windows vNext Upgrade task sequence from Software Center on our device. To illustrate the whole process of how it looks like when we in-place upgrade Windows 7 SP1 to Windows 10 Technical Preview, I’ve recorded it for your convenience:
Results
We’ve now successfully upgraded our device from Windows 7 SP1 to Windows 10 Technical Preview. As we get closer to the release of a final product of Windows 10, we’ll see how this process evolves or if it stays the same. What’s interesting also is to see how well they’ll embed the Upgrade scenario into ConfigMgr vNext.



Hi, I get the same error, please assist or advise?
i got the following error when i tried to add the path in the configuration manager
System.Runtime.InteropServices.COMException
The XML content is invalid; check that the XML matches the schema for the SMS task sequence.
Stack Trace:
at System.Runtime.InteropServices.Marshal.ThrowExceptionForHRInternal(Int32 errorCode, IntPtr errorInfo)
at System.Runtime.InteropServices.Marshal.ThrowExceptionForHR(Int32 errorCode)
at System.Management.ManagementObject.InvokeMethod(String methodName, ManagementBaseObject inParameters, InvokeMethodOptions options)
at Microsoft.ConfigurationManagement.Migration.ObjectSerialization.WmiConnection.TryExecuteMethod(IObjectContext context, Object method, Object target, IObjectSession cache)
at Microsoft.ConfigurationManagement.Migration.ObjectSerialization.ObjectLibraryImpl.ExecuteMethod(IObjectContext context, IObjectSession cache, Object method, Object target)
at Microsoft.ConfigurationManagement.Migration.ObjectSerialization.ObjectMethod`1.Execute(IObjectContext context, IObjectSession cache)
at Microsoft.ConfigurationManagement.Migration.ConfigMgr2012.SMS_TaskSequence.LoadFromXml(IObjectContext context, String Xml)
at Microsoft.ConfigurationManagement.Migration.ConfigMgr2012.SoftwareDistribution.TaskSequenceLibrary.ResolveDependency(ObjectHandle source, ObjectHandle target, ObjectContext targetContext, ImportSetting setting)
at Microsoft.ConfigurationManagement.Migration.ObjectSerialization.ObjectLibrary`1.d__6.MoveNext()
at Microsoft.ConfigurationManagement.Migration.ObjectSerialization.ObjectContext.SaveChanges(IEnumerable`1 values)
at Microsoft.ConfigurationManagement.Migration.ObjectSerialization.ImportRequest.Submit()
at Microsoft.ConfigurationManagement.AdminConsole.MigrationAssistant.FileContentPageControl.PostApply(BackgroundWorker worker, DoWorkEventArgs e)
at Microsoft.ConfigurationManagement.AdminConsole.SmsWizardPage.PostApply(BackgroundWorker worker, DoWorkEventArgs e)
at Microsoft.ConfigurationManagement.AdminConsole.SmsWizardForm.PostApply(SmsWizardPage page, BackgroundWorker worker, DoWorkEventArgs e)
at Microsoft.ConfigurationManagement.AdminConsole.SmsWizardForm.PostApply(BackgroundWorker worker, DoWorkEventArgs e)
at Microsoft.ConfigurationManagement.AdminConsole.ProgressPage.backgroundWorkerPostApply_DoWork(Object sender, DoWorkEventArgs e)
at System.ComponentModel.BackgroundWorker.OnDoWork(DoWorkEventArgs e)
at System.ComponentModel.BackgroundWorker.WorkerThreadStart(Object argument)
——————————-